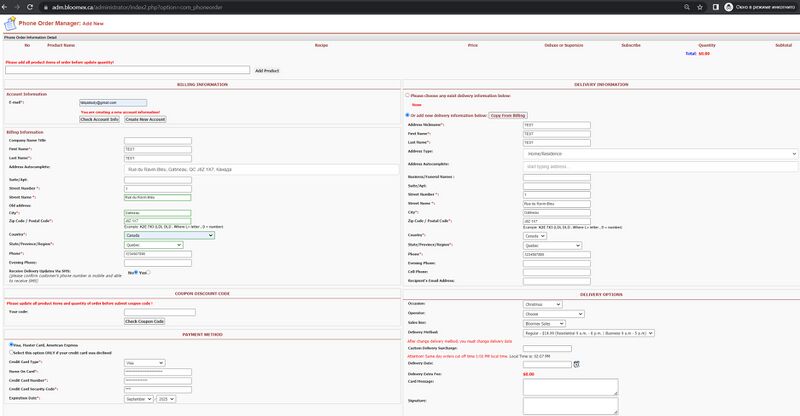
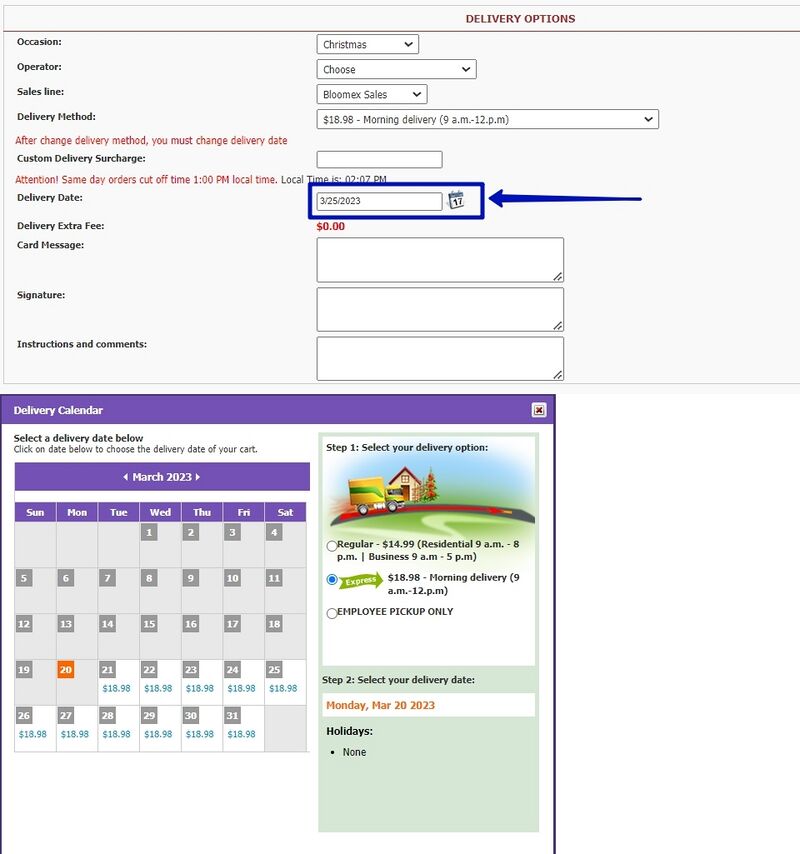
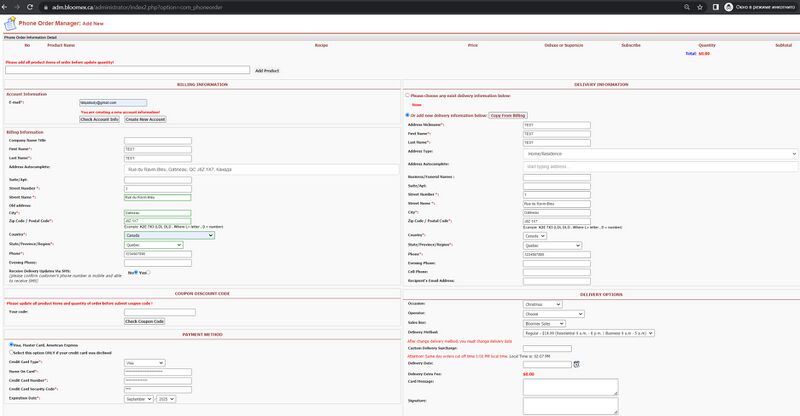
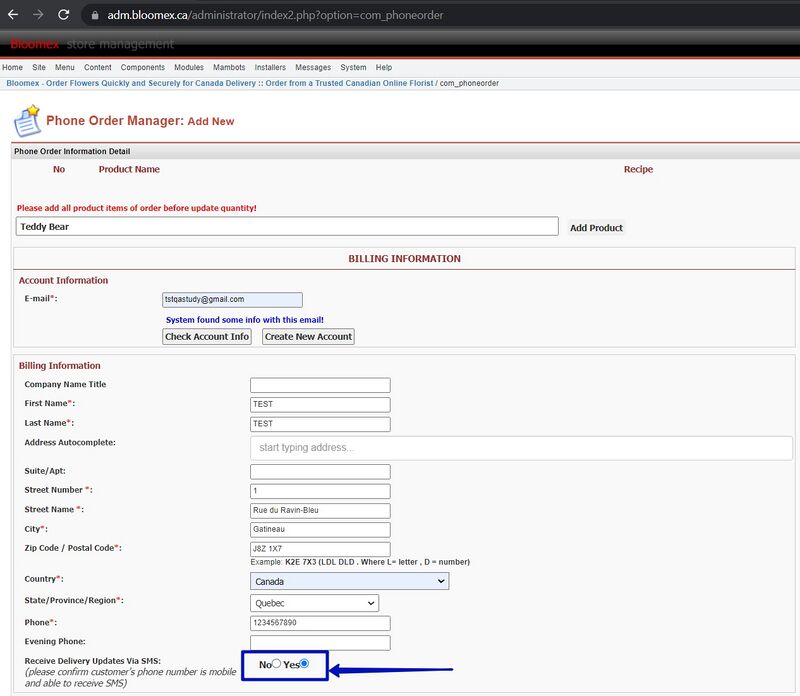
Test-case (Admin): Difference between revisions
No edit summary |
No edit summary |
||
| (198 intermediate revisions by 4 users not shown) | |||
| Line 1: | Line 1: | ||
< Back to | |||
[[QA and Testing]] | |||
__TOC__ | |||
<div class="center" style="width: auto; margin-left: auto; margin-right: auto;"> | |||
'''Release notes of the Admin and Web system for bloomex.ca''' | |||
</div> | |||
<div id="BackToTop" class="noprint" style="background-color:#DDEFDD; position:fixed; | |||
bottom:32px; left:2%; z-index:9999; padding:0; margin:0;"><span style="color:blue; | |||
font-size:8pt; font-face:verdana,sans-serif; border:0.2em outset #ceebf7; | |||
padding:0.1em; font-weight:bolder; -moz-border-radius:8px; "> | |||
[[#top| Back to the Top ]]</span></div> | |||
{| class="wikitable" style="text-align:center;" | {| class="wikitable" style="text-align:center;" | ||
|- | |- | ||
| Line 5: | Line 18: | ||
! Steps | ! Steps | ||
! Expected result | ! Expected result | ||
|- | |- | ||
| style="background-color:#ffffed;" |Homepage | | colspan="4" style="background-color:#ffffed;" | | ||
== Homepage == | |||
|- | |- | ||
| 1 | | 1 | ||
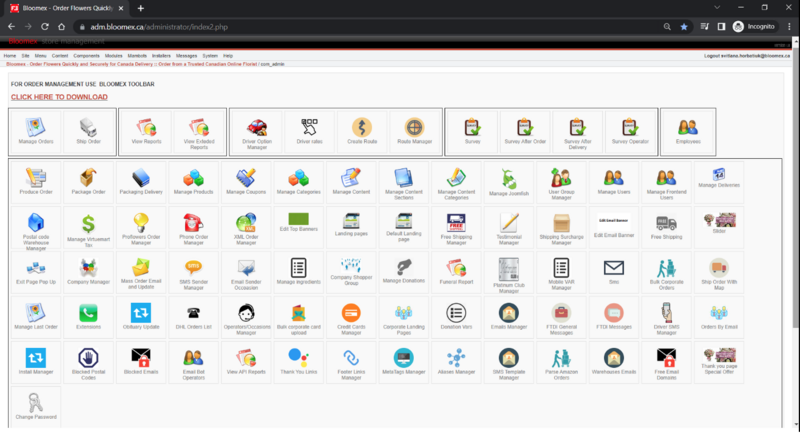
| Line 12: | Line 28: | ||
| Go to the Homepage | | Go to the Homepage | ||
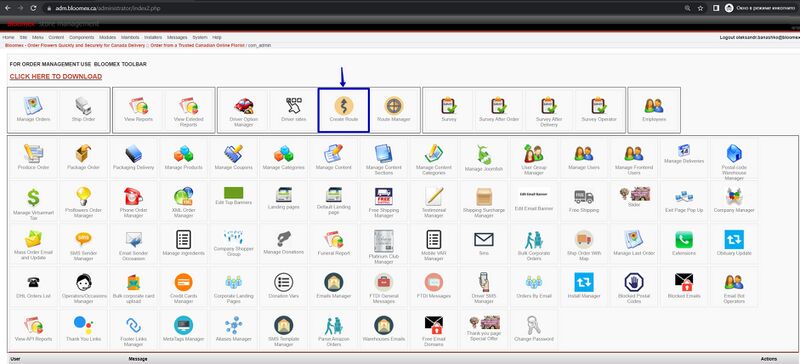
| All sections of the Control Panel are displayed correctly. | | All sections of the Control Panel are displayed correctly. | ||
[[Image:All sections of the Control Panel are displayed correctly..png|800px]] | [[Image:All sections of the Control Panel are displayed correctly..png|800px]] | ||
|- | |- | ||
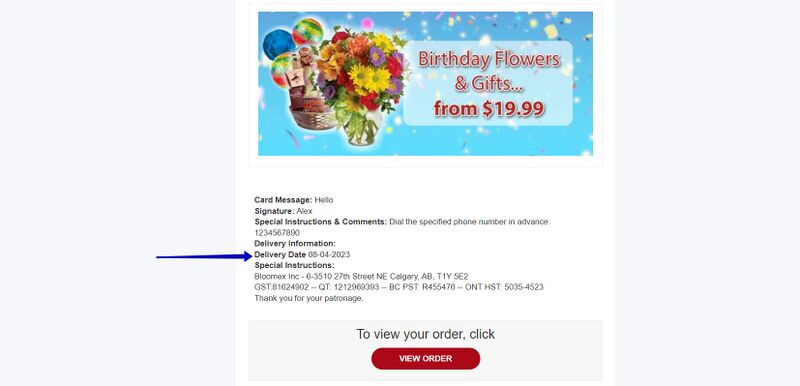
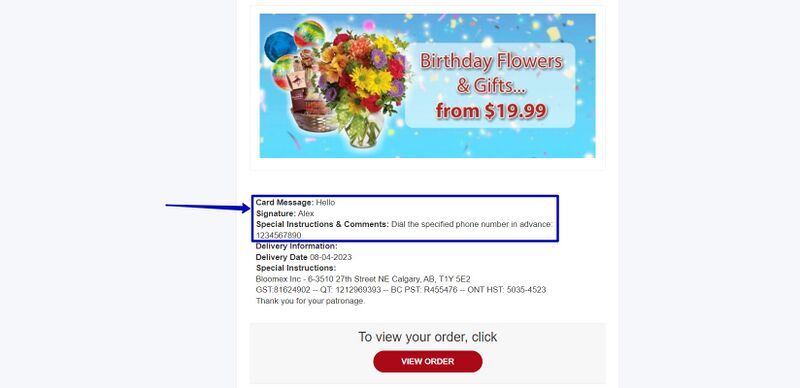
| style="background-color:#ffffed;" |Manage orders | | colspan="4" style="background-color:#ffffed;" | | ||
==Manage orders== | |||
|- | |- | ||
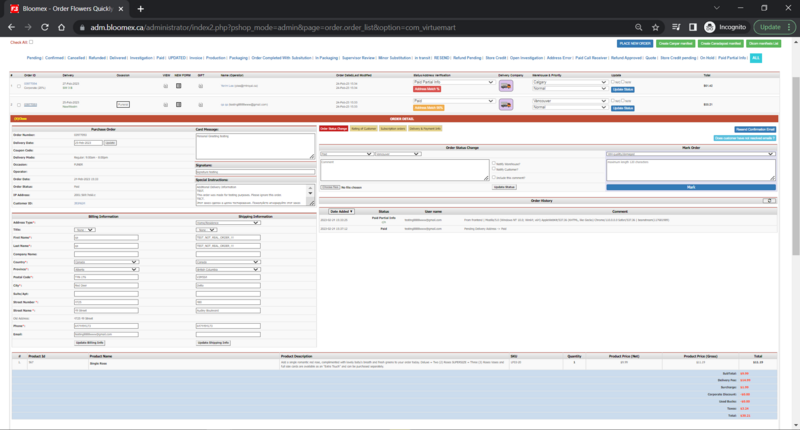
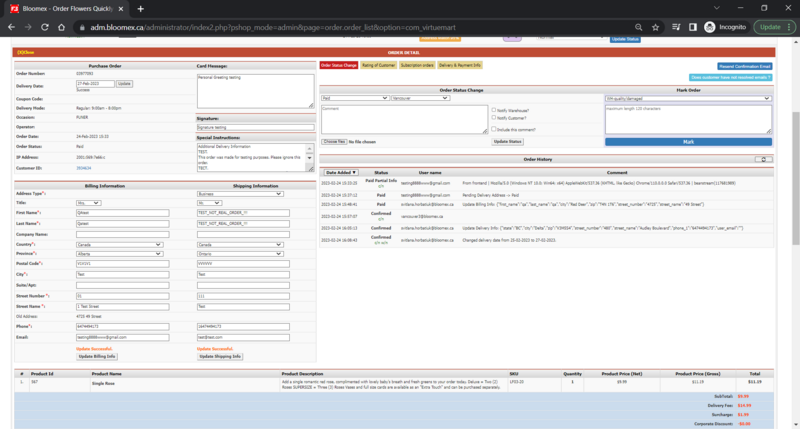
| 2 | | 2 | ||
| Check your placed orders for missing data or incorrect in addresses, delivery date, instructions, signature, card message, occasion (funeral), order calculation is correct | | Check your placed orders for missing data or incorrect in addresses, delivery date, instructions, signature, card message, occasion (funeral), order calculation is correct | ||
| Precondition: | | Precondition: | ||
order was placed | order was placed | ||
| Line 28: | Line 49: | ||
[[Image:All necessary information is filled (addresses, delivery date, instruction.png|800px]] | [[Image:All necessary information is filled (addresses, delivery date, instruction.png|800px]] | ||
|- | |- | ||
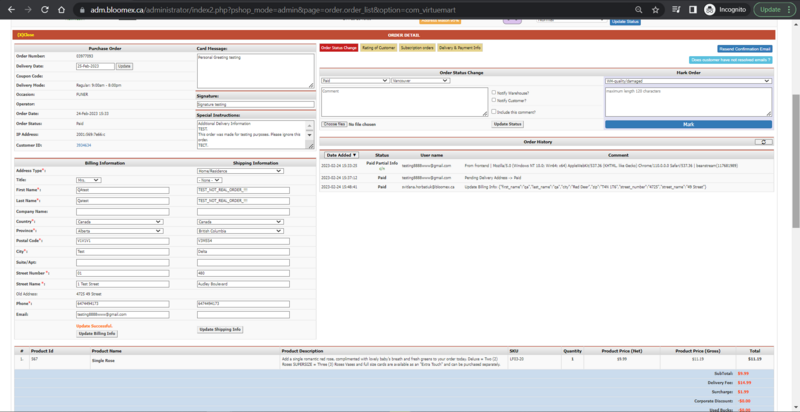
| 3 | | 3 | ||
| Line 38: | Line 60: | ||
2. Update shipping information | 2. Update shipping information | ||
| 1. Billing information was updated and a record about updating is shown in history of order (shown after refreshing) | | 1. Billing information was updated and a record about updating is shown in history of order (shown after refreshing) | ||
| Line 45: | Line 68: | ||
[[Image:Shipping information was updated and a record about updating is shown in history of order.png|800px]] | [[Image:Shipping information was updated and a record about updating is shown in history of order.png|800px]] | ||
|- | |- | ||
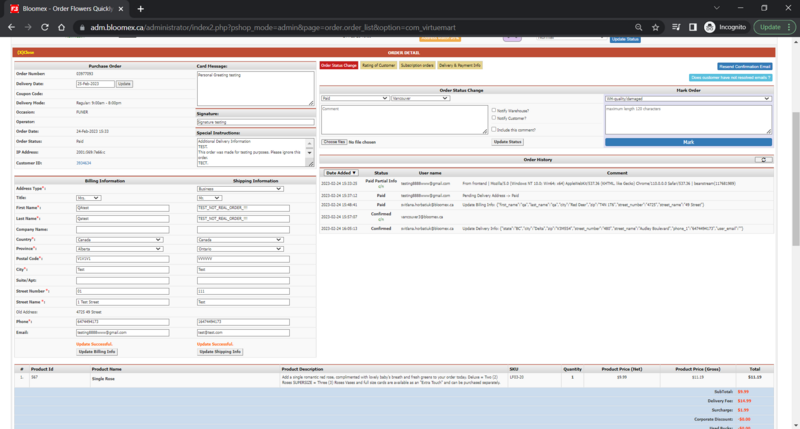
| 4 | | 4 | ||
| Line 56: | Line 80: | ||
[[Image:Delivery date was updated and a record about updating is shown in history of order.png|800px]] | [[Image:Delivery date was updated and a record about updating is shown in history of order.png|800px]] | ||
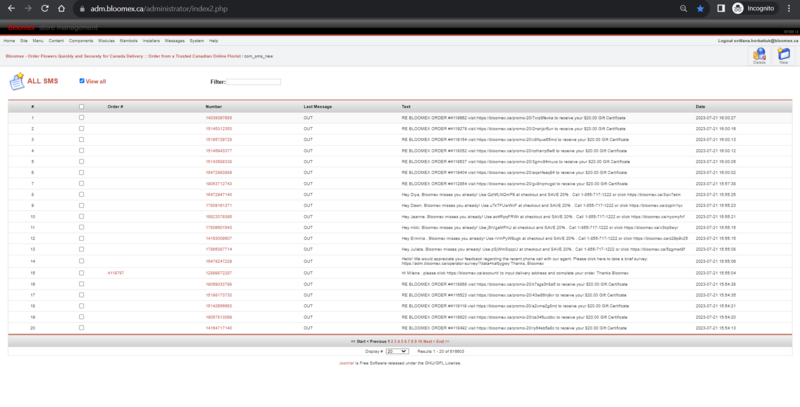
|- | |- | ||
| 5 | | 5 | ||
| Line 68: | Line 93: | ||
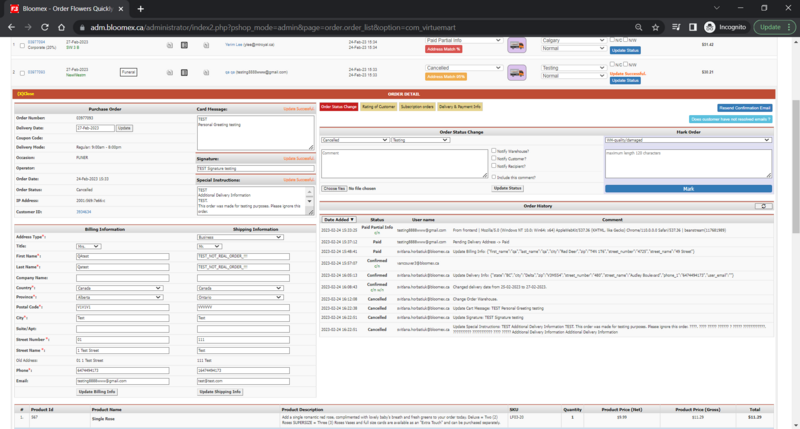
3. Update special instructions | 3. Update special instructions | ||
| Card message, signature, special instructions were updated and a record about updating is shown in the history of order (shown after refreshing) | | Card message, signature, special instructions were updated and a record about updating is shown in the history of order (shown after refreshing) | ||
[[Image:Card message, signature, special instructions were updated and a record about updating is shown in the history of order .png|800px]] | [[Image:Card message, signature, special instructions were updated and a record about updating is shown in the history of order .png|800px]] | ||
|- | |- | ||
| 6 | | 6 | ||
| Line 89: | Line 116: | ||
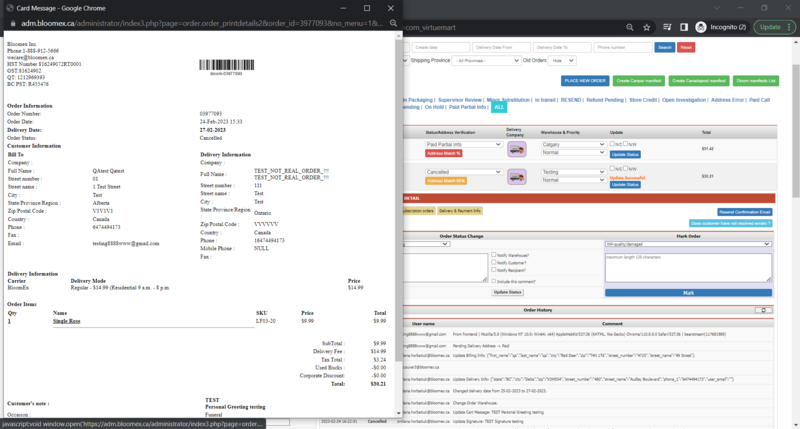
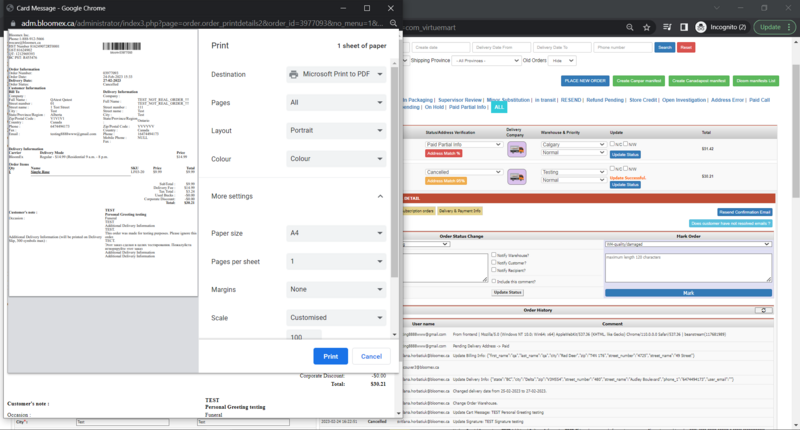
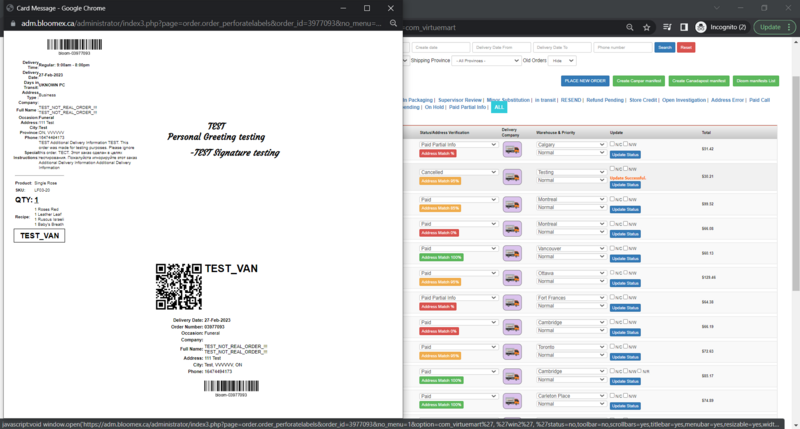
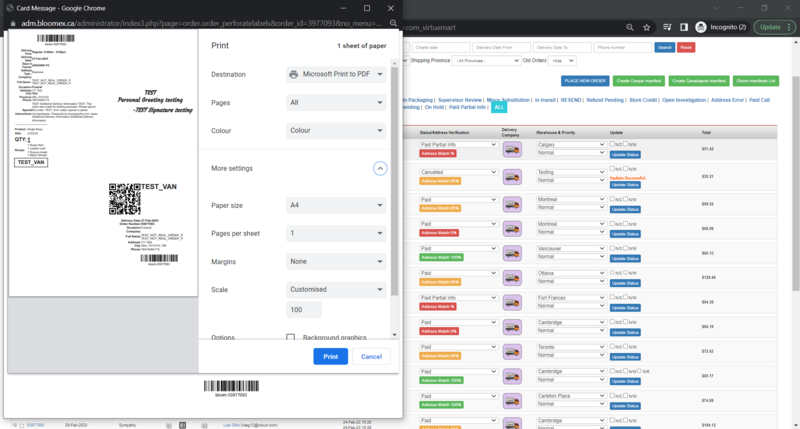
6. View in print preview (Ctrl+P) | 6. View in print preview (Ctrl+P) | ||
| 1. "View" window with information about the order is opened | | 1. "View" window with information about the order is opened | ||
| Line 112: | Line 140: | ||
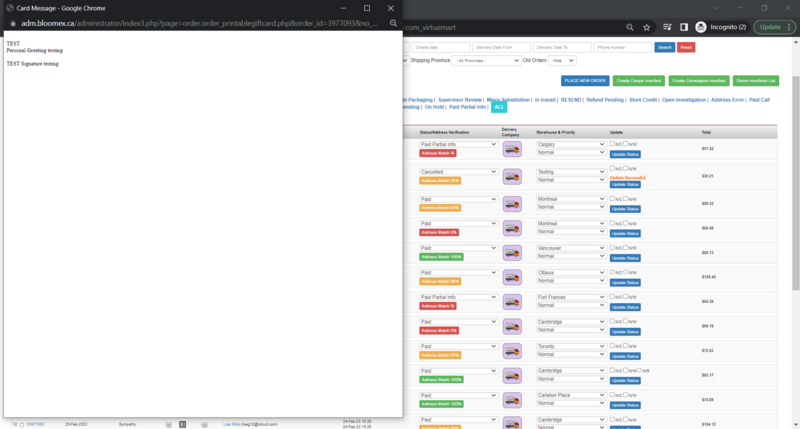
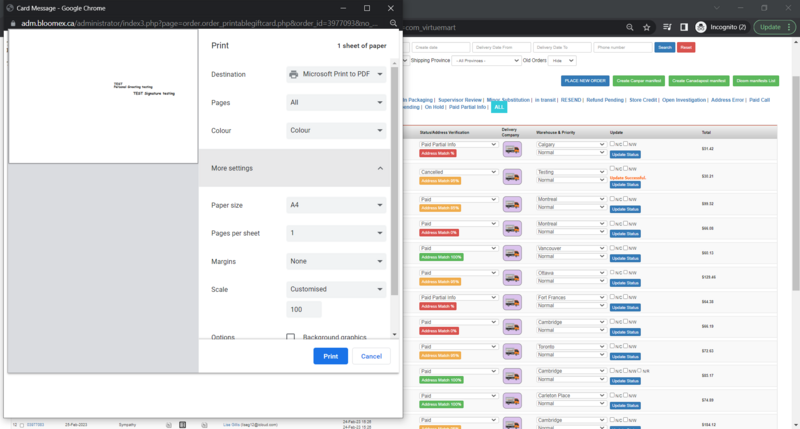
[[Image:6. "Gift" in print preview displayed correctly.png|800px]] | [[Image:6. "Gift" in print preview displayed correctly.png|800px]] | ||
|- | |- | ||
| 7 | | 7 | ||
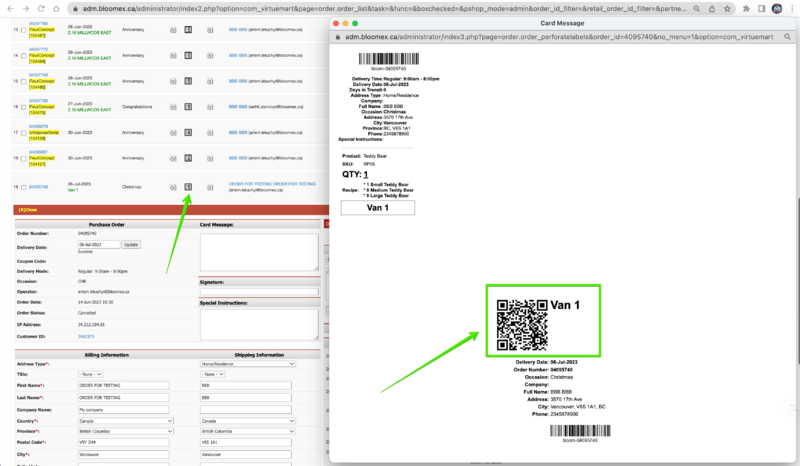
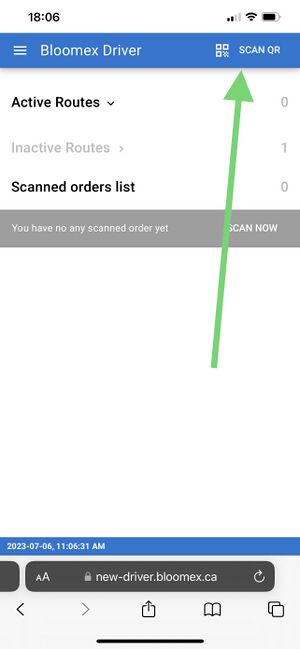
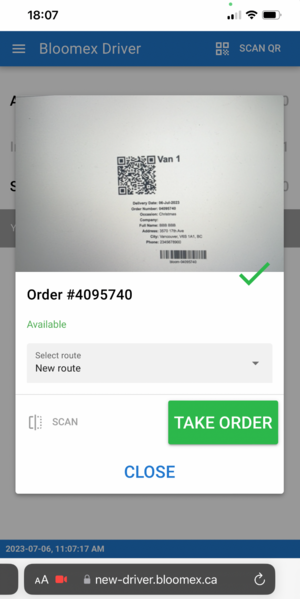
| Check QR-code scaninng via mobile drive app | | Check QR-code scaninng via mobile drive app | ||
| | | Precondition: | ||
| | |||
order was placed | |||
1. Click on the "New form" button | |||
2. Open https://new-driver.bloomex.ca/ | |||
3. Scan barcode via mobile drive app | |||
| 1. New form page is opened | |||
[[Image:Click on the "New form" button.png|800px]] | |||
2. The Driver App is opened | |||
[[Image:Open https---new-driver.bloomex.ca-.jpeg|300px]] | |||
3. The order was scanned | |||
[[Image:Scan barcode via mobile.png|300px]] | |||
|- | |- | ||
| 8 | | 8 | ||
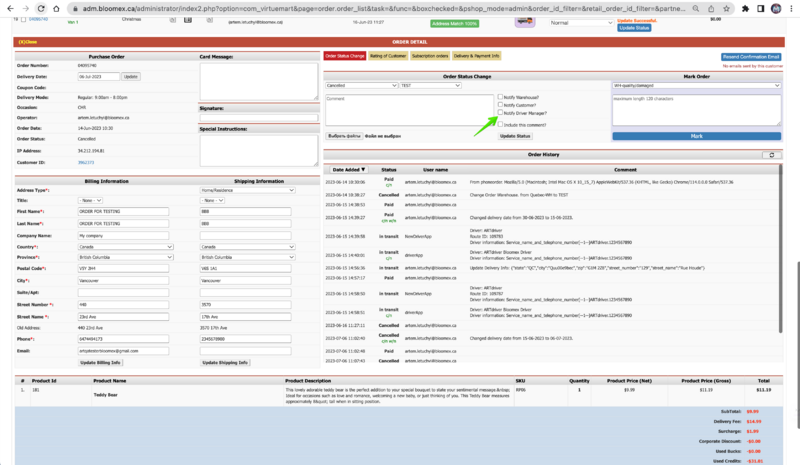
| Changing statuses and information from driver app | | Changing statuses and information from driver app | ||
| | | Precondition: | ||
| | |||
order was placed, order details page is opened in Manage Orders module | |||
Steps: | |||
Select "Notify Driver Manager?" checkbox and Click on the "update status" button | |||
| The checkbox is selected and status is updated | |||
[[Image:Notify driver manager.png|800px]] | |||
|- | |- | ||
| 9 | | 9 | ||
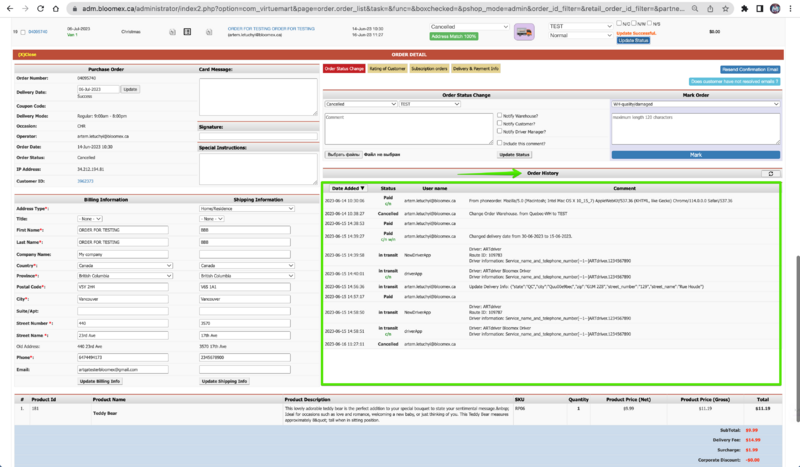
| Order history | | Order history | ||
| | | Precondition: | ||
| | |||
order was placed, order details page is opened in Manage Orders module | |||
Steps: | |||
Open details page is opened in Manage Orders module | |||
| The Order history is displayed | |||
[[Image:Order History.png|800px]] | |||
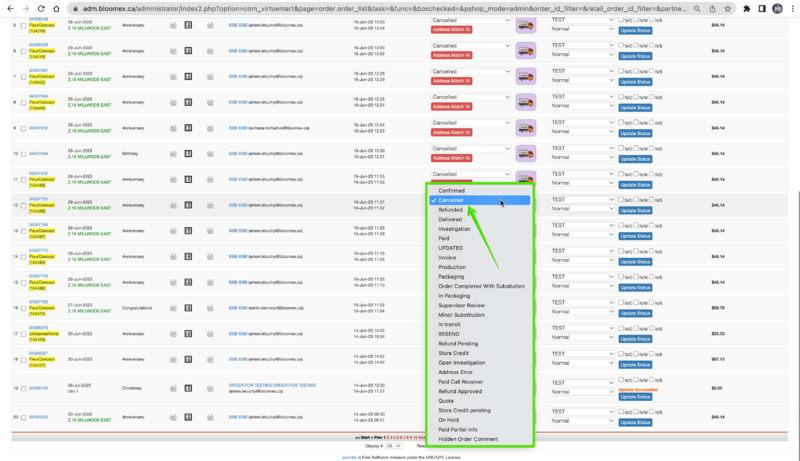
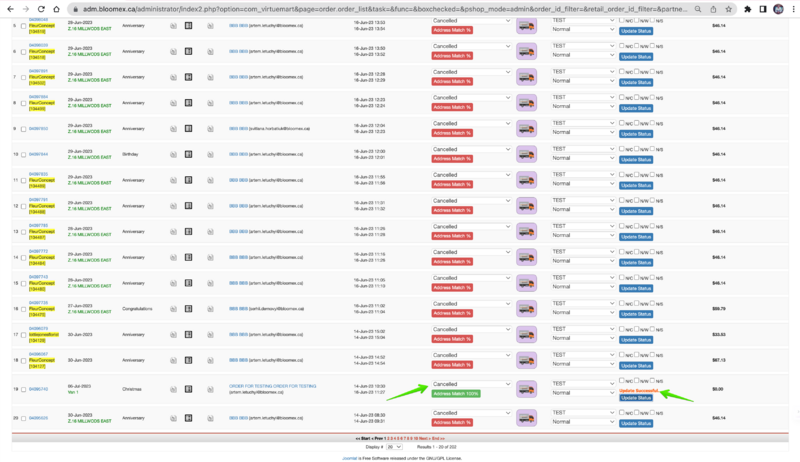
|- | |- | ||
| 10 | | 10 | ||
| Update order status is working | | Update order status is working | ||
| | | Precondition: | ||
order was placed, order details page is opened in Manage Orders module | |||
Steps: | |||
1. Click on the status dropdown list and choose any status | |||
2. Click on the "update status" button | |||
| | | 1. The status dropdown list is opened and choose new status | ||
| | [[Image:The status dropdown list is opened and choose new status.png|800px]] | ||
2. The Status is updated and "Update Successful" message is displayed | |||
[[Image:The Status is updated and "Update Successful" message is displayed.png|800px]] | |||
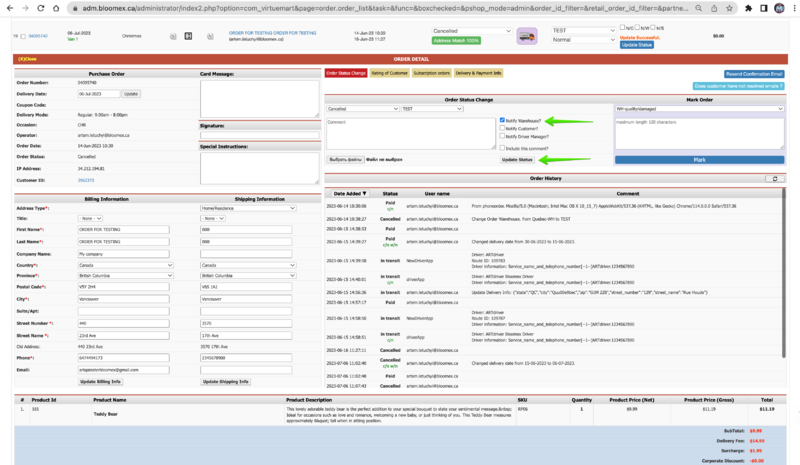
|- <span id="Warehouse letter about changing status"></span> | |||
| rowspan="2" |11 | |||
| | | rowspan="2" |Sending letter to warehouse (about created order and changing status) | ||
|- | |||
| " | |||
| | |||
| | |||
| Precondition: | | Precondition: | ||
Order was placed, order details page is opened in Manage Orders module | |||
Steps: | Steps: | ||
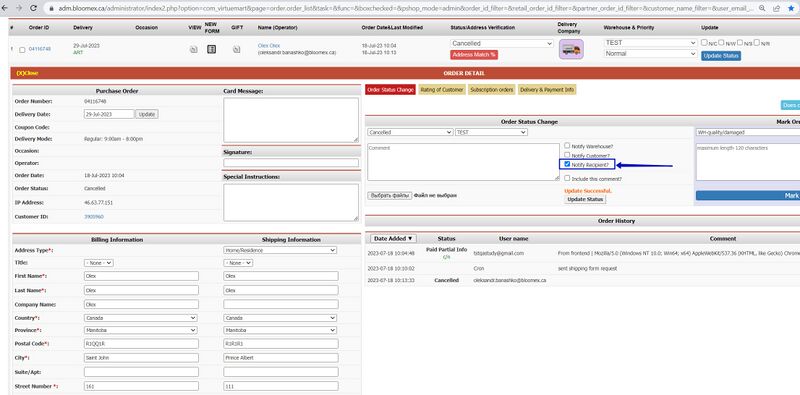
Select the "Notify Warehouse?" checkbox, select status, and click on the "Update status" button | |||
| The checkbox is selected and status is updated | |||
[[Image:The checkbox is selected and status is updated.png|800px]] | |||
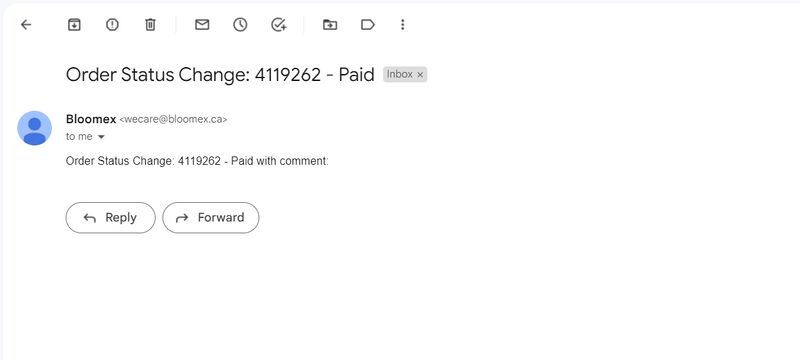
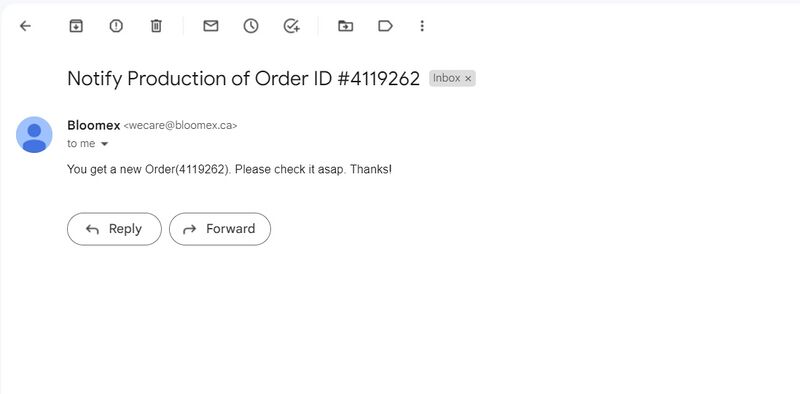
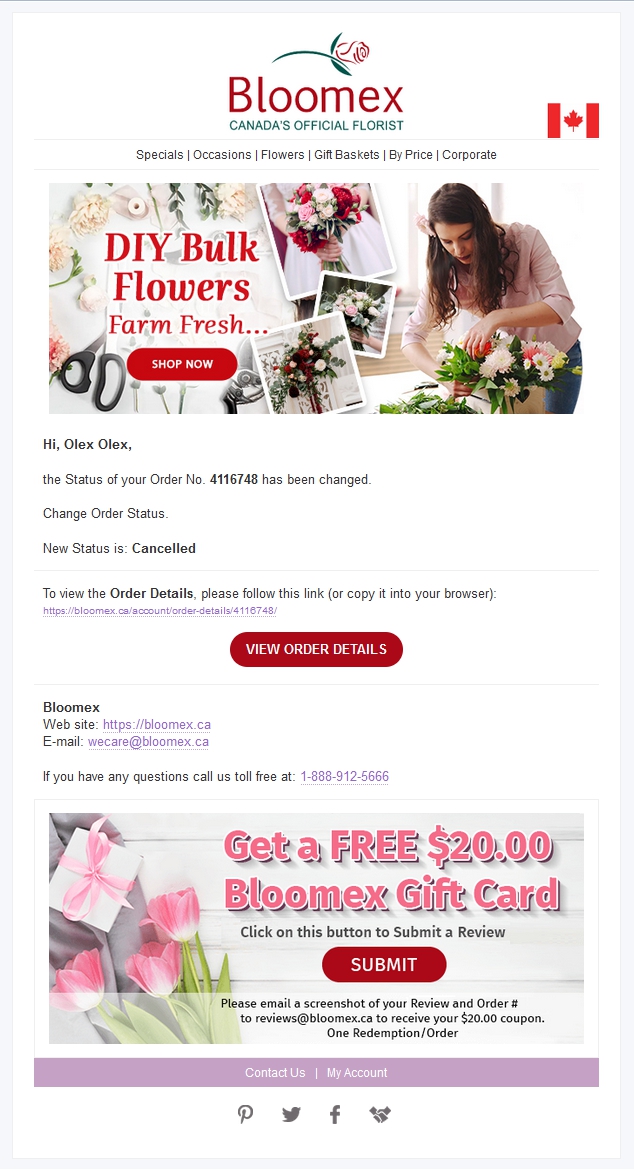
The "Change Order Status" email is delivered | |||
[[Image: | [[Image:Order Status Change.jpg|800px]] | ||
|- <span id="Changing status for client"></span> | |||
| Precondition: | |||
Order was placed, order details page is opened in the Manage Orders module | |||
Steps: | |||
Select the "Notify Customer?" checkbox, select status, and click on the "Update status" button | |||
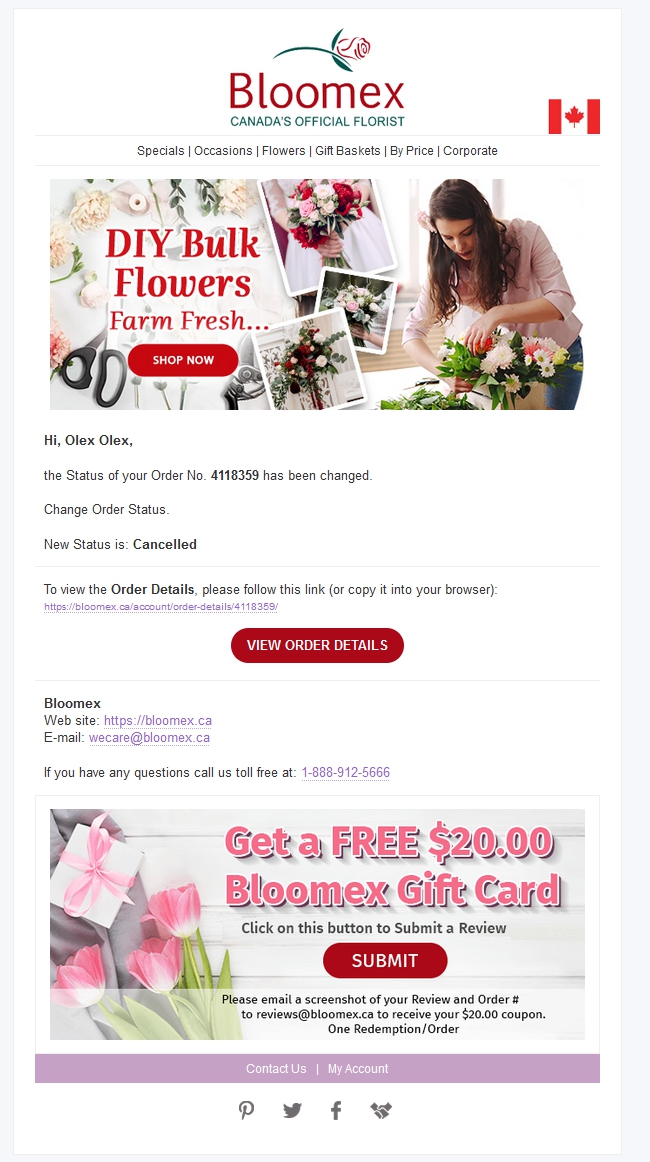
| The "Change Order Status" email is delivered | |||
[[Image: | [[Image:Order Status Change Client.jpg|800px]], | ||
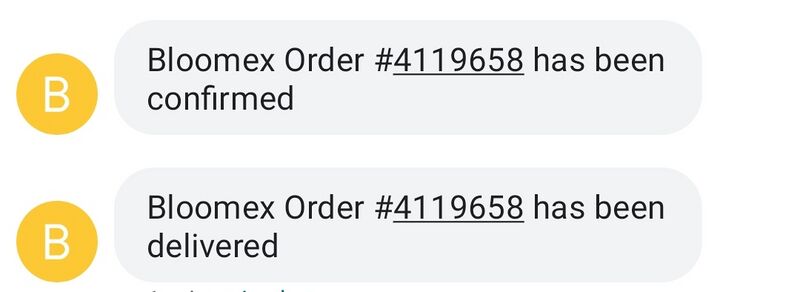
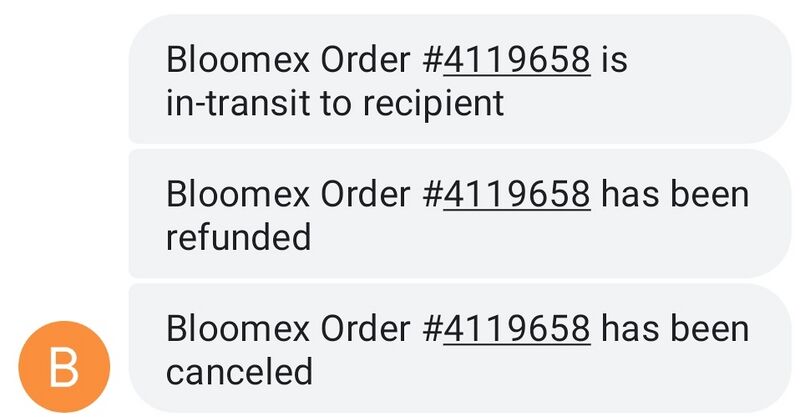
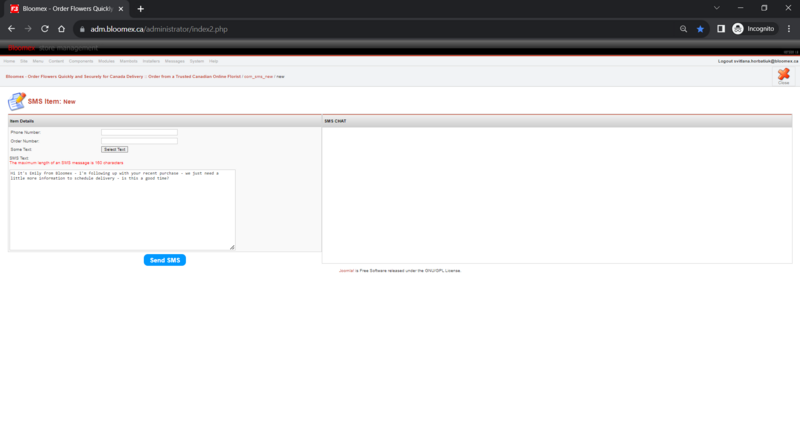
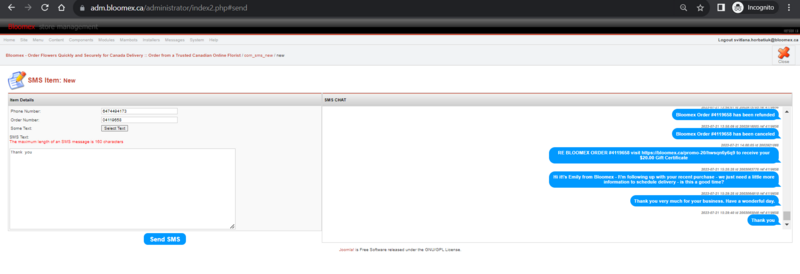
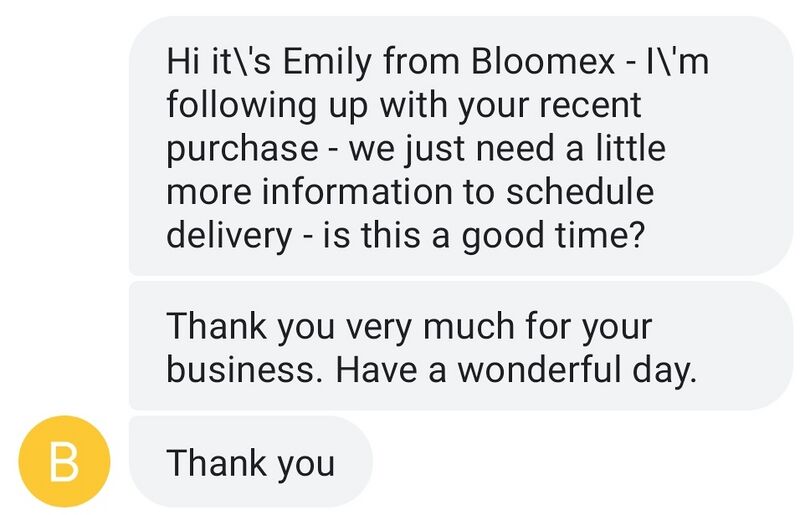
If customer enabled SMS tracking, SMS should come | |||
[[Image:smsStatus.jpg|800px]] | |||
[[Image:smsStatus2.jpg|800px]] | |||
After order status changed to delivered SMS about Gift Certificate comes | |||
<span id="About Gift Certificate"></span> | |||
[[Image:GiftCrtificate.jpg|800px]] | |||
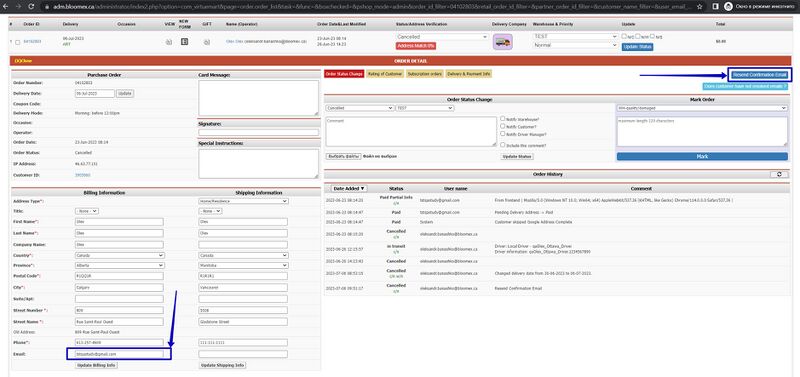
|- <span id="Resend Confirmation"></span> | |||
| 12 | |||
| "Resend confirmation email" function | |||
| Precondition: | |||
Order was placed, order details page is opened in Manage Orders module | |||
Steps: | |||
Click the "Resend Confirmation Email" button | |||
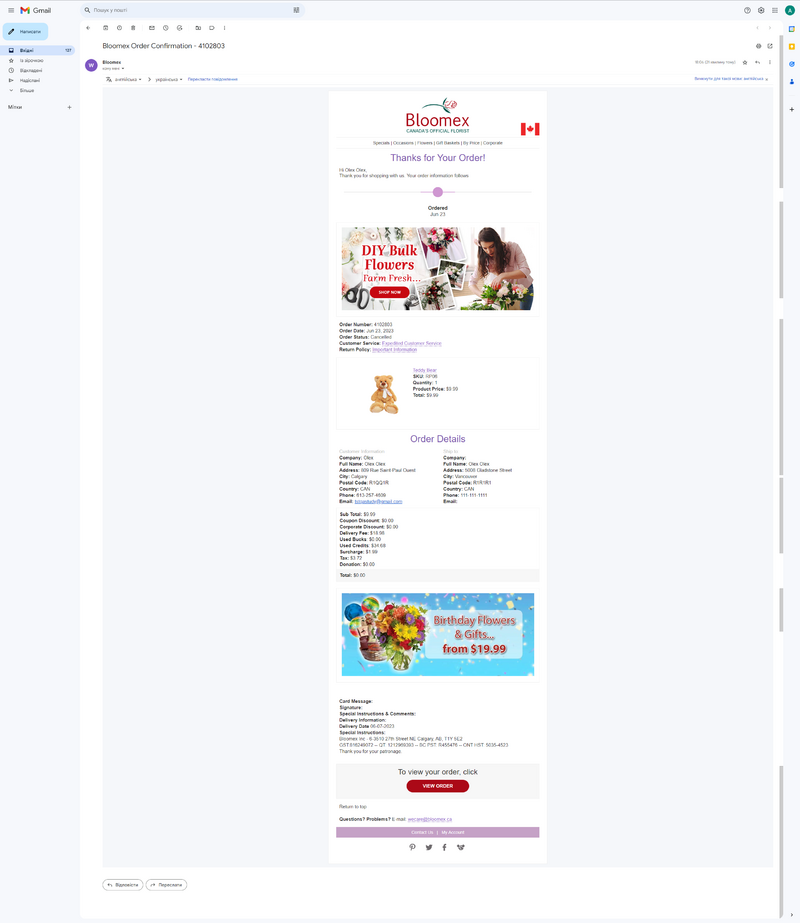
| Confirmation email re-sent to Email specified in "Billing Information" | |||
[[Image: | [[Image:Resend Confirmation Email.jpg|800px]] | ||
[[Image:2023-07-20 182901.png|800px]] | |||
|- | |||
| 13 | |||
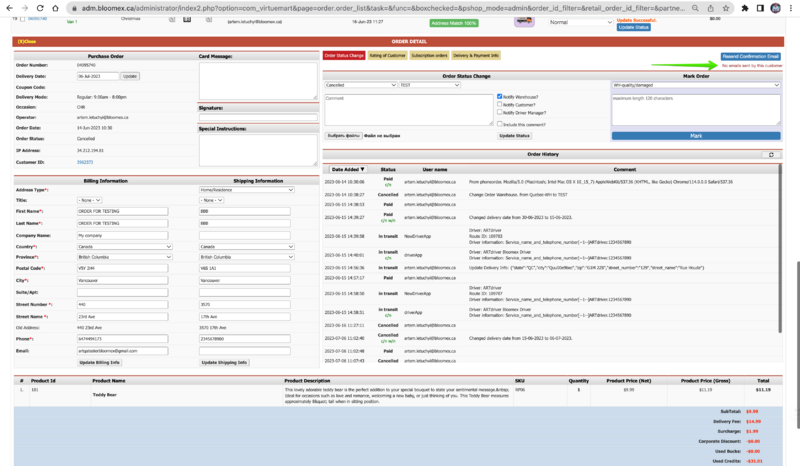
| "Does customer have not resolved emails?" function | |||
| Precondition: | |||
Order was placed, order details page is opened in Manage Orders module | |||
Steps: | |||
"Does customer have not resolved emails?" button | |||
| The "No emails sent by this customer" message is displayed | |||
[[Image:No emails sent by this customer.png|800px]] | |||
|- | |- | ||
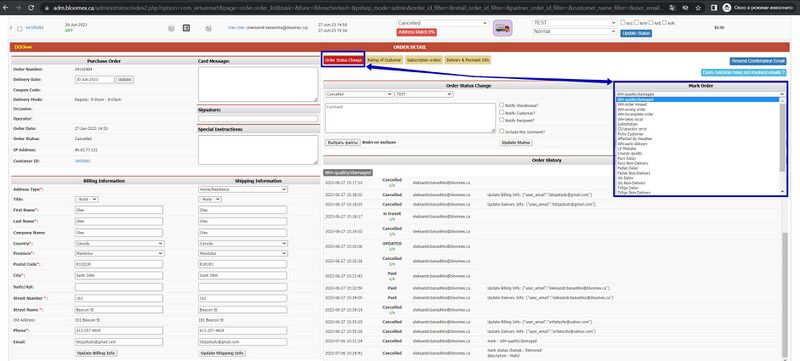
| | | rowspan="3" | 14 | ||
| | | rowspan="3" | "Mark Order" function | ||
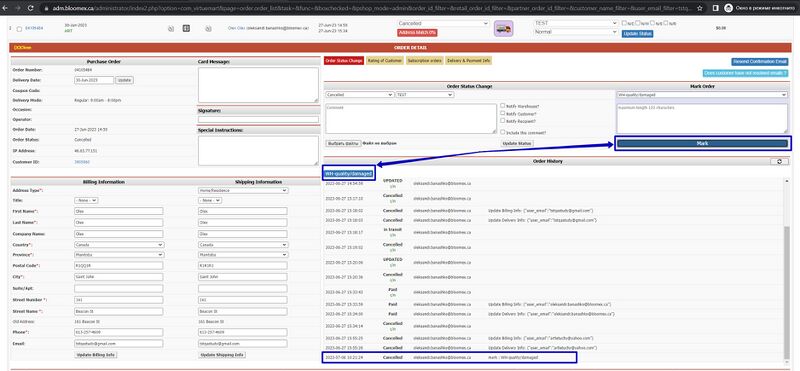
| Precondition: | | Precondition: | ||
Order was placed, order details page is opened in the Manage Orders module | |||
Steps: | Steps: | ||
1. | 1. In the "Order Status Change" tab - select the required "Mark Order" | ||
2. | 2. Click the “Mark” button | ||
| 1. The "Mark order" list - displayed | |||
[[Image:Mark.jpg|800px]] | |||
2. Notice - "Mark" has applied | |||
[[Image: | [[Image:Mark 2.jpg|800px]] | ||
|- | |- | ||
| | | (Mark unpublished) | ||
Precondition: | |||
Order was placed, order details page is opened in the Manage Orders module | |||
Steps: | Steps: | ||
1. | 1. left click on activated - "Mark" | ||
2. | 2. Enter a message and Click the “Save” button | ||
| 1. The field for entering a message has opened | |||
[[Image:Mark 2 5.jpg|800px]] | |||
[[Image:Mark 3.jpg|800px]] | |||
| | |||
2. Notice - "Mark unpublished” | |||
[[Image:Mark 4.jpg|800px]] | |||
|- | |||
| (Mark published) | |||
Precondition: | |||
Order was placed, order details page is opened in the Manage Orders module | |||
1. left click on deactivated - "Mark" | |||
2. Enter a message and Click the “Save” button | |||
| 1. The field for entering a message has opened | |||
[[Image: | [[Image:Mark 2 5.jpg|800px]] | ||
2. Notice - "Mark published” | |||
[[Image: | [[Image:Mark 6.jpg|800px]] | ||
|- | |- | ||
| | | 15 | ||
| | | "Rating of Customer" displaying | ||
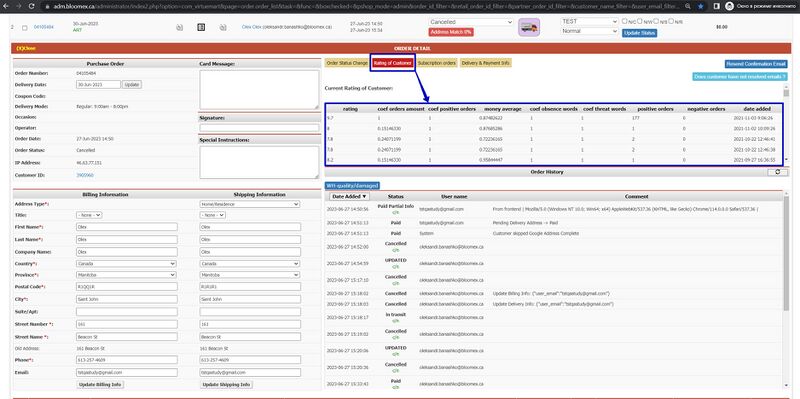
| Precondition: | | Precondition: | ||
Order was placed, order details page is opened in the Manage Orders module | |||
Go to the "Rating of Customer" tab and look at the "Current Rating of Customer:" section | |||
| "Rating of Customer" is displayed | |||
[[Image:Rating of Customer.jpg|800px]] | |||
|- | |||
| | | 16 | ||
| "Subscription orders" displaying | |||
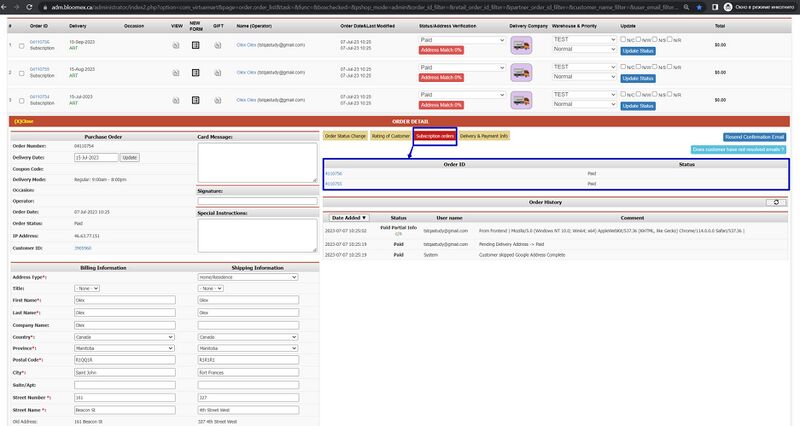
| Precondition: | |||
Order was placed with a "subscription", order details page is opened in the Manage Orders module | |||
Go to the "Subscription orders" tab and make sure that the subscription is completed | |||
| "Subscription orders" - are displayed | |||
[[Image:Subscription orders.jpg|800px]] | |||
|- | |- | ||
| | | 17 | ||
| | | Searching order by filters | ||
| Precondition: | | Precondition: | ||
Order was placed in the Manage Orders module | |||
Specify the necessary information for the search by specifying them in the "Filter" and "Order by" sections | |||
| The orders are filtered according to the specified information | |||
| | |||
[[Image:Filter Order by.jpg|800px]] | |||
|- | |- | ||
| | | 18 | ||
| | | Status filters | ||
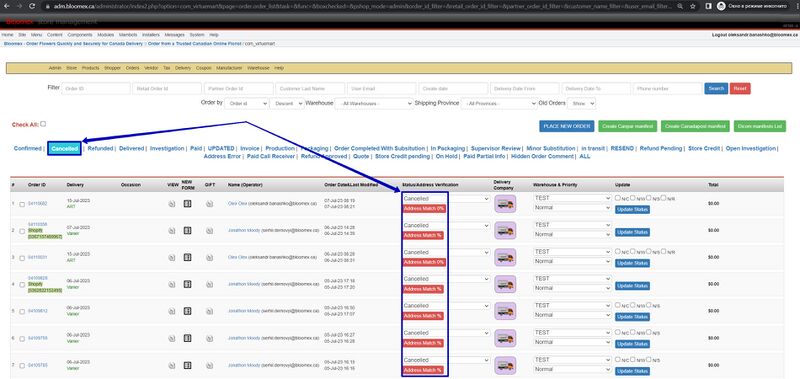
| Precondition: | | Precondition: | ||
Order was placed in the Manage Orders module | |||
Select the wants status to filter | |||
| Orders are filtered according to the selected status | |||
[[Image:Status filters.jpg|800px]] | |||
|- | |||
| 19 | |||
| Other menu tabs | |||
| Precondition: | |||
Order was placed, order details page is opened in the Manage Orders module | |||
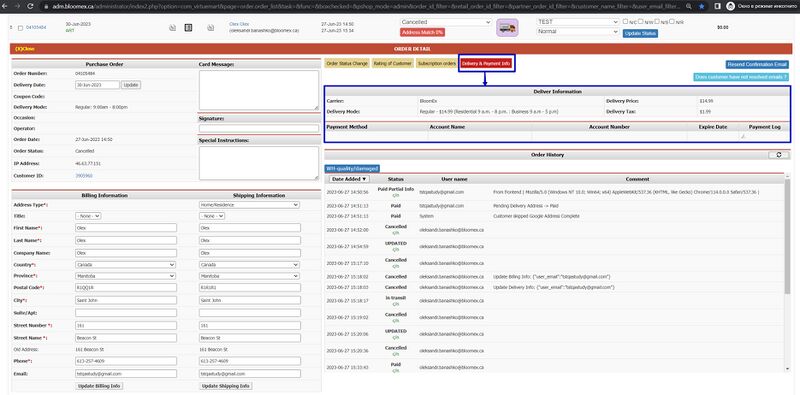
Go to the "Delivery and Payment Info" tab and look at the "Deliver Information" | |||
| "Delivery and Payment Info" is displayed | |||
[[Image:Delivery and Payment Info.jpg|800px]] | |||
|- | |- | ||
| | | 20 | ||
| | | Check Hidden Order Comments | ||
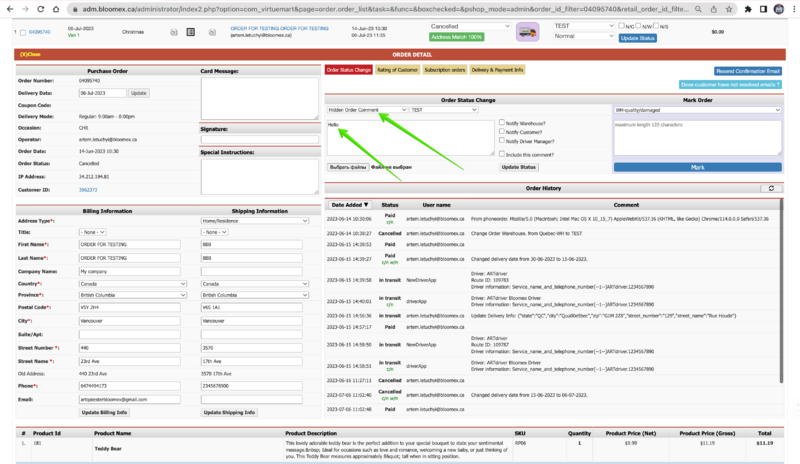
| Precondition: | | Precondition: | ||
Select "Customer Service Supervisor" group for account in "User Group" section | |||
Order was placed, order details page is opened in the Manage Orders module | |||
Steps: | Steps: | ||
1. | 1. Fill in "Comment" field and select "Hidden Order Comments" status | ||
2. | 2. Click on the "Update Status" button | ||
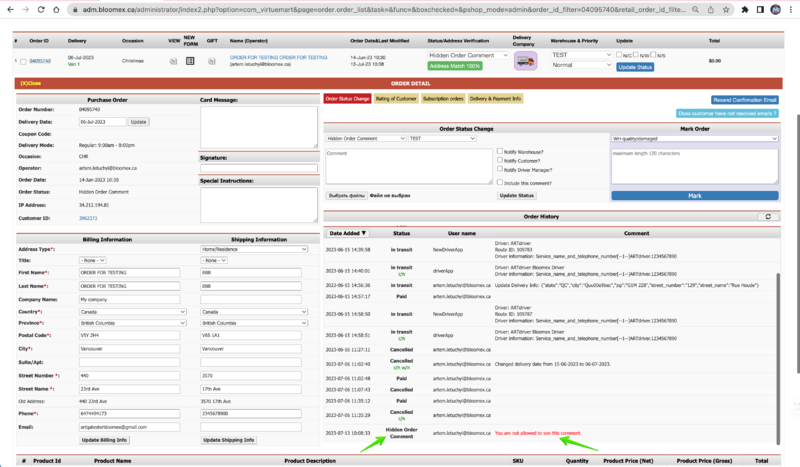
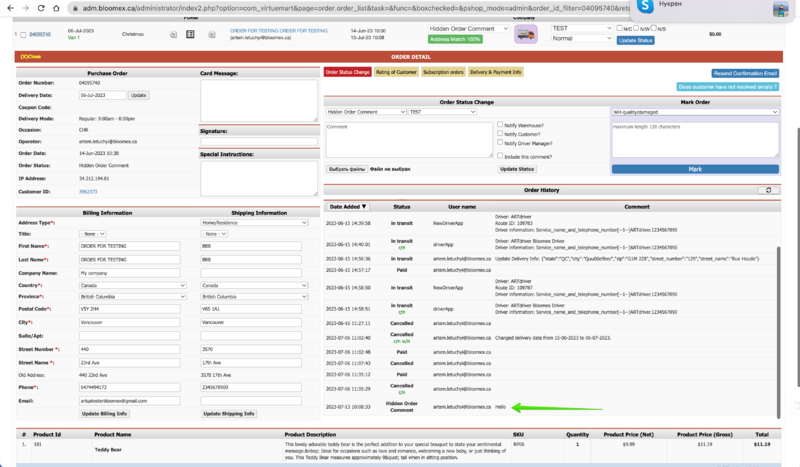
3. Log in as a user with rights and proceed to order with Hidden Order Comments | |||
| 1. The "Comment" field is filled "Hidden Order Comments" status is selected | |||
| | [[Image:Status plus comment.png|800px]] | ||
2. The "You are not allowed to see this comment." message is displayed in history | |||
[[Image:You are not allowed to see this comment..png|800px]] | |||
3. The message written with a status is displayed for users with the given rights | |||
[[Image:Hidden message.png|800px]] | |||
| | |- <span id="Changed status to Hidden Comments"></span> | ||
| 21 | |||
| Changed status to Hidden Comments | |||
| Precondition: | |||
Order was placed, the order details page is opened in the Manage Orders module | |||
Steps: | |||
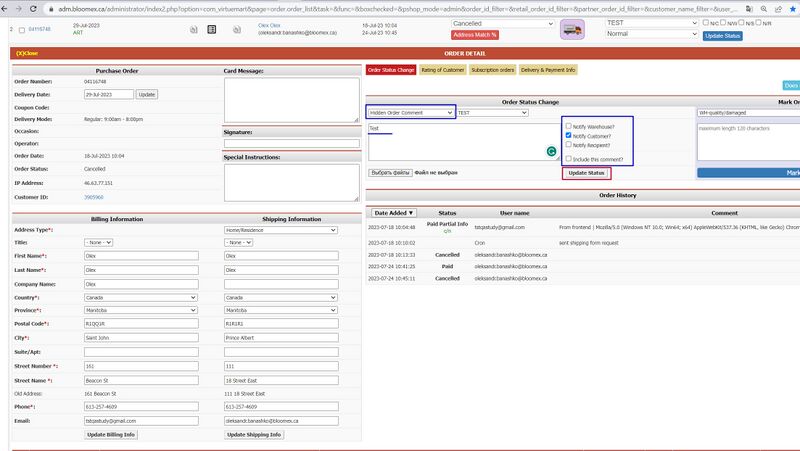
1. Select "Hidden Order Comment" status | |||
2. check the checkbox who needs to be notified and click the "Update Status" button | |||
| 1. Status "Hidden Order Comment" - displayed | |||
| | [[Image:Hidden Comments.jpg|800px]] | ||
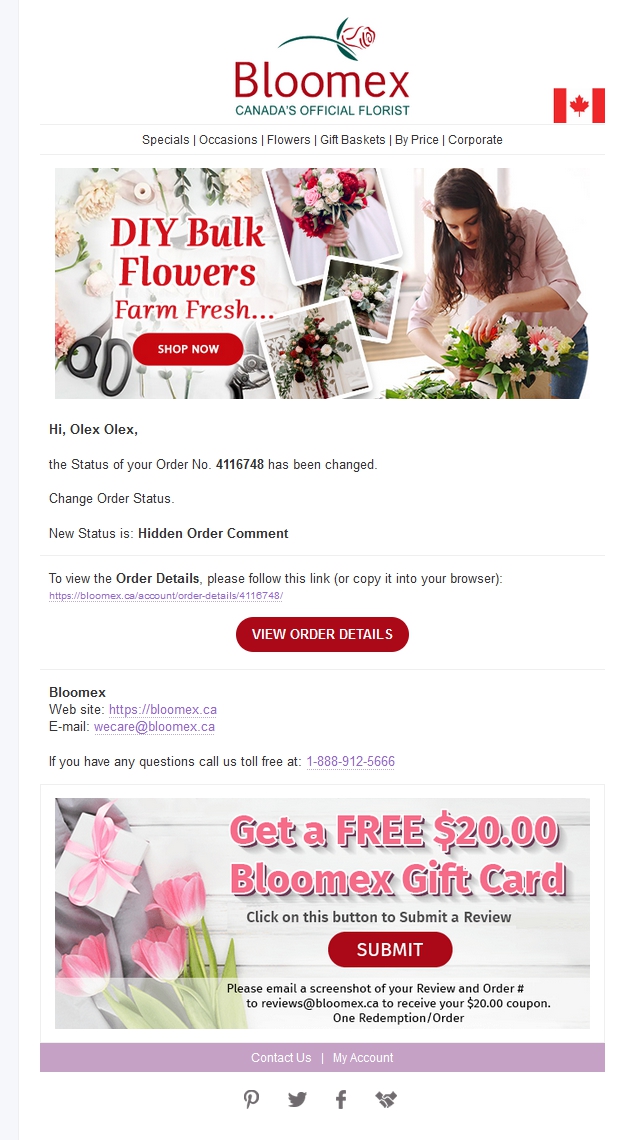
2. The letter about the status change came to the mail | |||
[[Image:Hidden Comments 1.jpg|800px]] | |||
|- | |||
| colspan="4" style="background-color:#ffffed;" | | |||
=Phone order manager= | |||
|- | |||
| 22 | |||
| Place order with creating a new account | |||
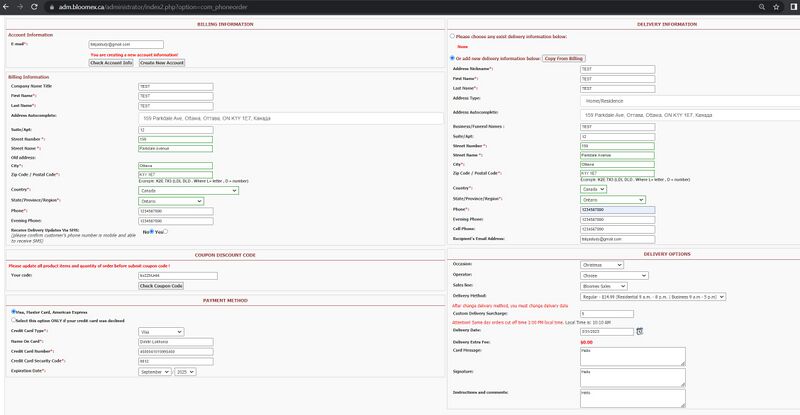
| Precondition: | |||
The user hasn't an existing account | |||
Steps: | |||
1. Enter the name of the product and click the "Add Product" button | |||
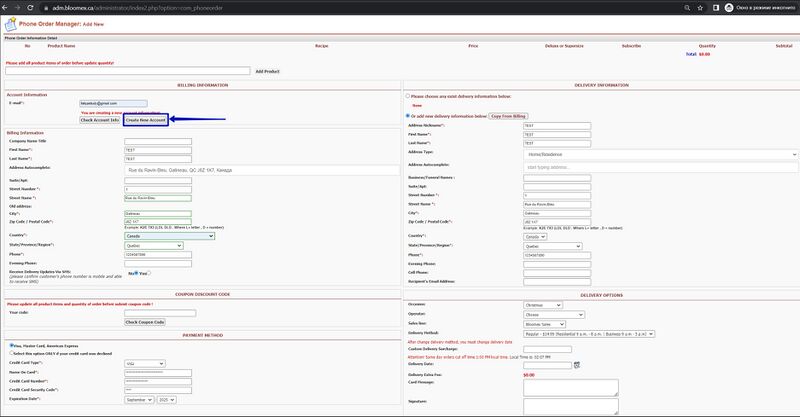
2. Click the "Create New Account" button and Fill in the recommended fields | |||
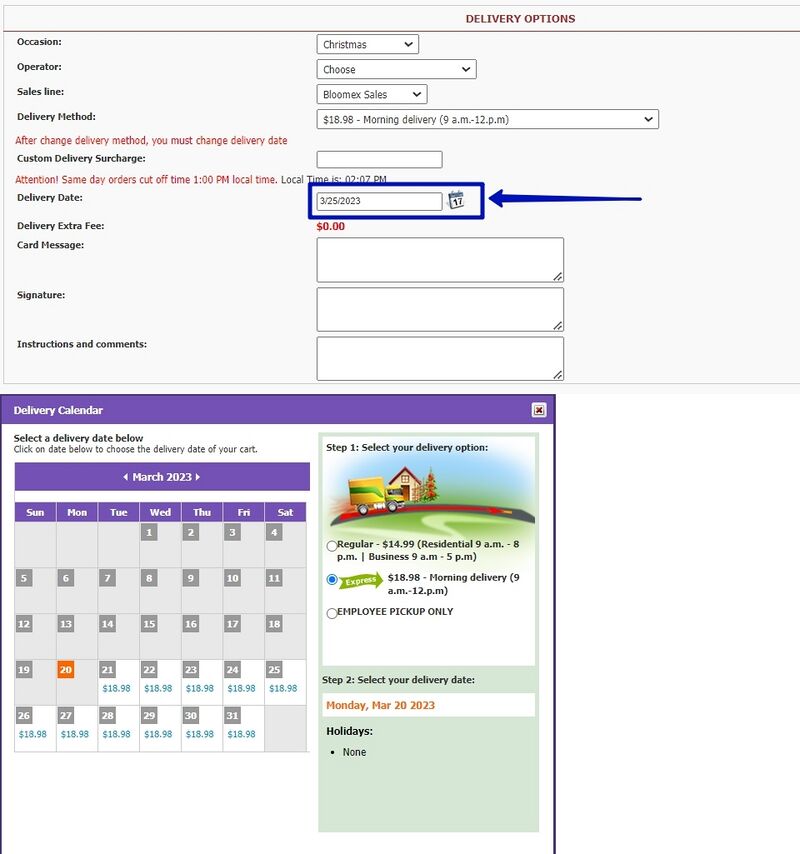
3. Choose a delivery date | |||
4. Click the "Save Order" button | |||
| 1. Product added | |||
[[Image:1. Product added.jpg|800px]] | |||
2. The information is filled in and displayed correctly | |||
2. | [[Image:2. The information is filled in and displayed correctly.jpg|800px]] | ||
3. The date was successfully selected and confirmed | |||
| | [[Image:3. The date was successfully selected and confirmed calendar.jpg|800px]] | ||
4. Message: "Save Phone Order Successfully and Payment Approved" | |||
[[Image:4. Message- "Save Phone Order Successfully and Payment Approved".jpg|800px]] | |||
|- | |- | ||
| | | 23 | ||
| | | Place order with existing user | ||
| Precondition: | | Precondition: | ||
The | The user has an existing account | ||
Steps: | Steps: | ||
1. Enter the | 1. Enter the name of the product and click the "Add Product" button | ||
2. | 2. Enter your email address to verify information in the "E-mail" field and Click the “Check Account Info” button | ||
3. | 3. Fill in the recommended fields | ||
4. Choose a delivery date | |||
5. Click the "Save Order" button | |||
| 1. Product added | |||
[[Image:1. Product added.jpg|800px]] | |||
2. Account accepted | |||
| | [[Image:2. Account accepted.jpg|800px]] | ||
The | 3. The information is filled in and displayed correctly | ||
[[Image:3. The information is filled in and displayed .jpg|800px]] | |||
4. The date was successfully selected and confirmed | |||
[[Image:4. The date was successfully confirmed.jpg|800px]] | |||
5. Message: "Save Phone Order Successfully and Payment Approved" | |||
[[Image:4. Message- "Save Phone Order Successfully and Payment Approved".jpg|800px]] | |||
|- | |- | ||
| | | 24 | ||
| | | Several products adding | ||
| Precondition: | | Precondition: | ||
The | The order was created through the "Phone Order manager" | ||
Steps: | Steps: | ||
1. Enter the | 1. Enter the name of the product in the search field | ||
2. | 2. Select a product from the drop-down list | ||
3. Click the | 3. Click the “Add Product” button | ||
| 1. Found all products with similar names | |||
[[Image:1. Found all products with similar names.jpg|800px]] | |||
2. The selected product was displayed in the search field | |||
[[Image:2. The selected product was displayed in the search field.jpg|800px]] | |||
3. Product added to "Phone Order Information Detail" | |||
[[Image:3. Product added to "Phone Order Information Detail".jpg|800px]] | |||
|- | |- | ||
| | | 25 | ||
| | | Several quantity calculations | ||
| Precondition: | | Precondition: | ||
The | The order was created through the "Phone Order manager" | ||
Steps: | Steps: | ||
1. Enter the | 1. Enter the name of the product in the search field | ||
2. | 2. Select a product from the drop-down list | ||
3. | 3. Click the “Add Product” button | ||
4. | 4. Change the "Quantity" of the product and check the "Total price" | ||
| 1. | | 1. Found all products with similar names | ||
[[Image:1. Found all products with similar names.jpg|800px]] | |||
2. | 2. The selected product was displayed in the search field | ||
[[Image:2. The selected product was displayed in the search field.jpg|800px]] | |||
3. | 3. Product added to "Phone Order Information Detail" | ||
[[Image:3. Product added to "Phone Order Information Detail".jpg|800px]] | |||
4. | 4. "Quantity" of the product has changed, the "Total Price" calculated correctly | ||
[[Image:4. "Quantity" of the product has changed, the "Total Price" calculated correctly.jpg|800px]] | |||
|- | |- | ||
| | | 26 | ||
| Receive delivery updates via SMS | |||
| | | Precondition: | ||
| | |||
Proceed to the step of "Billing Information" | |||
Steps: | Steps: | ||
1. Fill in the recommended fields | |||
2. In the "Receive Delivery Updates Via SMS", check the "Yes" | |||
| 1. The information is filled in and displayed correctly | |||
[[Image: | [[Image:1. The information in phone order manager is filled in and displayed correctly.jpg|800px]] | ||
2. Radio buttons "Receive Delivery Updates Via SMS" "No" and "Yes" is displayed | |||
[[Image:2. Radio buttons "Receive Delivery Updates Via SMS" "No" and "Yes" is displayed.jpg|800px]] | |||
|- | |- | ||
| | | 27 | ||
| | | Submit coupon code | ||
| Precondition: | | Precondition: | ||
Proceed to the step of "COUPON DISCOUNT CODE" | |||
Steps: | Steps: | ||
1. | 1. Fill in the recommended fields | ||
2. | 2. Enter the coupon code "Your code" field and Click "Check Coupon Code" | ||
| 1. The | | 1. The information is filled in and displayed correctly | ||
[[Image:1. The | [[Image:1. The information in phone order manager is filled in and displayed correctly.jpg|800px]] | ||
2. | 2. Coupon activated. Message: "This coupon code will reduce $20.00 of order total price" | ||
[[Image:2. | [[Image:2. Coupon activated. Message- "This coupon code will reduce $20.00 of order total price".jpg|800px]] | ||
|- | |- | ||
| | | 28 | ||
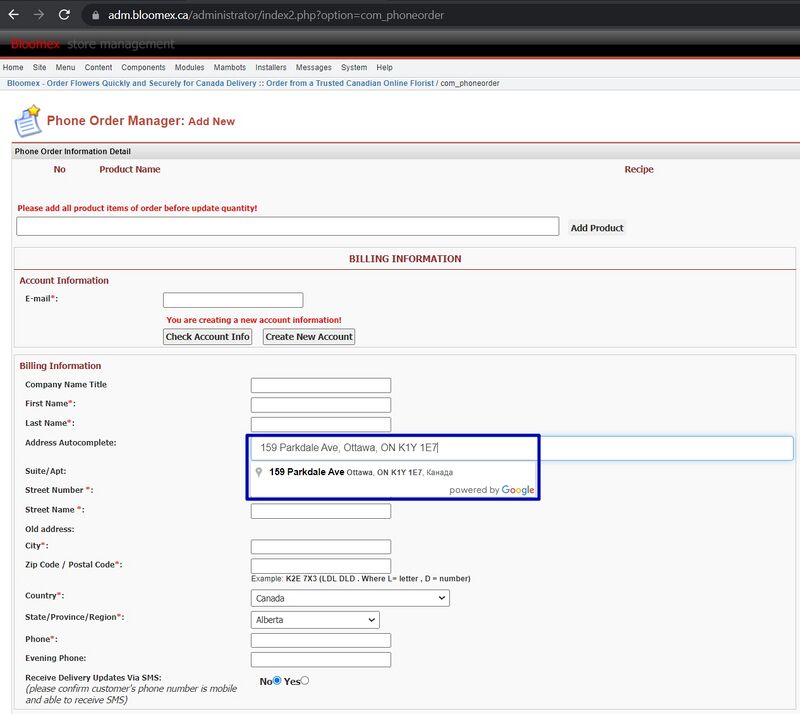
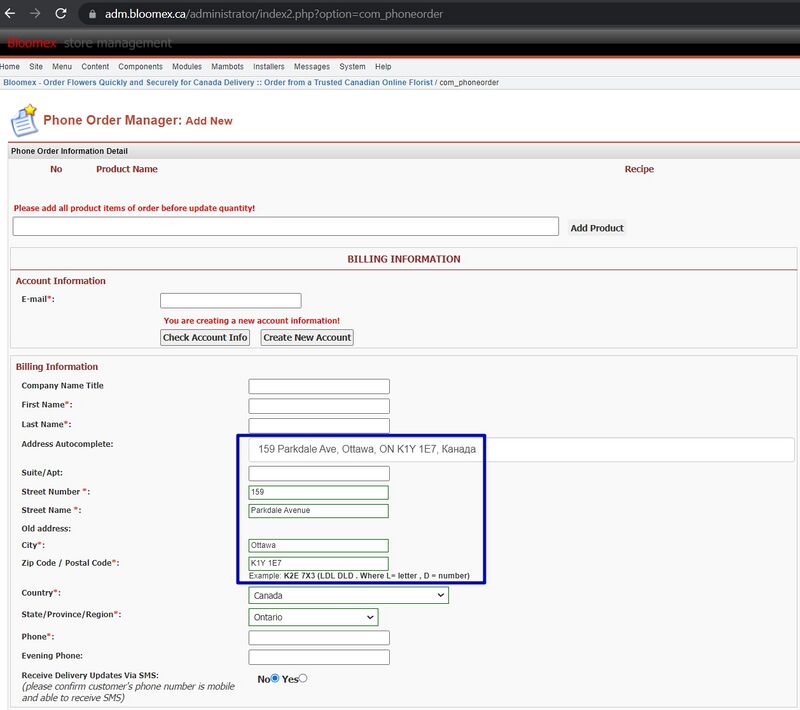
| | | The system pulls correct and full user autocomplete address | ||
| Precondition: | | Precondition: | ||
Proceed to the step of "Billing Information" | |||
Steps: | Steps: | ||
Enter | 1. Enter an existing address in the “Address Autocomplete” field | ||
2. Select an address from the drop-down list | |||
| 1. Address found successfully | |||
[[Image:1. Address found successfully.jpg|800px]] | |||
2. The address is displayed correctly | |||
[[Image: | [[Image:2. The address is displayed correctly.jpg|800px]] | ||
|- | |- | ||
| | | 29 | ||
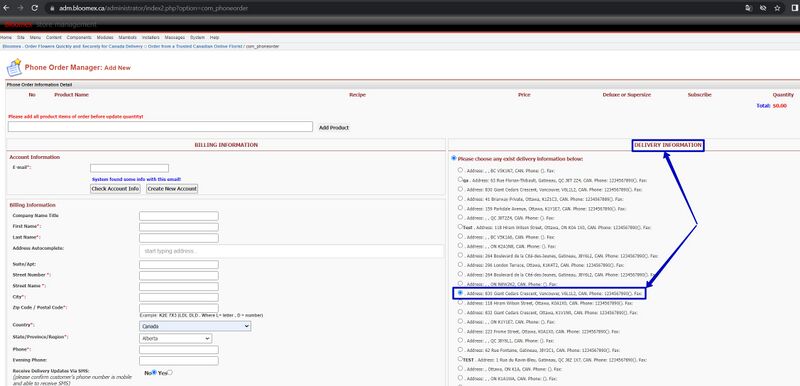
| | | Choose any existing delivery information | ||
| Precondition: | | Precondition: | ||
Proceed to the step of "Delivery Information" | |||
Steps: | Steps: | ||
1. | 1. Sign in with an existing account | ||
2. | 2. Place the radio button opposite the address | ||
| 1. | | 1. The list of addresses is displayed | ||
2. Address selected | |||
2. | [[Image:2. Address selected.jpg|800px]] | ||
|- | |- | ||
| | | 30 | ||
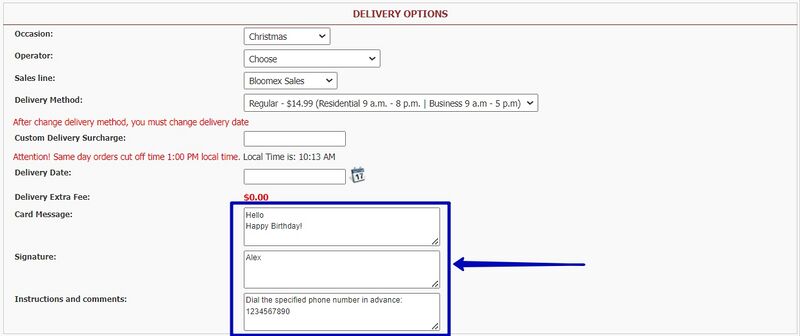
| | | Fill card message and special instructions | ||
| Precondition: | | Precondition: | ||
Proceed to the step of "Delivery Options" | |||
Steps: | Steps: | ||
1. | 1. Enter information in the “Card Message” field | ||
2. | 2. Enter information in the “Signature” field | ||
3. Enter information in the “Instructions and comments” field | |||
| 1. Information in the “Card Message” field is displayed | |||
2. Information in the “Signature” field is displayed | |||
3. Information in the “Instructions and comments” field is displayed | |||
[[Image:3. Information in the Instructions and comments field is displayed.jpg|800px]] | |||
|- <span id="Confirmation"></span> | |||
| 31 | |||
| Confirmation email after creation order from Phone order | |||
| Precondition: | |||
Finish the order using "Phone Order Manager" and check the order confirmation email | |||
Steps: | |||
Click the “Save Order” button | |||
| The confirmation email is delivered | |||
| | |||
[[Image: | [[Image:Confirmation.png|800px]] | ||
|- | |- | ||
| | | 32 | ||
| | | Finish order and check order confirmation email: | ||
i. Delivery date | |||
ii. Address | |||
iii. Card Message | |||
iv. Products (names, SKU, descriptions, quantities, and prices) | |||
| Precondition: | | Precondition: | ||
Finish the order and check the order confirmation email | |||
Steps: | Steps: | ||
1. | 1. Click the “Save Order” button | ||
2. Check | 2. Check email: Delivery date, Address, Card message, Products (names, SKU, descriptions, quantities, and prices) | ||
| 1. Order successfully created | |||
2. The | [[Image:1. Order successfully created.jpg|800px]] | ||
[[Image:1.1 Order successfully created.jpg|800px]] | |||
2. The confirmation letter contains the following data: Delivery date, Address, Card message, Products (names, SKU, descriptions, quantities, and prices) | |||
[[Image:2. The confirmation letter contains the following data.jpg|800px]] | |||
[[Image:3. The confirmation letter contains the following data.jpg|800px]] | |||
[[Image:5. The confirmation letter contains the following data.jpg|800px]] | |||
[[Image:4. The confirmation letter contains the following data.jpg|800px]] | |||
|- | |- | ||
| | | 33 | ||
| Check | | Check the correct functionality of all required and not required fields | ||
| | | Steps: | ||
1. Enter the name of the product in the search field | |||
2. Enter information in the required and not required fields | |||
| 1. The product is displayed | |||
1. | [[Image:1. The product is displayed.jpg|800px]] | ||
2. | 2. Information in all fields is displayed | ||
[[Image: | [[Image:2. Information in all fields is displayed.jpg|800px]] | ||
|- | |||
| colspan="4" style="background-color:#ffffed;" | | |||
=Create route= | |||
|- | |- | ||
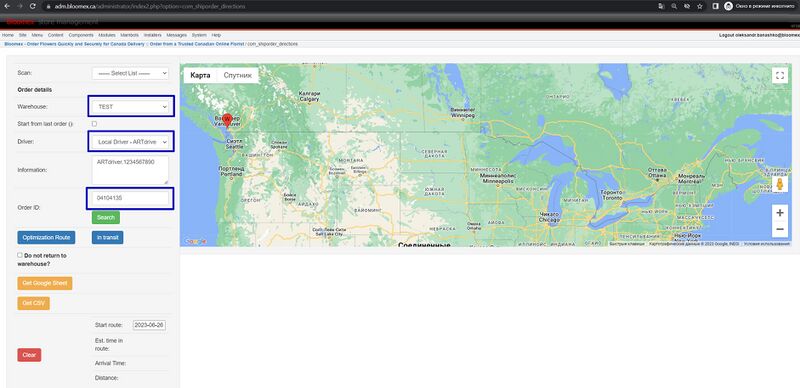
| | | 34 | ||
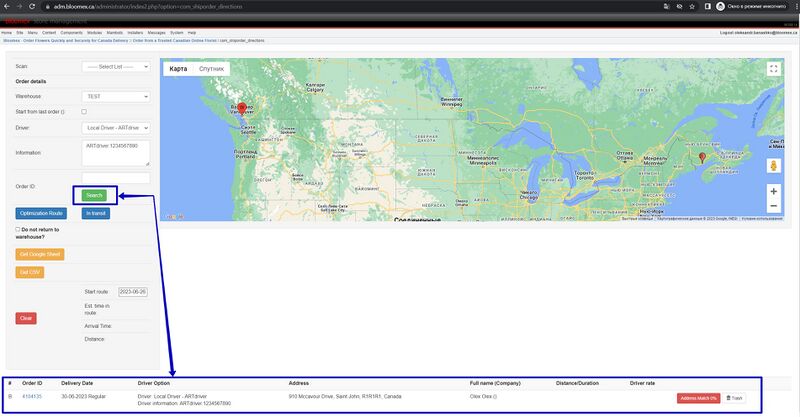
| | | Сorrect choosing of order details(Search) | ||
| Precondition: | | Precondition: | ||
The route was created through the "Create Route" | |||
Steps: | Steps: | ||
1. Select | 1. Enter the basic information in the "Order details" section: a) Select Warehouse; b) Select Driver; c) Enter Order ID | ||
2. Click the "Search" button | |||
3. Check the information on the basis of which the route will be created | |||
| | |||
[[Image:General info.jpg|800px]] | |||
1. Information in all fields is displayed | |||
[[Image:1. Search.jpg|800px]] | |||
| | |||
2. The route is optimized and is displayed | |||
2. | [[Image:2.Search.jpg|800px]] | ||
|- | |- | ||
| | | 35 | ||
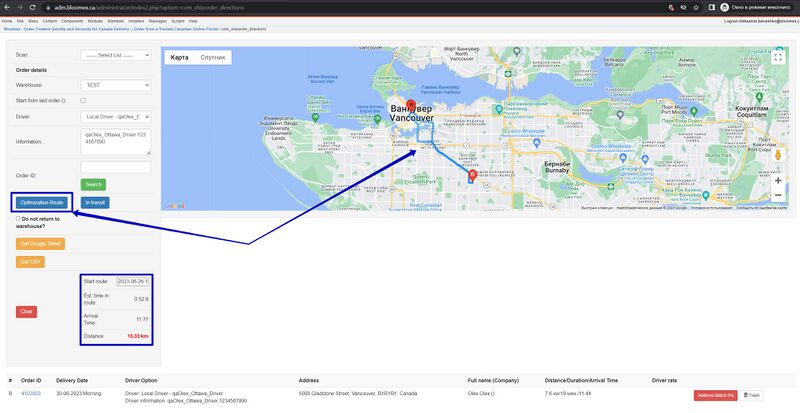
| | | Optimization route function | ||
| Precondition: | | Precondition: | ||
The route was created through the "Create Route" | |||
Steps: | Steps: | ||
1. Select | 1. Enter the basic information in the "Order details" section: a) Select Warehouse; b) Select Driver; c) Enter Order ID | ||
2. | 2. Click the "Search" button | ||
[[Image: | 3. Click the "Optimization Route" button | ||
| 1. Information in all fields is displayed | |||
[[Image:1. Search.jpg|800px]] | |||
2. Information was found using the search and is displayed | |||
[[Image:2.Search.jpg|800px]] | |||
3. The route is optimized and displayed on the map | |||
[[Image:3.Search.jpg|800px]] | |||
|- | |- | ||
| | | 36 | ||
| | | Route creation(In transit) | ||
| Precondition: | | Precondition: | ||
The route was created through the "Create Route" | |||
Steps: | Steps: | ||
1. | 1. Enter the basic information in the "Order details" section: a) Select Warehouse; b) Select Driver; c) Enter Order ID | ||
2. Click | 2. Click the "Search" button | ||
3. Click the "Optimization Route" button | |||
4. Click the "In transit" button | |||
| 1. Information in all fields is displayed | |||
[[Image:1. Search.jpg|800px]] | |||
2. Information was found using the search and is displayed | |||
[[Image:2.Search.jpg|800px]] | |||
| | |||
3. The route is optimized and displayed on the map | |||
[[Image:3.Search.jpg|800px]] | |||
| | |||
4. The route is created and displayed on the "Route Manager" section | |||
[[Image:4.Search.jpg|800px]] | |||
|- | |||
| 37 | |||
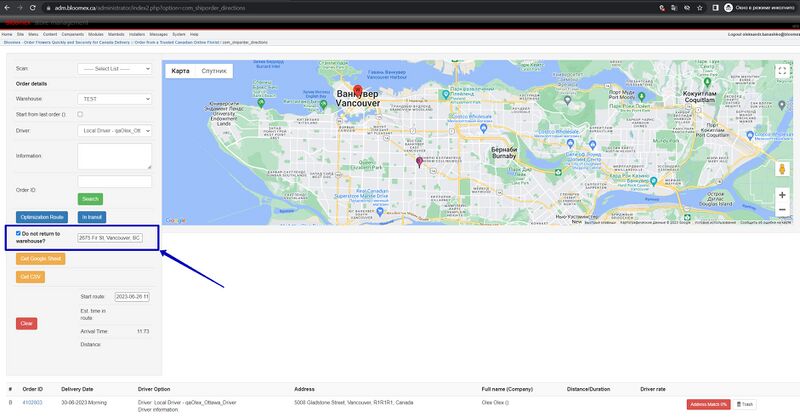
| Do not return to the warehouse field | |||
| Precondition: | |||
The route was created through the "Create Route" | |||
Steps: | |||
1. Enter the basic information in the "Order details" section: a) Select Warehouse; b) Select Driver; c) Enter Order ID | |||
2. | 2. Click the "Search" button | ||
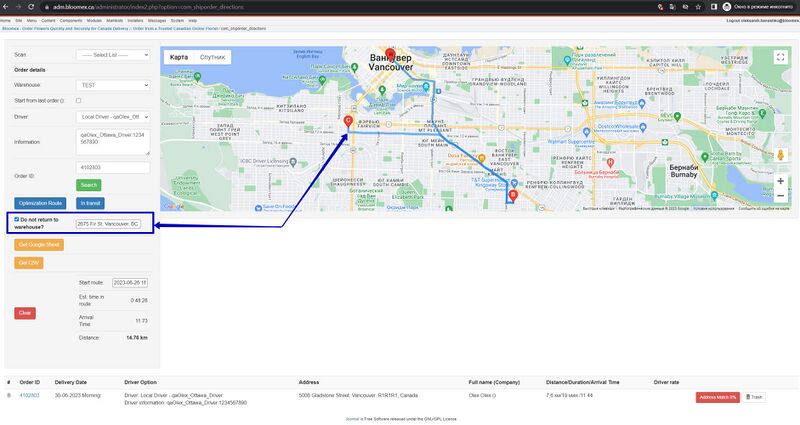
3. Check the box next to "Do not return to the warehouse?" and enter the return address | |||
4. Click the "Optimization Route" button | |||
| 1. Information in all fields is displayed | |||
[[Image: | [[Image:1. Search.jpg|800px]] | ||
2. Information was found using the search and is displayed | |||
[[Image:2.Search.jpg|800px]] | |||
3. The check box and the entered address are displayed correctly | |||
[[Image:6.Search.jpg|800px]] | |||
4. The route is created and displayed with a return point instead of a warehouse | |||
| | [[Image:5.Search.jpg|800px]] | ||
|- | |||
| rowspan="2" | 38 | |||
| rowspan="2" | Other functions | |||
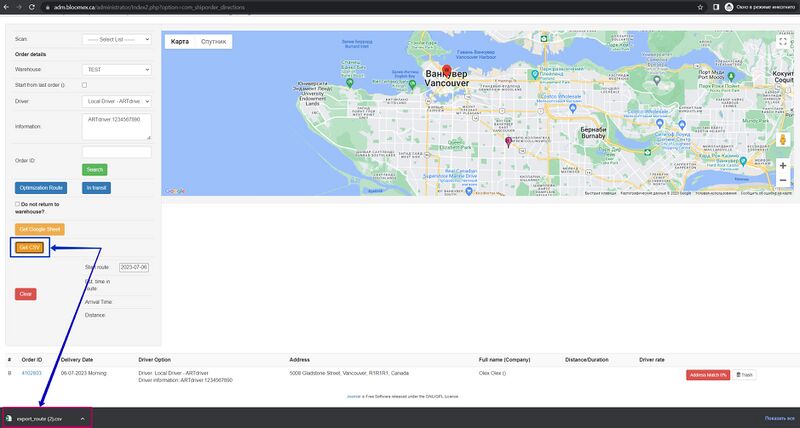
| (Get CSV) | |||
Precondition: | |||
The route was created through the "Create Route" | |||
Steps: | |||
1. Enter the basic information in the "Order details" section: a) Select Warehouse; b) Select Driver; c) Enter Order ID | |||
2. Click the "Get CSV" button | |||
| Route downloaded to your device | |||
[[Image:Export route.jpg|800px]] | |||
|- | |- | ||
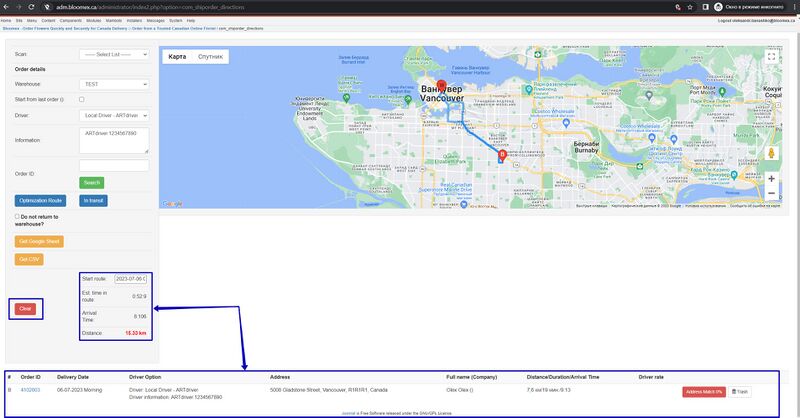
| | | (Clear function) | ||
Precondition: | |||
The route was created through the "Create Route" | |||
Steps: | Steps: | ||
1. | 1. Enter the basic information in the "Order details" section: a) Select Warehouse; b) Select Driver; c) Enter Order ID | ||
2. Click | 2. Click the "Clear" button | ||
| | | Information about the route - cleared | ||
[[Image:Clear.jpg|800px]] | |||
|- | |||
| colspan="4" style="background-color:#ffffed;" | | |||
=Route manager= | |||
|- | |- | ||
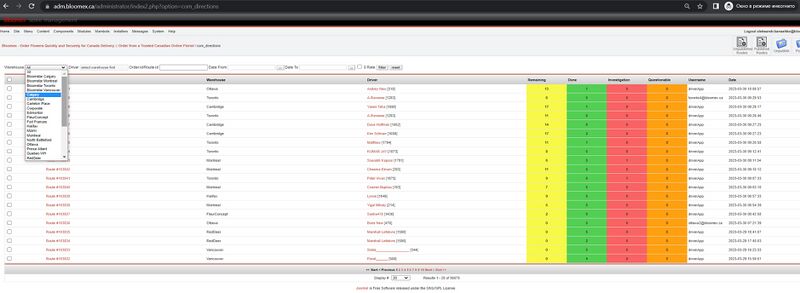
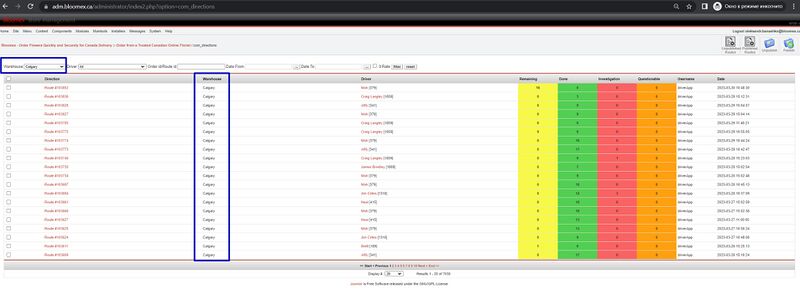
| | | 39 | ||
| | |Search for routes by warehouse | ||
| Precondition: | | Precondition: | ||
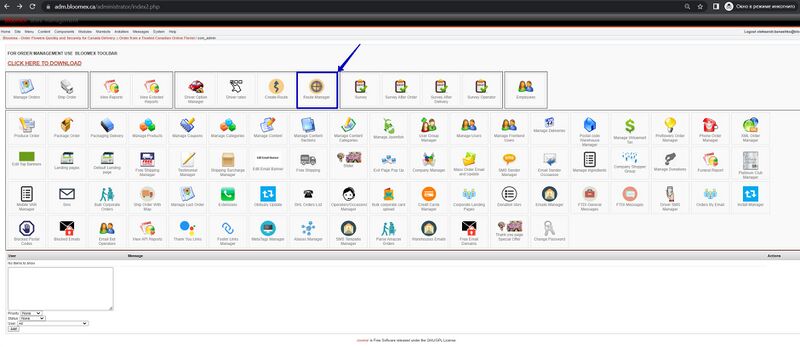
Click on the " | Click on the "Route Manager" section | ||
Steps: | Steps: | ||
Select the drop-down list "Warehouse" | |||
|The selected warehouse is sorted | |||
| | [[Image:Route manager.jpg|800px]] | ||
[[Image:Route manager drop down list.jpg|800px]] | |||
[[Image:Route manager result.jpg|800px]] | |||
|- | |- | ||
| | | 40 | ||
| | | Search by driver | ||
| Precondition: | | Precondition: | ||
Click on the " | Click on the "Route Manager" section | ||
Steps: | Steps: | ||
1. Select the " | 1. Select the drop-down list "Warehouse" | ||
2. Select the drop-down list "Driver" | |||
| 1. The selected warehouse is sorted | |||
[[Image:1. The selected warehouse is sorted.jpg|800px]] | |||
2. The selected Driver is sorted | |||
2. | [[Image:2. The selected Driver is sorted.jpg|800px]] | ||
[[Image:2. The selected Driver is sorted 1.jpg|800px]] | |||
|- | |- | ||
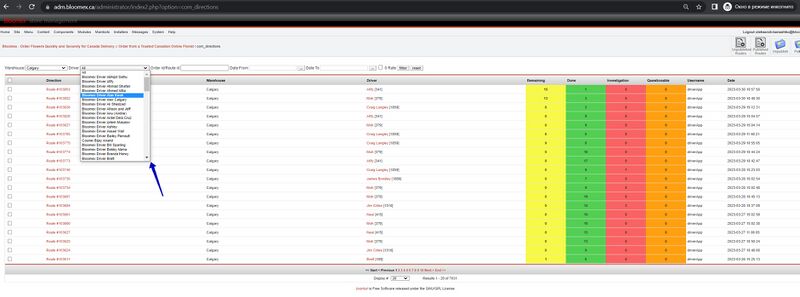
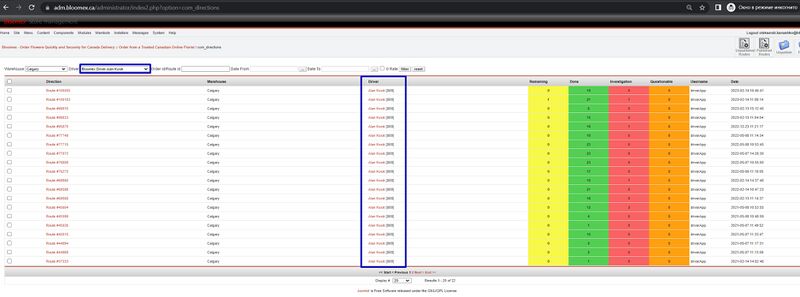
| | | 41 | ||
| | | Search by order id/route id | ||
| Precondition: | | Precondition: | ||
Click on the "Route Manager" section | |||
Steps: | Steps: | ||
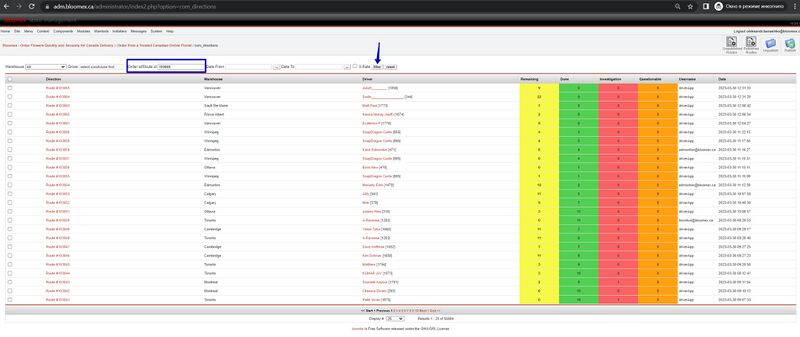
Enter the order id or route id in the "Order id/Route id" field and click on the "Filter" button | |||
| Search by order id or route id is displayed | |||
[[Image: | [[Image:Search by order id or route id is displayed.jpg|800px]] | ||
[[Image:Search by order id or route id is displayed1.jpg|800px]] | |||
|- | |- | ||
| | | 42 | ||
| | | Search by date | ||
| Precondition: | | Precondition: | ||
Click on the "Route Manager" section | |||
Steps: | Steps: | ||
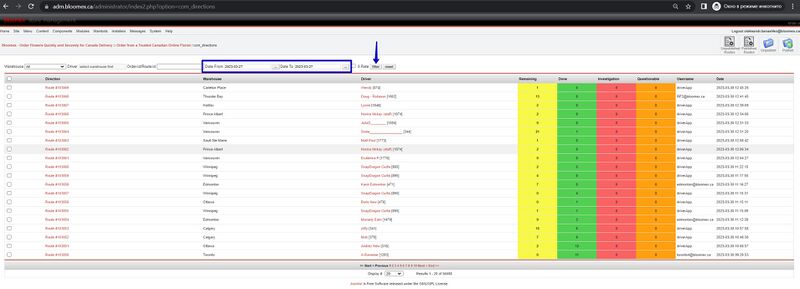
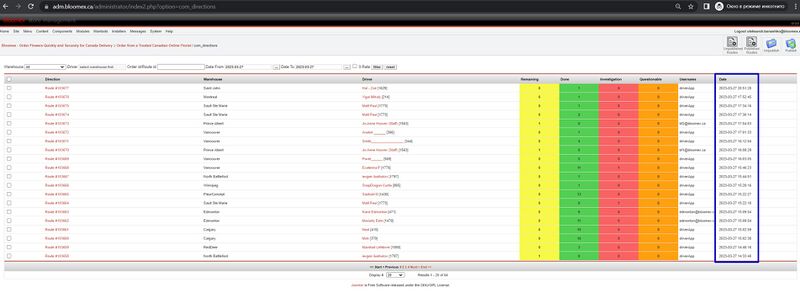
Select "Date From" and "Date To" and click on the "Filter" button | |||
| Search by date is displayed | |||
[[Image:Search by date is displayed.jpg|800px]] | |||
| | |||
[[Image: | [[Image:Search by date is displayed1.jpg|800px]] | ||
|- | |||
| 43 | |||
| Correct displaying of information in a PDF file | |||
|- | |||
| | |||
| | |||
| Precondition: | | Precondition: | ||
Select a route and go to it | |||
Steps: | Steps: | ||
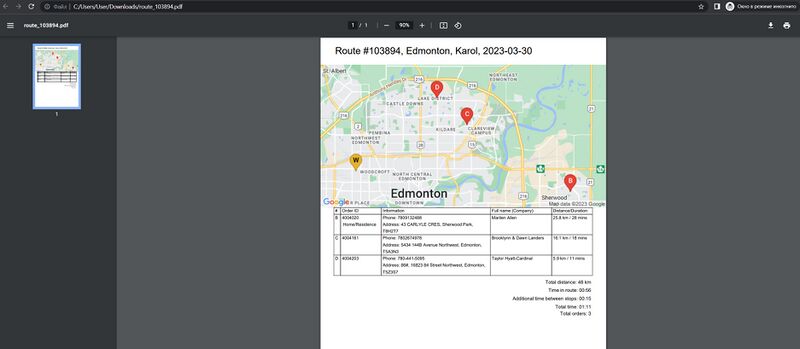
1. | 1. Click the "PDF" button | ||
2. | 2. Check the information in the PDF file | ||
| 1. "PDF" file is downloaded | |||
[[Image:1. "PDF" file is downloaded.jpg|800px]] | |||
2. The information in the "PDF" file is displayed correctly | |||
2. The | [[Image:2. The information in the "PDF" file is displayed correctly.jpg|800px]] | ||
|- | |||
| 44 | |||
| Unpublish route function | |||
| Precondition: | |||
Click on the "Route Manager" section | |||
Steps: | |||
1. | 1. Select a route using the checkbox | ||
2. Click | 2. Click the "Unpublish" button | ||
| 1. The route is selected | |||
[[Image:Unpublish route function step 1.jpg|800px]] | |||
2. The publication of the route canceled | |||
[[Image:Unpublish route function step 2.jpg|800px]] | |||
[[Image: | |||
|- | |- | ||
| | | 45 | ||
| | | Publish route function | ||
| Precondition: | | Precondition: | ||
Click on the "Route Manager" section | |||
Steps: | Steps: | ||
1. Select | 1. Select a route using the checkbox | ||
2. Click | 2. Click the "Publish" button | ||
| 1. The route is selected | |||
[[Image:Publish route function step 1.jpg|800px]] | |||
2. Selected route - published | |||
[[Image: | [[Image:Publish route function step 2.jpg|800px]] | ||
|- | |- | ||
| | | 46 | ||
| | | Check Status | ||
| Precondition: | | Precondition: | ||
Click on the "Route Manager" section | |||
Steps: | Steps: | ||
1. Select | 1. Select a route | ||
2. | 2. Check "Status" | ||
| 1. The route is selected | |||
[[Image:Check Status step 1.jpg|800px]] | |||
2. The status is displayed | |||
[[Image: | [[Image:Check Status step 2.jpg|800px]] | ||
2. | |||
|- | |- | ||
| | | 47 | ||
| | | Check billable | ||
| Precondition: | | Precondition: | ||
Click on the "Route Manager" section | |||
Steps: | Steps: | ||
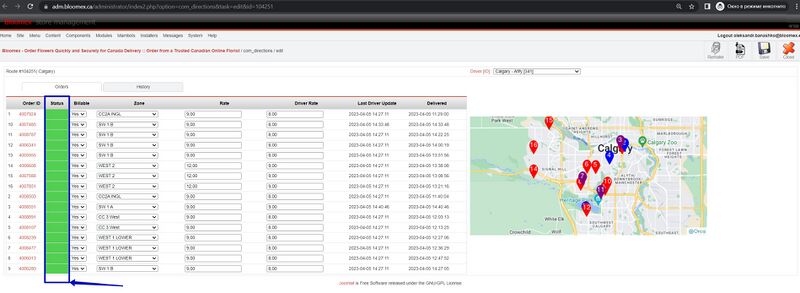
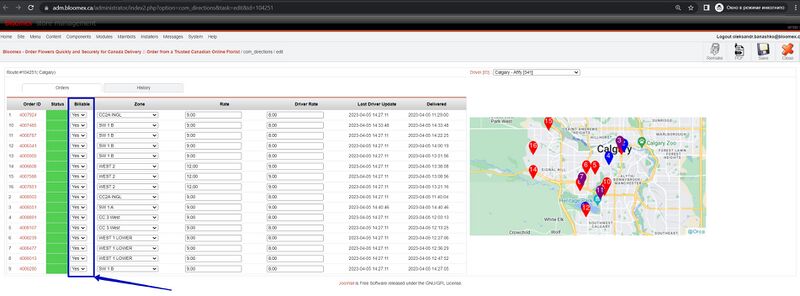
1. | 1. Select a route | ||
2. | 2. Check column "Billable" | ||
| 1. The route is selected | |||
[[Image:Check billable step 1.jpg|800px]] | |||
2. The "Billable" is displayed | |||
2. | |||
[[Image: | [[Image:Check billable step 2.jpg|800px]] | ||
|- | |- | ||
| | | 48 | ||
| | | Rates | ||
| | | Precondition: | ||
Click on the "Route Manager" section | |||
Steps: | |||
1. Select a route | |||
2. Check "Rate and Driver Rate" | |||
| 1. The route is selected | |||
[[Image:Rates step 1.jpg|800px]] | |||
2. The "Rate and Driver Rate" is displayed | |||
[[Image:Rates step 2.jpg|800px]] | |||
[[Image: | |||
|- | |- | ||
| | | 49 | ||
| | | History | ||
| Precondition: | | Precondition: | ||
Click on the "Route Manager" section | |||
Steps: | Steps: | ||
1. | 1. Select a route | ||
2. Go to the “History” tab | |||
| 1. The route is selected | |||
[[Image:History step 1.jpg|800px]] | |||
2. The change history is displayed | |||
2. | [[Image:History step 2.jpg|800px]] | ||
|- | |- | ||
| | | 50 | ||
| | | Remake function | ||
| Precondition: | | Precondition: | ||
Click on the "Route Manager" section and select a route | |||
Steps: | Steps: | ||
1. | 1. Click on the "Remake" button | ||
2. Click on | 2. Click on “ok” | ||
| 1. The "Remake" button is displayed | |||
[[Image:Remake function step 1.jpg|800px]] | |||
2. Route returned to the driver app. | |||
[[Image: | [[Image:Remake function step 2.jpg|800px]] | ||
|- | |||
| colspan="4" style="background-color:#ffffed;" | | |||
=Employees= | |||
|- | |- | ||
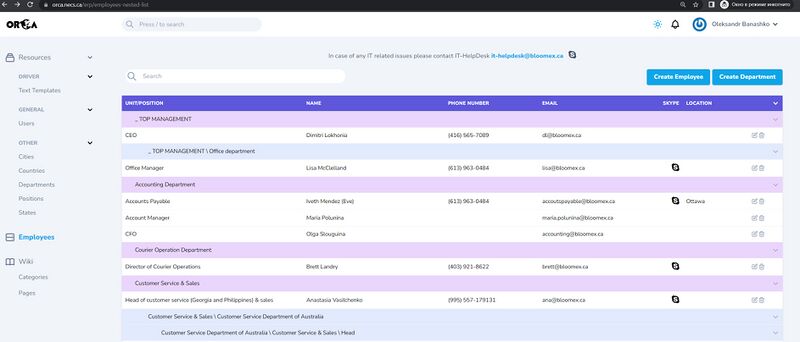
| | | 51 | ||
| | | Transition to ORCA | ||
| | | Steps: | ||
Click on the "Employees" section | |||
| The "employee's" page opened | |||
[[Image:Transition to ORCA.jpg|800px]] | |||
|- | |||
| colspan="4" style="background-color:#ffffed;" | | |||
=Manage front end users= | |||
|- | |||
| 52 | |||
| Add new user and log in with a new credentials on frontend (incognito mode) | |||
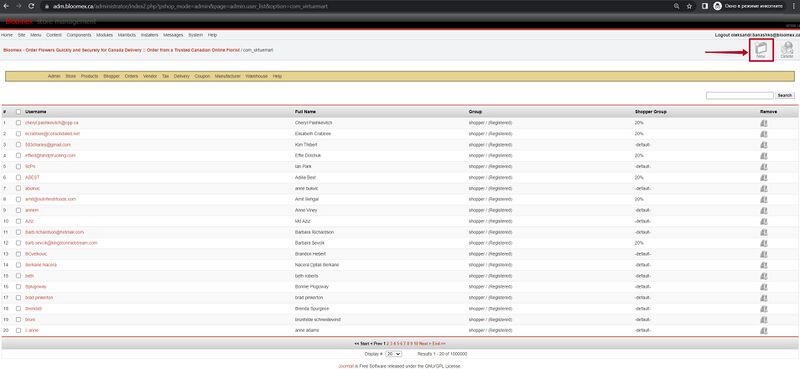
| Steps: | |||
1. Click on the "Manage Frontend Users" section | |||
2. Click on the "New" button | |||
3. Fill in the information and click the "Save" button | |||
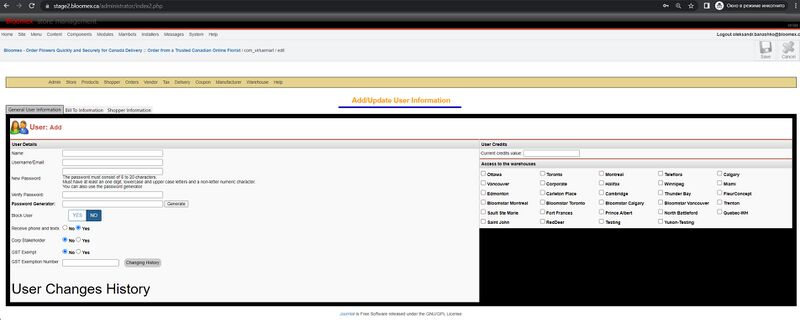
| [[Image:Add new user and log in with a new credentials on frontend step 0.jpg|800px]] | |||
1. The "Manage Frontend Users" page opened | |||
[[Image:Add new user and log in with a new credentials on frontend step 1.jpg|800px]] | |||
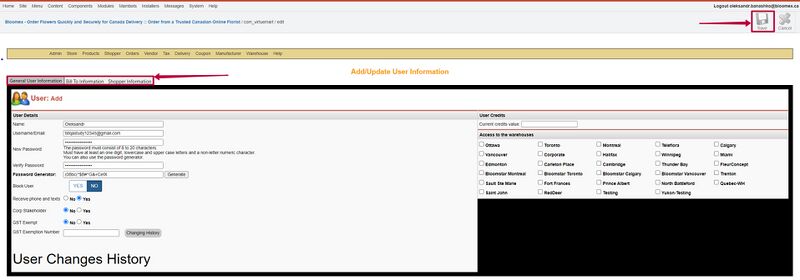
2. The "Add/Update User Information" page opened | |||
[[Image:Add new user and log in with a new credentials on frontend step 2.jpg|800px]] | |||
3. Received Message: "New User was added successfully" | |||
[[Image:Add new user and log in with a new credentials on frontend step 3.jpg|800px]] | |||
[[Image:Add new user and log in with a new credentials on frontend step 3.1.jpg|800px]] | |||
|- | |||
| 53 | |||
| Delete user | |||
| Precondition: | |||
Click on the "Manage Frontend Users" section | |||
Steps: | |||
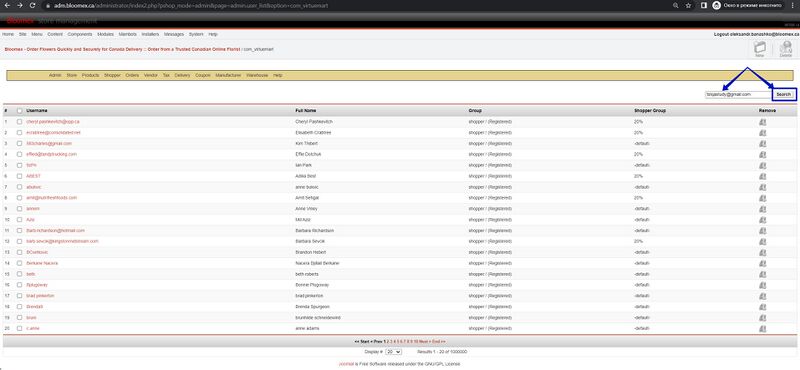
1. Enter the search field “User Name” and click on the "Search" button | |||
2. | 2. Check the checkbox next to the desired user | ||
3. Click on the "Remove" button | |||
| 1. The entered user was found | |||
[[Image: | [[Image:Delete frontend user step 1.jpg|800px]] | ||
2. A check box is displayed in front of the user | |||
2. | [[Image:Delete frontend user step 2.jpg|800px]] | ||
3. Received Message: "User(s) was deleted successfully" | |||
3. | [[Image:Delete frontend user step 3.jpg|800px]] | ||
[[Image:Delete frontend user step 3.1.jpg|800px]] | |||
|- | |||
| 54 | |||
| Change general user information | |||
| Precondition: | |||
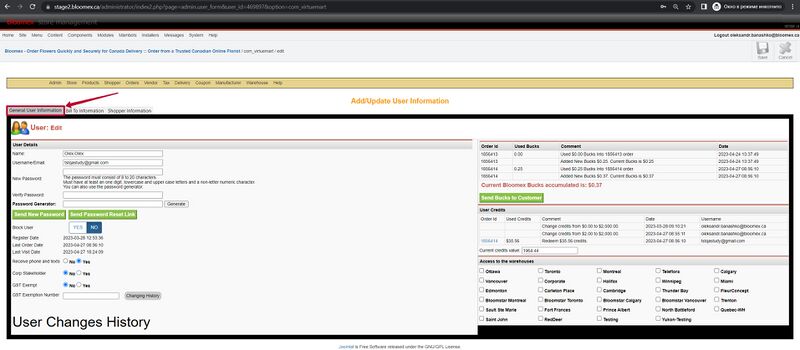
Click on the "Manage Frontend Users" section and select the user | |||
Steps: | |||
1. Select the "General User information" tab and change the required information | |||
2. Click on the "Save" button | |||
1. | | 1. The "General User information" tab is displayed | ||
[[Image:1. The General User information tab is displayed.jpg|800px]] | |||
2. | 2. Received Message: "User was updated successfully" | ||
[[Image:2. Received Message User was updated successfully.jpg|800px]] | |||
3. | [[Image:3. Received Message User was updated successfully.jpg|800px]] | ||
| | |- | ||
| 55 | |||
| Change bill to information | |||
| Precondition: | |||
Click on the "Manage Frontend Users" section and select the user | |||
Steps: | |||
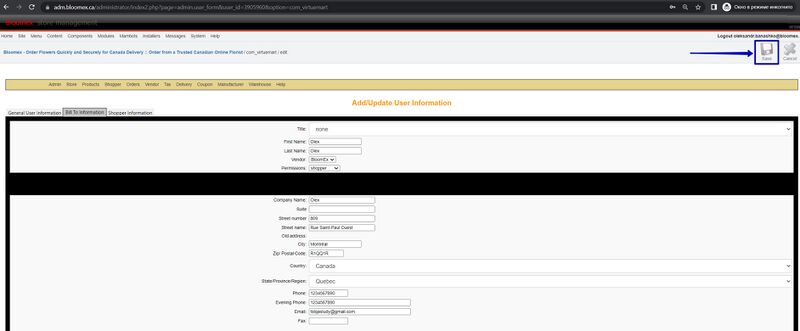
1. Select the "Bill To Information" tab and change the required information | |||
2. Click on the "Save" button | |||
1. | | 1. The "Bill To Information" tab is displayed | ||
[[Image:1. The Bill To Information tab is displayed.jpg|800px]] | |||
2. Received Message: "User was updated successfully" | |||
[[Image: | [[Image:2. Received Message User was updated successfully.jpg|800px]] | ||
[[Image:3. Received Message User was updated successfully.jpg|800px]] | |||
|- | |- | ||
| | | 56 | ||
| | | Change shopper information | ||
| | | Precondition: | ||
Click on the "Manage Frontend Users" section and select the user | |||
Steps: | |||
1. Select the "Shopper Information" tab and change the required information | |||
2. Click on the "Save" button | |||
| 1. The "Bill To Information" tab is displayed | |||
[[Image: | [[Image:53(1).jpg|800px]] | ||
2. Received Message: "User was updated successfully" | |||
| | [[Image:53(2).jpg|800px]] | ||
|- | |- | ||
| | | colspan="4" style="background-color:#ffffed;" | | ||
| | =Ship Order= | ||
|- | |||
| 57 | |||
| Find order by id | |||
| Precondition: | |||
Go to "Ship Order" section | |||
Steps: | |||
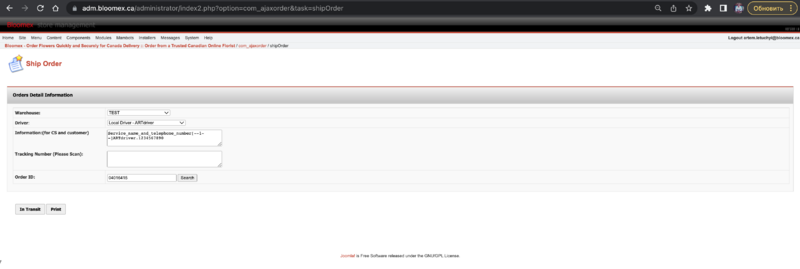
1. | 1. Fill in "Order ID" field, select warehouse and driver | ||
(example 04016415, TEST, Artdriver) | |||
2. Click on " | 2. Click on the "Search" button | ||
| 1. The " | | 1. The "Order ID" field is filled | ||
[[Image: | [[Image:54(1).png|800px]] | ||
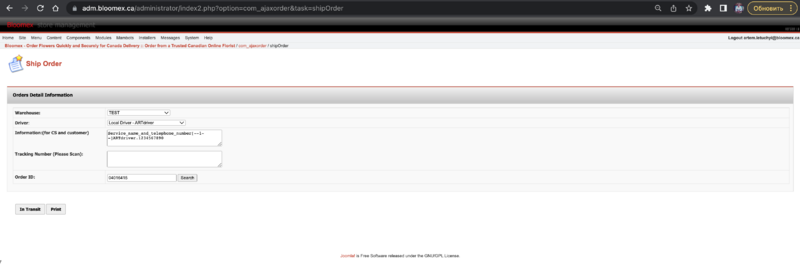
2. The | 2. The order is shown | ||
[[Image:54(2).png|800px]] | |||
|- | |||
| 58 | |||
| Transfer to transit | |||
| Precondition: | |||
example | Go to "Ship Order" section | ||
Steps: | |||
1. Fill in "Order ID" field , select warehouse and driver | |||
(example 04016415, TEST, Artdriver) | |||
2. Click on the "Search" button | |||
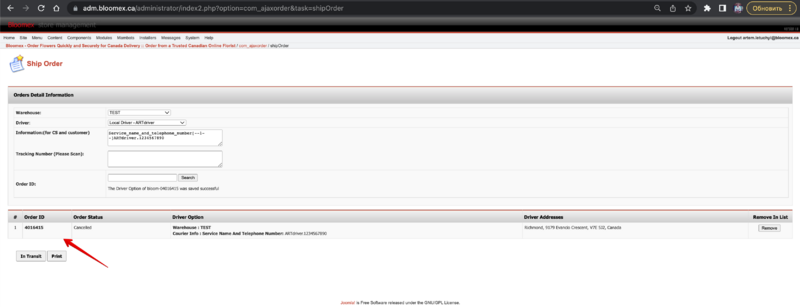
3. Click on the "In Transit" button | |||
| 1. The "Order ID" field is filled | |||
[[Image: | [[Image:55(1).png|800px]] | ||
2. The order is shown | |||
2. | [[Image:55(2).png|800px]] | ||
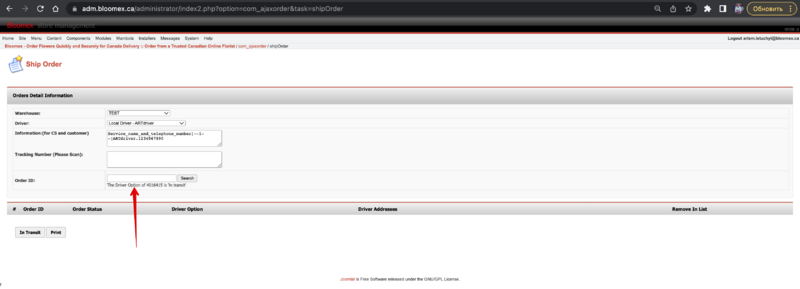
3. The "The Driver Option of 4016415 is 'in transit'" message is displayed and the order moves to the "In Transit" status | |||
[[Image: | [[Image:55(3).png|800px]] | ||
|- | |- | ||
| | | 59 | ||
| | | Prints orders preview (Ctrl+P) | ||
| | | Precondition: | ||
Go to "Ship Order" section | |||
Steps: | |||
1. Fill in "Order ID" field , select warehouse and driver | |||
(example 04016415, TEST, Artdriver) | |||
2. Click on the "Search" button | |||
3. Click on the "Print" button | |||
| 1. The "Order ID" field is filled | |||
[[Image: | [[Image:55(1).png|800px]] | ||
2. The order is shown | |||
[[Image: | [[Image:55(2).png|800px]] | ||
3. The new page is opened | |||
Steps: | [[Image:56(3).png|800px]] | ||
|- | |||
| colspan="4" style="background-color:#ffffed;" | | |||
=Driver Option Manager= | |||
|- | |||
| 60 | |||
| Create a new driver | |||
| Steps: | |||
1. | 1. Click on the "Driver Option Manager" section | ||
2. Click on the " | 2. Click on the "New" button | ||
3. | 3. Fill in the "Driver Option Detail", and click on the "Save" button | ||
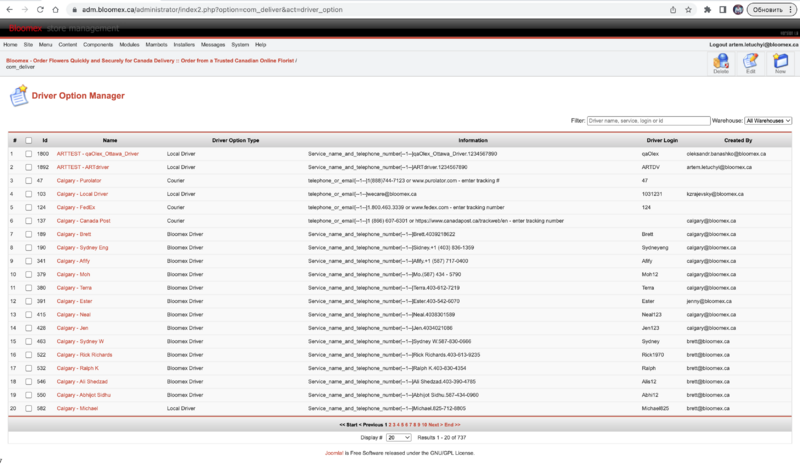
| 1. The appropriate page is opened | |||
| 1. The | |||
[[Image:57(1).png|800px]] | |||
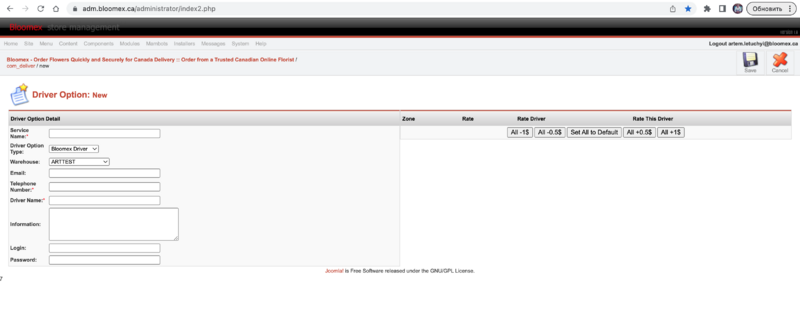
2. The page is opened and contain | 2. The page is opened and contain ("Driver Option Detail" tamplate , Zone, Rate, Rate Driver, Rate this Driver titles) | ||
[[Image:57(2).png|800px]] | |||
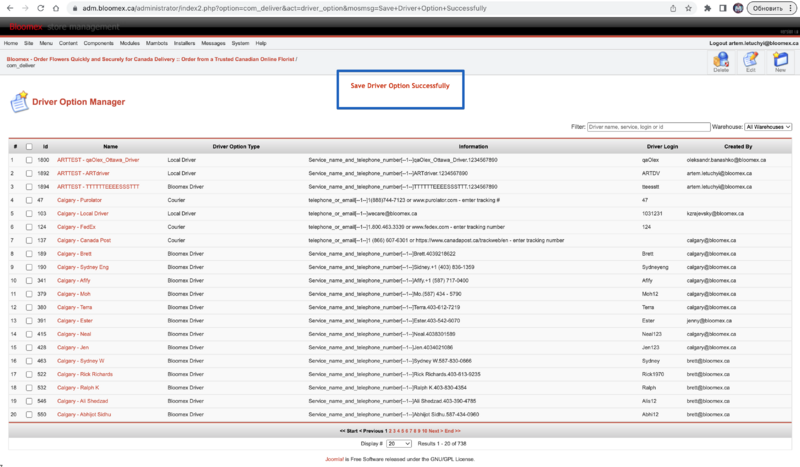
3. The " | 3. The "Save Driver Option Successfully" message is displayed | ||
[[Image:57(3).png|800px]] | |||
|- | |- | ||
| | | 61 | ||
| | | Edit driver | ||
| Precondition: | | Precondition: | ||
Go to " | Go to "Driver Option Manager" section | ||
Steps: | Steps: | ||
1. Select your " | 1. Select your "Name" checkbox | ||
2. Click on the " | 2. Click on the "Edit" button | ||
3. | 3. Change "Service Name" field | ||
4. Click on the "Save" button | |||
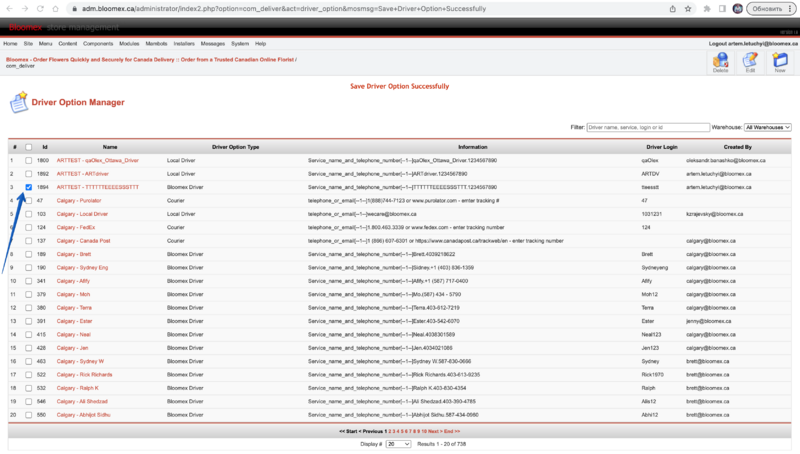
| 1. The "Name" checkbox is selected | |||
[[Image:58(1).png|800px]] | |||
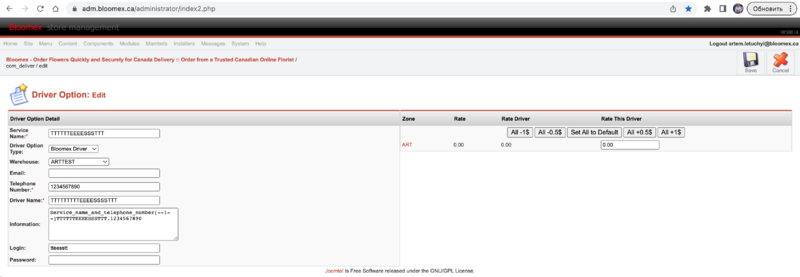
2. The page is opened and contain ("Driver Option Detail" tamplate , Zone, Rate, Rate Driver, Rate this Driver titles) | |||
[[Image:58(2).png|800px]] | |||
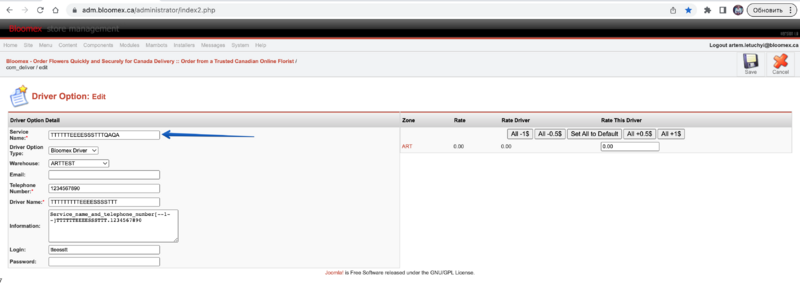
| | |||
3. The "Service Name" field is chenged | |||
| | [[Image:58(3).png|800px]] | ||
4. The "Save Driver Option Successfully" message is displayed | |||
[[Image:58(4).png|800px]] | |||
|- | |- | ||
| 62 | |||
| Delete driver | |||
| Precondition: | | Precondition: | ||
Go to " | Go to "Driver Option Manager" section | ||
Steps: | Steps: | ||
Select | 1. Select your "Name" checkbox | ||
2. Click on the "Delete" button | |||
3. Change "Service Name" field | |||
4. Click on the "Save" button | |||
| 1. The "Name" checkbox is selected | |||
1. | [[Image:59(1).png|800px]] | ||
2. | 2. The "Are you sure you want to delete selected items? " message is displayed | ||
| 1. The | [[Image:59(2).png|800px]] | ||
3. The driver is deleted | |||
[[Image:59(3).png|800px]] | |||
|- | |||
| 63 | |||
| Search by warehouse | |||
| Precondition: | |||
Go to "Driver Option Manager" section | |||
Steps: | |||
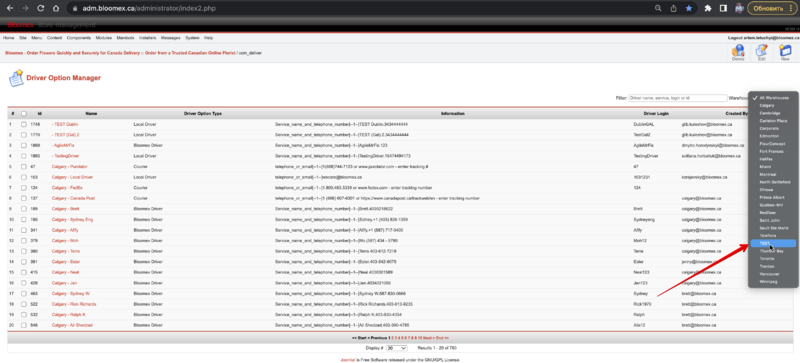
1. Click on the "All warehouses" drop-down list | |||
2. Select on the "*" warehouse | |||
(example "TEST") | |||
| 1. The drop-down list is shown | |||
[[Image:60(1).png|800px]] | |||
2. All drivers attached to this warehouse are displayed | |||
2. The window is opened and file is selected | [[Image:60(2).png|800px]] | ||
|- | |||
|- | | rowspan="4" |64 | ||
| Precondition: | | rowspan="4" |Search by filter | ||
| Precondition: | |||
Go to "Manage Users" section | |||
Go to "Driver Option Manager" section | |||
Steps: | |||
Steps: | |||
1.Click on the "Add DHL" button | |||
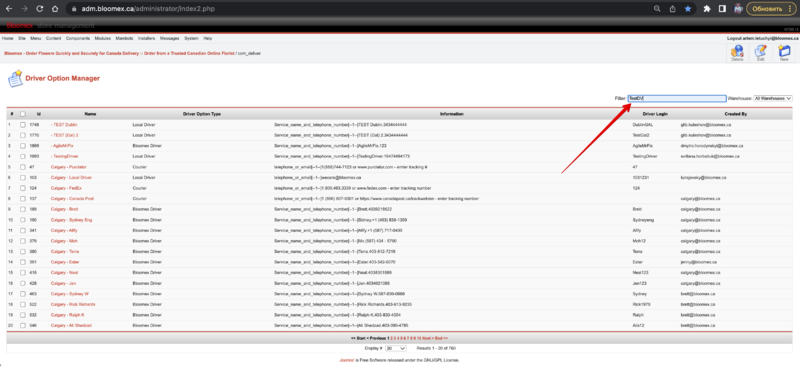
1. Fill in the Driver name in the "Filter" field | |||
2. Click on the "Upload" button and click "save" button | |||
(example TestDV) | |||
| 1. The new page is opened | |||
2. Click on the "Enter" button | |||
[[Image:The new page is opened.png|800px]] | |||
|1. The "Filter" field is filled in | |||
[[Image:61(1).png|800px]] | |||
2. The driver is shown | |||
[[Image:61(2).png|800px]] | |||
|- | |||
|Precondition: | |||
Go to "Driver Option Manager" section | |||
Steps: | |||
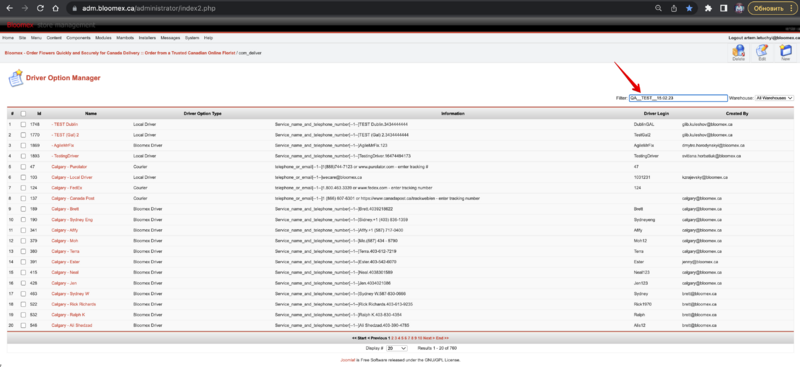
1. Fill in Service the "Filter" field | |||
(example QA__TEST__15.02.23) | |||
2. Click on the "Enter" button | |||
|1. The "Service" field is filled in | |||
[[Image:61(3).png|800px]] | |||
2. The driver is shown | |||
[[Image:61(4).png|800px]] | |||
|- | |||
|Precondition: | |||
Go to "Driver Option Manager" section | |||
Steps: | |||
1. Fill in login the "Filter" field | |||
(example TestDV) | |||
2. Click on the "Enter" button | |||
|1. The "Filter" field is filled in | |||
[[Image:61(4).png|800px]] | |||
2. The driver is shown | |||
[[Image:61(4).png|800px]] | |||
|- | |||
|Precondition: | |||
Go to "Driver Option Manager" section | |||
Steps: | |||
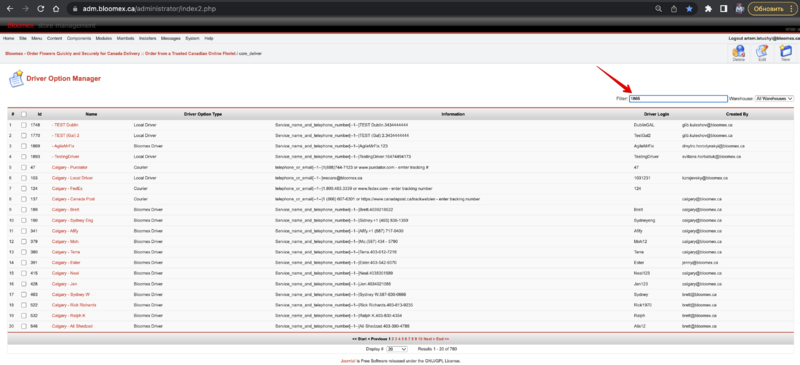
1. Fill in ID the "Filter" field | |||
(example 1865) | |||
2. Click on the "Enter" button | |||
|1. The "Filter" field is filled in | |||
[[Image:61(7).png|800px]] | |||
2. The driver is shown | |||
[[Image:61(8).png|800px]] | |||
|- | |||
| colspan="4" style="background-color:#ffffed;" | | |||
=Manage Coupons= | |||
|- | |||
| 65 | |||
| Creation new coupon | |||
| Steps: | |||
1. Click on the "Manage Coupons" section | |||
2. Click on the "New" button | |||
3. Fill in the "New Coupon" tamplete, and click on the "Save" button | |||
| 1. The appropriate page is opened | |||
[[Image:62(1).png|800px]] | |||
2. The page is opened and contain atributes "New Coupon" tamplate | |||
[[Image:62(2).png|800px]] | |||
3. The Coupon is added | |||
[[Image:62(3).png|800px]] | |||
|- | |||
| 66 | |||
| Search | |||
| Precondition: | |||
Go to "Manage Users" section | |||
Steps: | |||
1. Fill in the "Search" field | |||
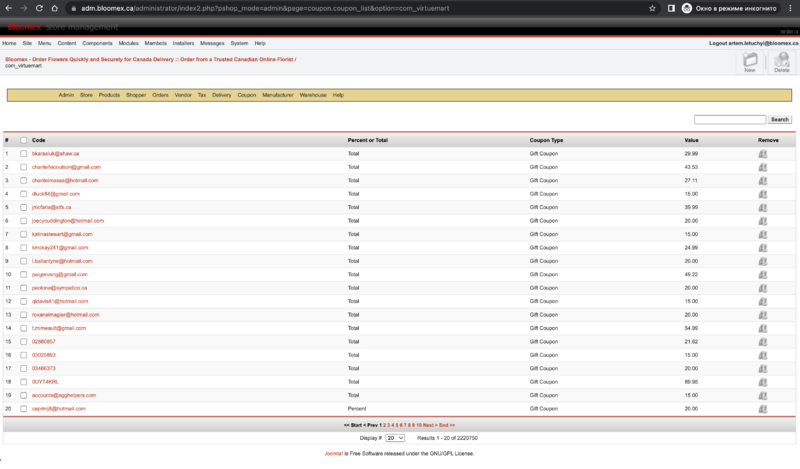
Example "QAQAQAQA10" | |||
2. Click on the "Search" button | |||
| 1. The "Search" field is filled in | |||
[[Image:63(1).png|800px]] | |||
2. The coupon name is displayed | |||
[[Image:63(2).png|800px]] | |||
|- | |||
| 67 | |||
| Edit coupon | |||
| Precondition: | |||
Go to "Manage Coupons" section | |||
Steps: | |||
1. Fill in the "Search" field and click on the "Search" button | |||
2. Click on the "Code" button | |||
Example (QAQAQAQA10) | |||
3. Edit coupon and click on the "Save" button | |||
| 1. The coupon name is displayed | |||
[[Image:64(1).png|800px]] | |||
2. The update coupon tamplate is displayed | |||
[[Image:64(2).png|800px]] | |||
3. The Coupon is updated | |||
|- | |||
| 68 | |||
| Delete coupon | |||
| Precondition: | |||
Go to "Manage Coupons" section | |||
Steps: | |||
1. Fill in the "Search" field and click on the "Search" button | |||
2. Select "Code" checkbox | |||
3. Click on the "Delete" button | |||
4. Click on the "Yes" button | |||
| 1. The coupon name is displayed | |||
[[Image:65(1).png|800px]] | |||
2. The "Code" checkbox is selected | |||
[[Image:65(2).png|800px]] | |||
3. The "Are you sure you want to delete selected items?" message is displayed | |||
[[Image:65(3).png|800px]] | |||
4. The coupon is deleted | |||
[[Image:65(4).png|800px]] | |||
|- | |||
| colspan="4" style="background-color:#ffffed;" | | |||
=View Reports= | |||
|- | |||
| 69 | |||
| View report result on screen | |||
| Steps: | |||
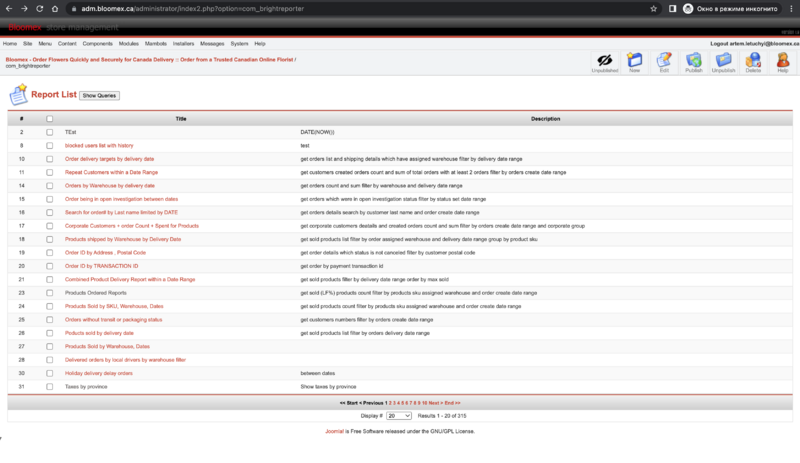
1. Click on the "View Reports" section | |||
2. Click on the Title name | |||
Example (blocked users list with history) | |||
3. Click on the "Show Report on Screen" button | |||
| 1. The appropriate page is opened | |||
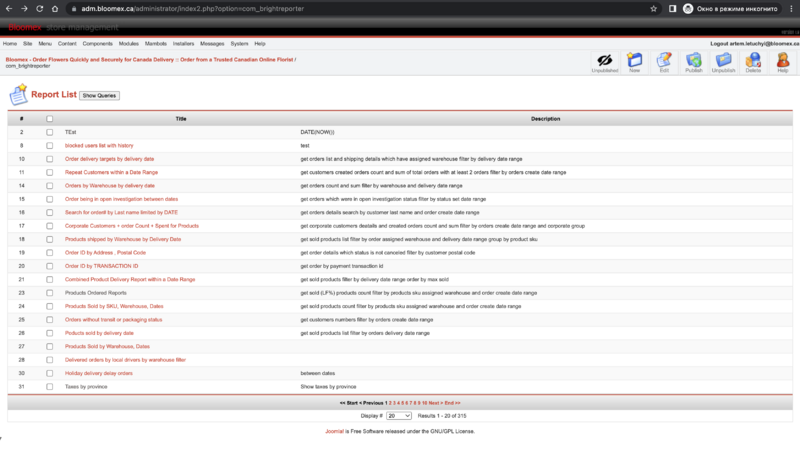
[[Image:66(1).png|800px]] | |||
2. The page is opened and contain ("Show Report on Screen" , "Export Report to MS Excel", "Export Report to Google Sheet", "Show Report on Screen with Explane" buttons) | |||
[[Image:66(2).png|800px]] | |||
3. The page with table about bloked users is opened | |||
[[Image:66(3).png|800px]] | |||
|- | |||
| 70 | |||
| View report result in Excel | |||
| Steps: | |||
1. Click on the "View Reports" section | |||
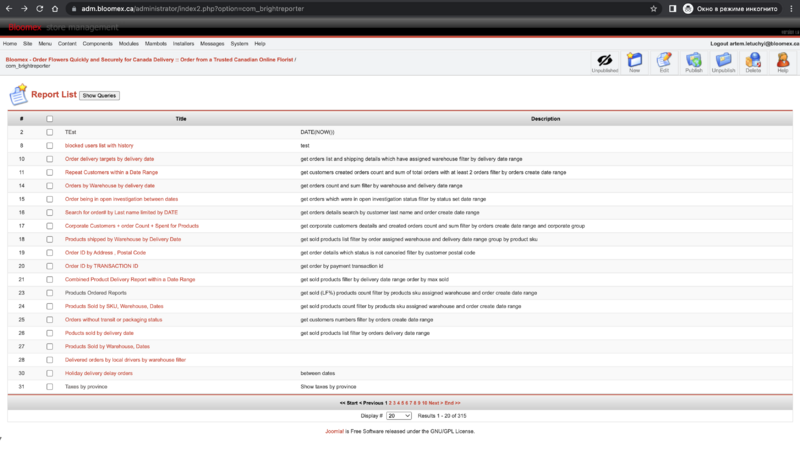
2. Click on the Title name | |||
Example (blocked users list with history) | |||
3. Click on the "Export Report to MS Excel" button | |||
| 1. The appropriate page is opened | |||
[[Image:67(1).png|800px]] | |||
2. The page is opened and contain ("Show Report on Screen" , "Export Report to MS Excel", "Export Report to Google Sheet", "Show Report on Screen with Explane" buttons) | |||
[[Image:67(2).png|800px]] | |||
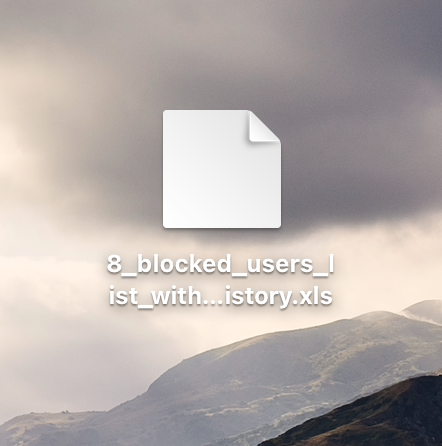
3. The file is downloaded on your pc | |||
[[Image:67(3).png|800px]] | |||
|- | |||
| 71 | |||
| View report result on screen (with Explain) | |||
| Steps: | |||
1. Click on the "View Reports" section | |||
2. Click on the Title name | |||
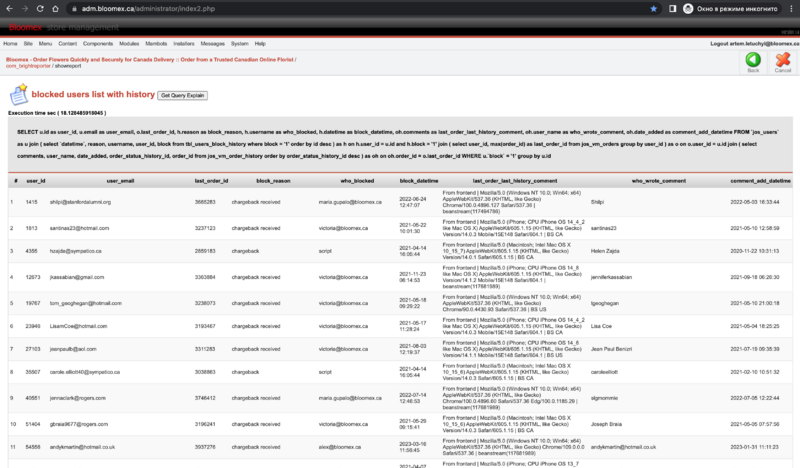
Example (blocked users list with history) | |||
3. Click on the "Show Report on Screen with Explane" button | |||
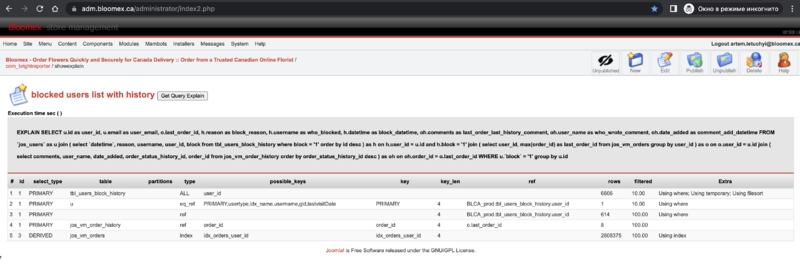
| 1. The appropriate page is opened | |||
[[Image:68(1).png|800px]] | |||
2. The page is opened and contain ("Show Report on Screen" , "Export Report to MS Excel", "Export Report to Google Sheet", "Show Report on Screen with Explane" buttons) | |||
[[Image:68(2).png|800px]] | |||
3. The page is opened | |||
[[Image:68(3).png|800px]] | |||
|- | |||
| 72 | |||
| Create report | |||
| Steps: | |||
1. Click on the "New" button | |||
2. Fill in fields and click on the "Save" button | |||
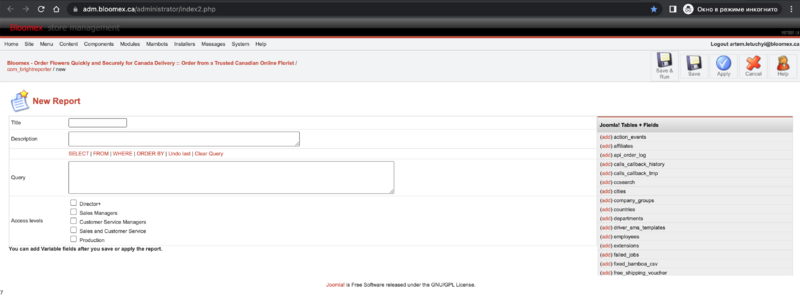
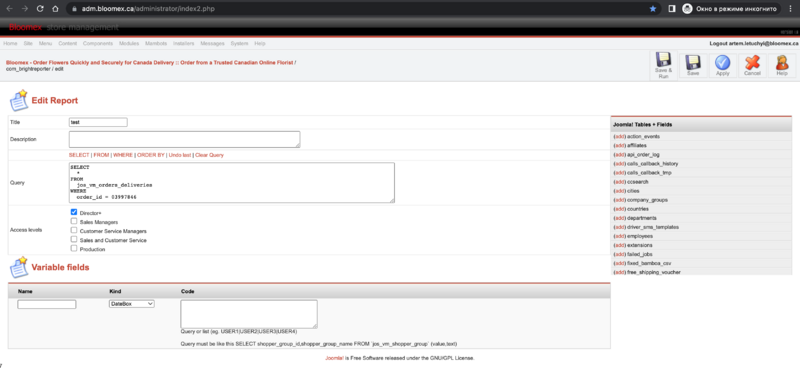
| 1. The new browser tab is opened and contain (New report and Joomla! Tables + Fields templates) | |||
[[Image:69(1).png|800px]] | |||
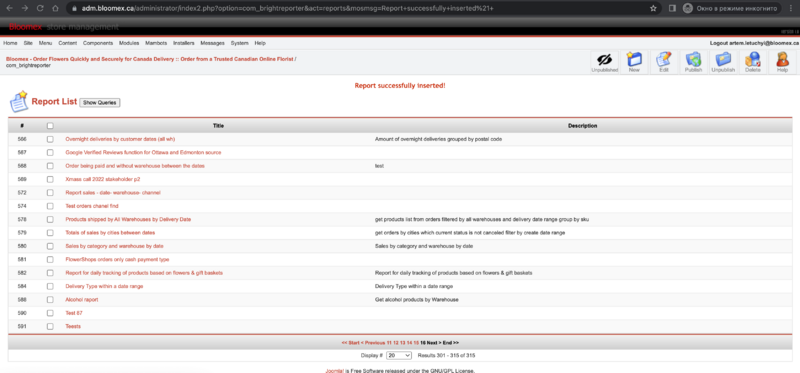
2. The "Report successfully inserted!" message is displayed and report is added | |||
[[Image:69(2).png|800px]] | |||
|- | |||
| 73 | |||
| Edit report | |||
| Steps: | |||
1. Select checkbox and click on the "Edit" button | |||
2. Edit and click on the "Save" button | |||
| 1. The new browser tab is opened and contain (New report and Joomla! Tables + Fields templates) | |||
[[Image:70(1).png|800px]] | |||
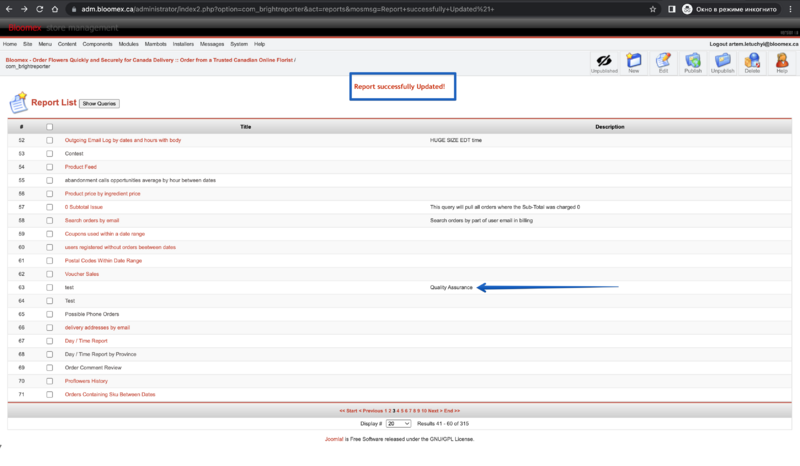
2. The "Report successfully inserted!" message is displayed and report is edited | |||
[[Image:70(2).png|800px]] | |||
|- | |||
| 74 | |||
| Publish report | |||
| Steps: | |||
Select checkbox and click on the "Publish" button | |||
| The page is refreshed and the title becomes red | |||
[[Image:71(1).png|800px]] | |||
|- | |||
| 75 | |||
| Unpublish report | |||
| Steps: | |||
Select checkbox and click on the "Unpublish" button | |||
| The page is refreshed and the title becomes gray | |||
[[Image:72(1).png|800px]] | |||
|- | |||
| 76 | |||
| Delete report | |||
| Steps: | |||
1. Select checkbox and click on the "Delete" button | |||
2. Click on "OK" button | |||
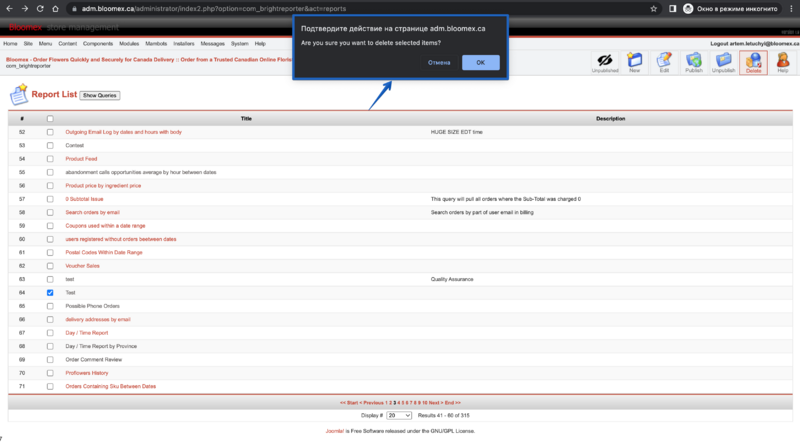
| 1. The "Are you sure you want to delete selected items? "message is displayed | |||
[[Image:73(1).png|800px]] | |||
2. The report is deleted | |||
|- | |||
| colspan="4" style="background-color:#ffffed;" | | |||
=Exteneded Reports= | |||
|- | |||
| 77 | |||
| View report result on the screen | |||
| Steps: | |||
1. Click on the report name | |||
2. Fill in fields and click on the "Show report on Screen" button | |||
example (29 -30 , vancouver) | |||
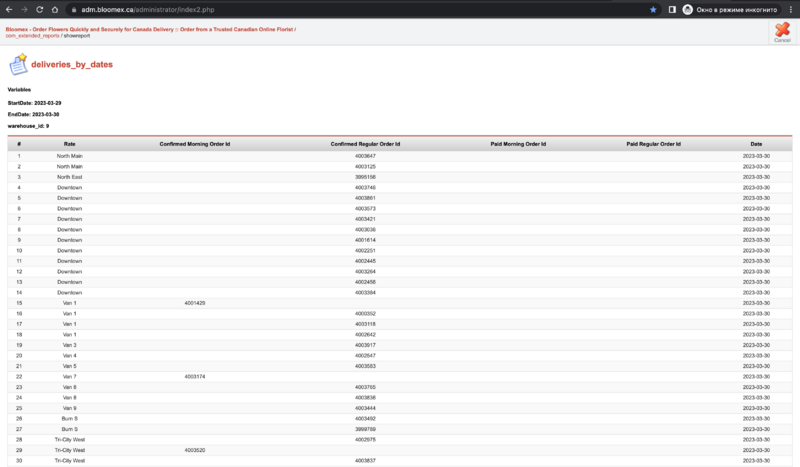
| 1. The appropriate page is opened | |||
[[Image:76(1).png|800px]] | |||
2. The fields are filled in and page with result is opened | |||
[[Image:76(2).png|800px]] | |||
|- | |||
| 78 | |||
| View report result in Excel | |||
| Steps: | |||
1. Click on the report name | |||
2. Fill in fields and click on the "Show report on Screen" button | |||
example (29 -30 , vancouver) | |||
| 1. The appropriate page is opened | |||
[[Image:77(1).png|800px]] | |||
2. The excel file is downloaded on pc | |||
|- | |||
|colspan="4" style="background-color:#ffffed;" | | |||
=Manage Users= | |||
|- | |||
| 79 | |||
| Create user | |||
| Steps: | |||
1. Click on the "Manage Users" section | |||
2. Click on the "New" button | |||
3. Fill in the "User Details" tamplete, and click on the "Save" button | |||
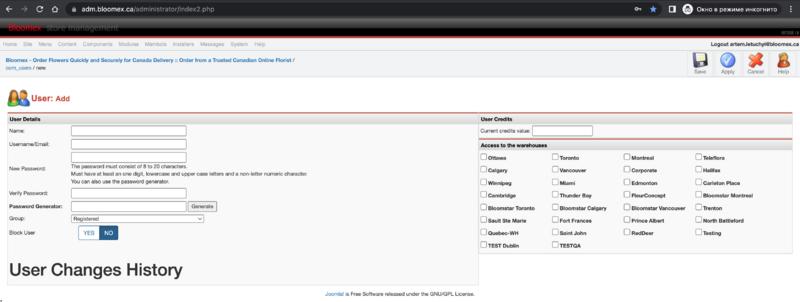
| 1. The appropriate page is opened | |||
[[Image:79(1).png|800px]] | |||
2. The page is opened and contain atributes (user details tamplate , User credits tamplate, Access to the warehouses tamplate) | |||
[[Image:79(2).png|800px]] | |||
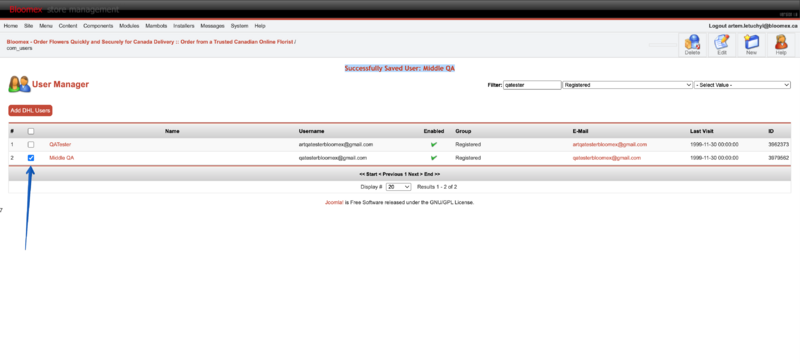
3. The "Successfully Saved User: Middle QA" message is displayed and new user is created | |||
[[Image:79(3).png|800px]] | |||
|- | |||
| 80 | |||
| Edit user | |||
| Precondition: | |||
Go to "Manage Users" section | |||
Steps: | |||
1. Select your "User Group" checkbox | |||
2. Click on the "Edit" button | |||
3. Select "Vancouver" checkbox | |||
4. Click on the "Save" button | |||
| 1. The your "User" checkbox is selected | |||
[[Image:The your User checkbox is selected.png|800px]] | |||
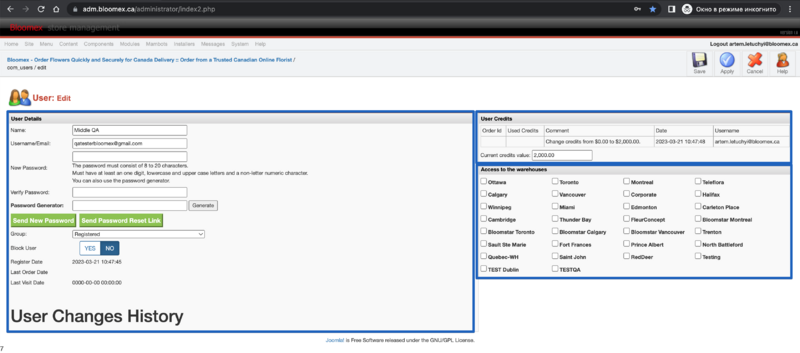
2. The page is opened and contain atributes (user details tamplate , User credits tamplate, Access to the warehouses tamplate) | |||
[[Image: The page is opened and contain atributes (user details tamplate , User credits tamplate, Access to the warehouses tamplate).png|800px]] | |||
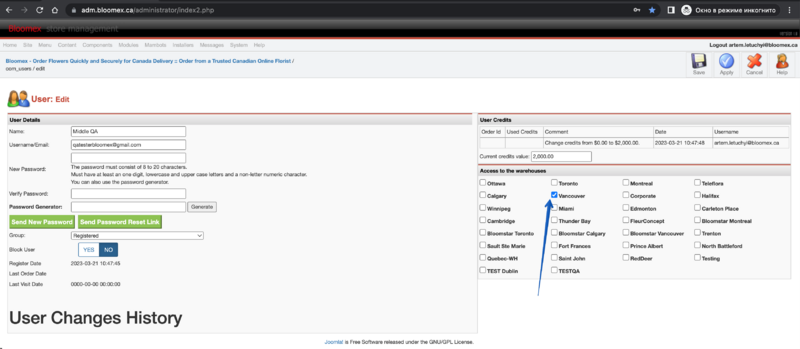
3. The "Vancouver" checkbox is selected | |||
[[Image: The Vancouver checkbox is selected.png|800px]] | |||
4. The "Successfully Saved User: Middle QA" message is displayed and user is edited | |||
|- <span id="About deleting the account (manage user)"></span> | |||
| 81 | |||
| Delete user | |||
| Precondition: | |||
Go to "Manage Users" section | |||
Steps: | |||
1. Select your "User" checkbox | |||
2. Click on the "Delete" button | |||
3. Click on the "OK" button | |||
| 1. The your "User" checkbox is selected | |||
2. The "Are you sure you want to delete selected items? " message is displayed | |||
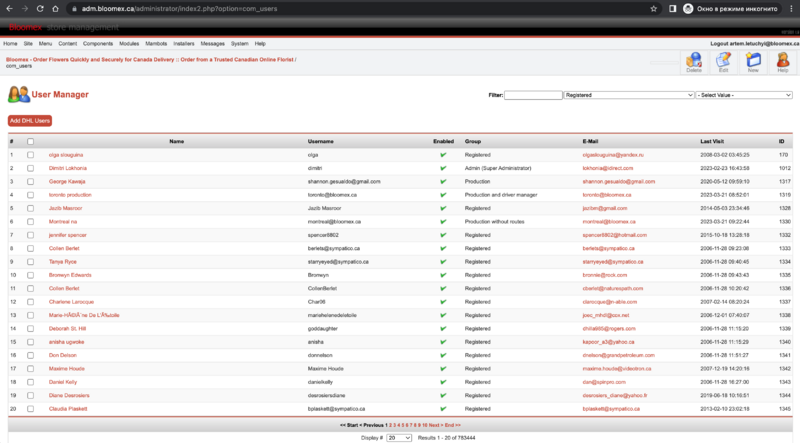
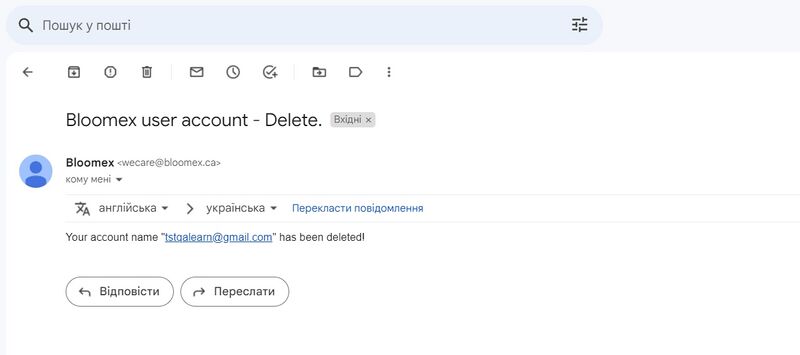
3. The User Group is deleted and a deletion letter was sent to the mail | |||
[[Image:Bloomex user account - Delete.jpg|800px]] | |||
|- | |||
| rowspan="3" | 82 | |||
| rowspan="3" | Filters | |||
| Preconditions | |||
Go to "Manage Users" section | |||
Steps: | |||
Fill in User name in "Filter" field and click on the enter | |||
| The "Filter" field is filled in and your user is displayed | |||
[[Image:The Filter field is filled in and your user is displayed.png|800px]] | |||
|- | |||
| Precondition: | |||
Go to "Manage Users" section | |||
Steps: | |||
Select any option in first dropdown list | |||
(example "Email group") | |||
| The Email group is selected and filtered users are displayed | |||
[[Image:The Email group is selected and filtered users are displayed.png|800px]] | |||
|- | |||
| Precondition: | |||
Go to "Manage Users" section | |||
Steps: | |||
Select any option in second dropdown list | |||
(example "Full Menus") | |||
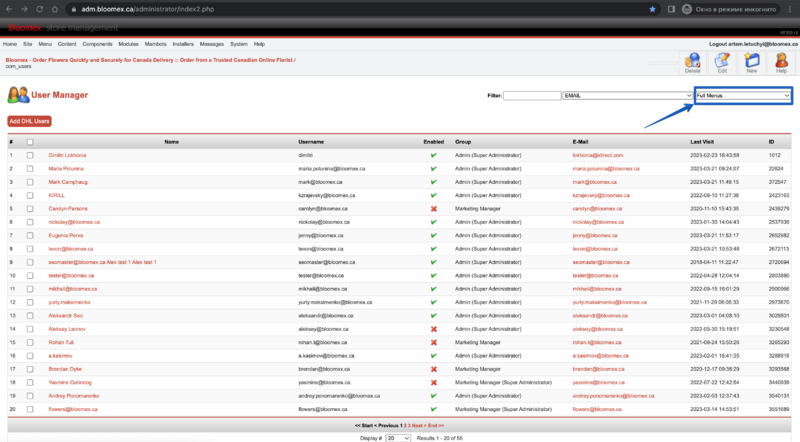
| The Full Menus is selected and filtered users are displayed | |||
[[Image:The Full Menus is selected and filtered users are displayed.png|800px]] | |||
|- | |||
| rowspan="2" | 83 | |||
| rowspan="2" | Add DHL user | |||
| Precondition: | |||
Go to "Manage Users" section | |||
Steps: | |||
1. Click on the "Add DHL" button | |||
2. Click on the "Choose file" button and select file | |||
| 1. The new page is opened | |||
[[Image:The new page is opened.png|800px]] | |||
2. The window is opened and file is selected | |||
[[Image:The window is opened and file is selected.png|800px]] | |||
|- | |||
| Precondition: | |||
Go to "Manage Users" section | |||
Steps: | |||
1.Click on the "Add DHL" button | |||
2. Click on the "Upload" button and click "save" button | |||
| 1. The new page is opened | |||
[[Image:The new page is opened.png|800px]] | |||
2. The window is opened and file is saved | |||
|- | |||
| colspan="4" style="background-color:#ffffed;" | | |||
=User Group Manager= | |||
|- | |||
| rowspan="2" | 84 | |||
| rowspan="2" | Create user group | |||
| Steps: | |||
1. Click on the User Group Manager" section | |||
2. Click on the "New" button | |||
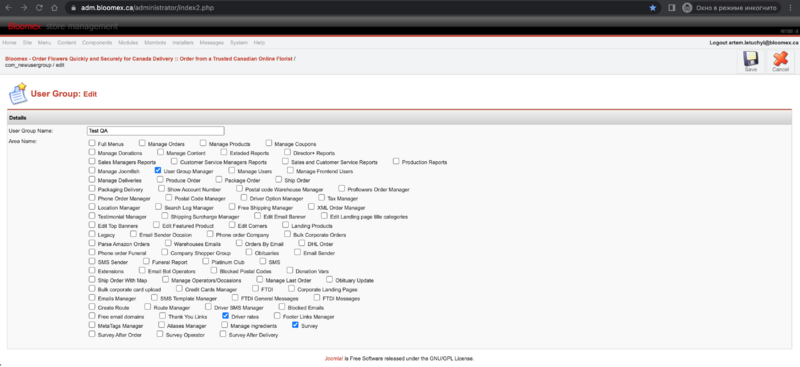
3. Fill in the "User Group Name" field, select checkboxes and click on the "Save" button | |||
(Example "Test QA" name, "User Group Manager", "Driver Rates", "Survey" checkboxes) | |||
| 1. The appropriate page is opened | |||
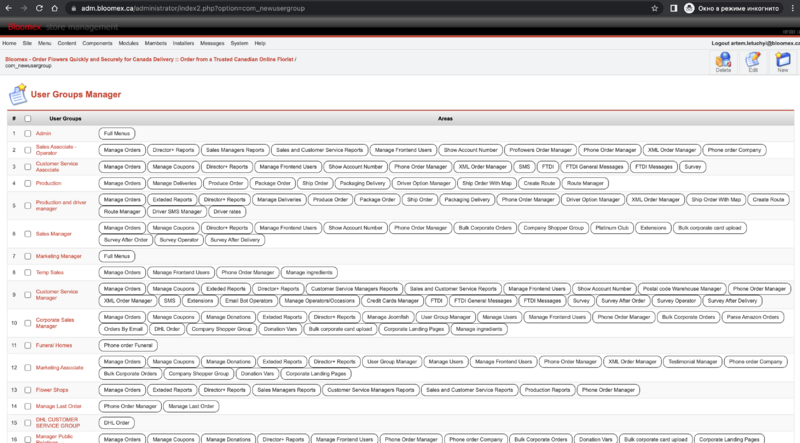
[[Image:84(1).png|800px]] | |||
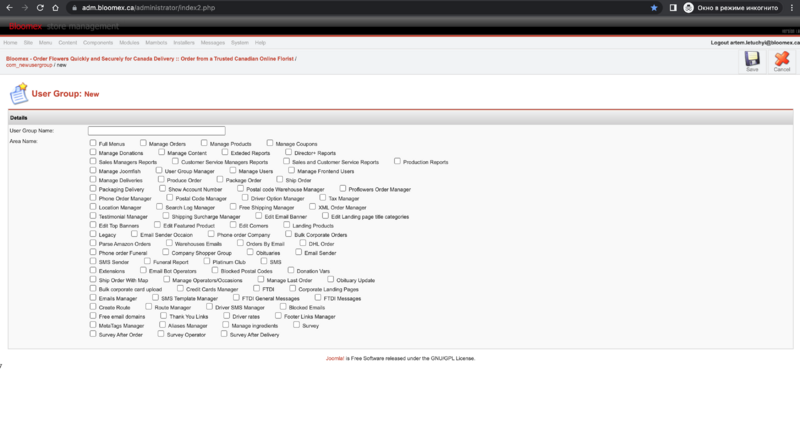
2. The page is opened and contain atributes("User Group Name" field , Area Name checkboxses, "Save","Cancel" buttons) | |||
[[Image:84(2).png|800px]] | |||
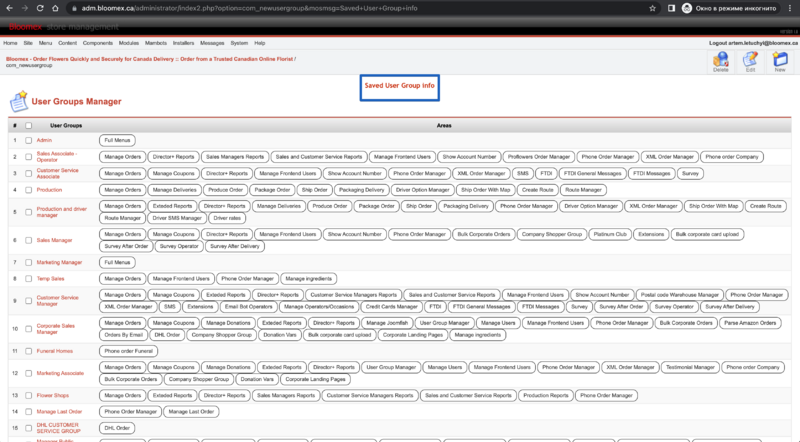
3. The "User Group Name" field is filled in, the checkboxes is selected and the "Saved User Group info" message is displayed | |||
[[Image:84(3).png|800px]] | |||
|- | |||
| Steps: | |||
1. Click on the "User Group Manager" section | |||
2. Click on the "New" button | |||
3. Click on the "Cancel" button | |||
| 1. The appropriate page is opened | |||
2. The page is opened and contain atributes("User Group Name" field , Area Name checkboxses, "Save","Cancel" buttons) | |||
3. The appropriate page is opened | |||
|- | |||
| 85 | |||
| Edit user group | |||
| Precondition: | |||
Go to "User Group Manager" section | |||
Steps: | |||
1. Select your "User Group" checkbox | |||
2. Click on the "Edit" button | |||
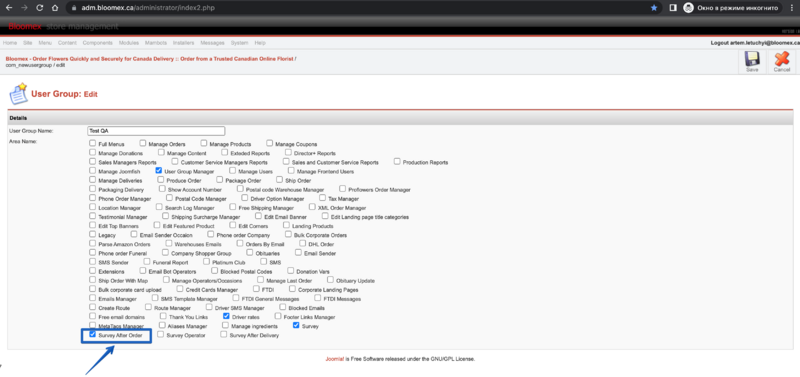
3. Select "Survay After Order" checkbox | |||
4. Click on the "Save" button | |||
|1. The your "User Group" checkbox is selected | |||
[[Image:85(1).png|800px]] | |||
2. The page is opened and contain atributes("User Group Name" field , Area Name checkboxses, "Save","Cancel" buttons) | |||
[[Image:85(2).png|800px]] | |||
3. The "Survey After Order" checkbox is selected | |||
[[Image:85(3).png|800px]] | |||
4. The "Saved User Group info" message is displayed | |||
|- | |||
|86 | |||
|Delete user group | |||
|Precondition: | |||
Go to "User Group Manager" section | |||
Steps: | |||
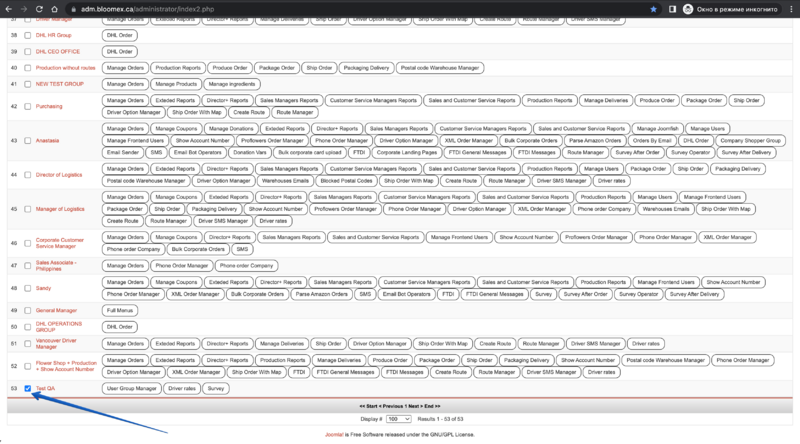
1. Select your "User Group" checkbox | |||
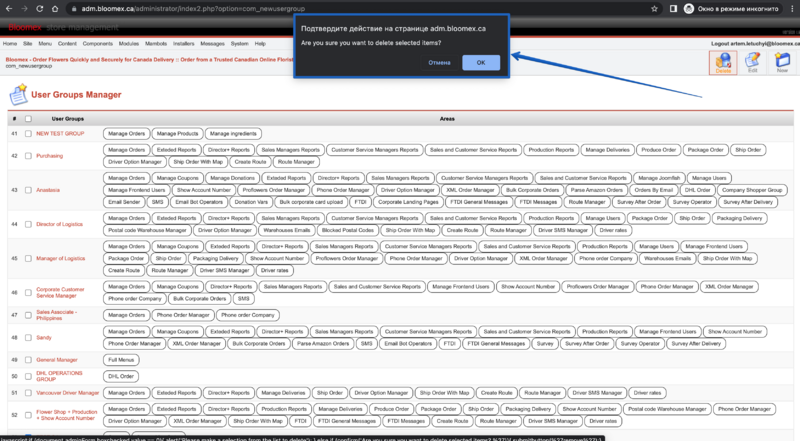
2. Click on the "Delete" button | |||
3. Click on the "OK" button | |||
|1. The your "User Group" checkbox is selected | |||
[[Image:86(1).png|800px]] | |||
2. The "Are you sure you want to delete selected items? " message is displayed | |||
[[Image:86(2).png|800px]] | |||
3. The User Group is deleted | |||
|- | |||
| 87 | |||
| User group rights | |||
| Precondition: | |||
Go to "User Group Manager" section | |||
Steps: | |||
1. Click the "New" button and create a new user, select rights - by checking the box | |||
2. Go to the "Manage User" section and select the created group | |||
3. View the rights available to the user | |||
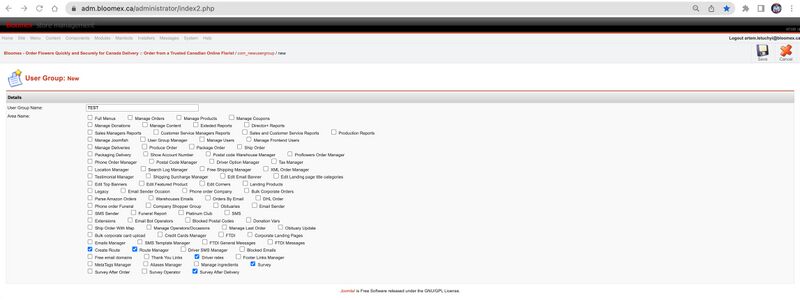
| 1. The "Create route" "Route Manager" "Driver rates" "Survey" and "Survey After Delivery" checkbox is selected | |||
[[Image:User group manager.png.jpg|800px]] | |||
2. The user is selected and the group is added in "Manage Users" section | |||
[[Image:User manager rights.jpg|800px]] | |||
3. Only the rights that have been selected for this group are displayed | |||
[[Image:User logout.jpg|800px]] | |||
|- | |||
| colspan="4" style="background-color:#ffffed;" | | |||
=Postal Code Warehouse Manager= | |||
|- | |||
| rowspan="3" |88 | |||
| rowspan="3" |Create postal code | |||
| Precondition: | |||
Go to "Postal Code Warehouse manager" section | |||
Steps: | |||
1. Click on the "New" button | |||
2. Fill in all fields and click on the "Save" button | |||
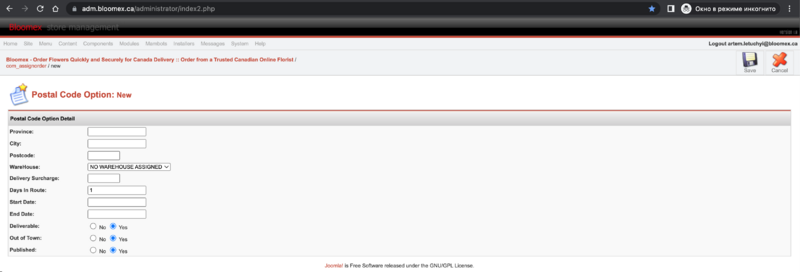
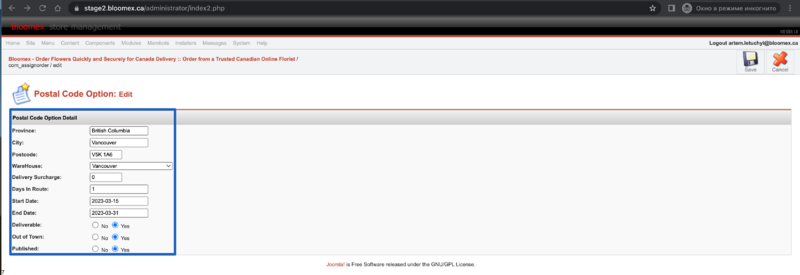
|1.The page with template is opened | |||
[[Image:88(1).png|800px]] | |||
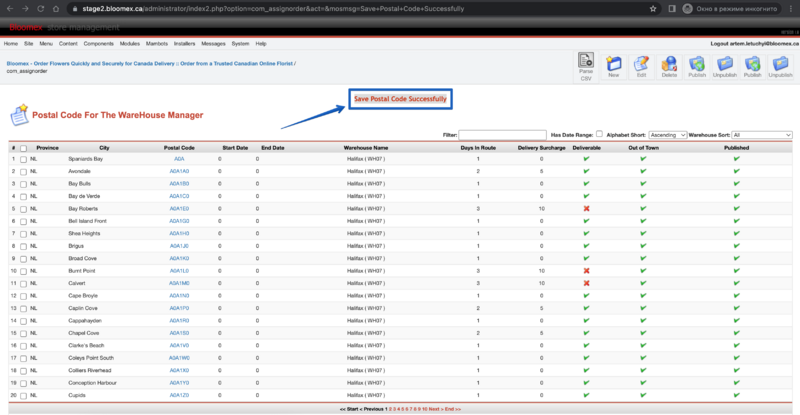
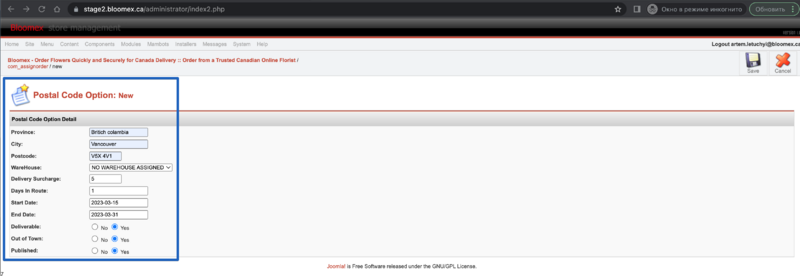
2. All fields are filled in and the "Save Postal Code Successfully" message and Postal Code is added | |||
[[Image:88(2).png|800px]] | |||
|- | |||
|Precondition: | |||
Go to "Postal Code Warehouse manager" section | |||
Steps: | |||
1. Click on the "New" button | |||
2. Fill in all fields, except "Warehouse" field | |||
3. Click on the "Save" button | |||
|1.The page with template is opened | |||
[[Image:88(3).png|800px]] | |||
2. All fields are filled, except "Warehouse" field | |||
[[Image:88(4).png|800px]] | |||
3. The Postal code is added with "no warehouse assigned" warehouse name | |||
[[Image:88(4).png|800px]] | |||
|- | |||
|Precondition: | |||
Go to "Postal Code Warehouse manager" section | |||
Steps: | |||
1. Click on the "New" button | |||
2. Fill in all fields and click on the "Cancel" button | |||
| 1.The page with template is opened | |||
2. The "Postal Code Warehouse manager" page is opened and Postal Code is not added | |||
|- | |||
| rowspan="3" |89 | |||
| rowspan="3" |Edit postal code option page | |||
| Precondition: | |||
Go to "Postal Code Warehouse manager" section | |||
Find your Postal Code | |||
Steps: | |||
1. Click on the your "Postal Code" checkbox | |||
2. Click on the "Edit" button | |||
3. Edit information and click on the "Save" button | |||
|1. The checkbox is selected | |||
[[Image:89(1).png|800px]] | |||
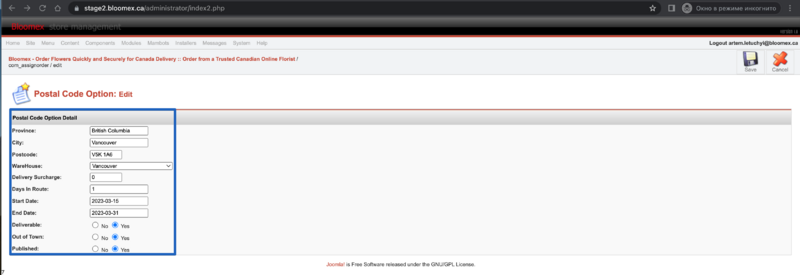
2. The page with template is opened | |||
[[Image:89(2).png|800px]] | |||
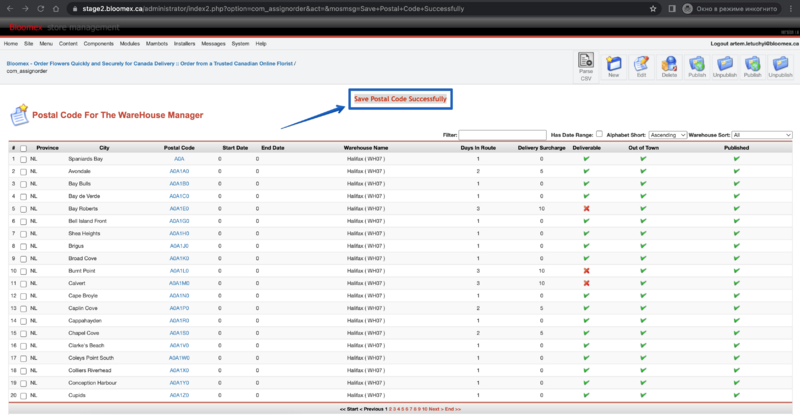
3. The postal code is edited and the "Save Postal Code Successfully" message is displayed | |||
[[Image:89(3).png|800px]] | |||
|- | |||
|Precondition: | |||
Go to "Postal Code Warehouse manager" section | |||
Steps: | |||
Click on the "Edit" button | |||
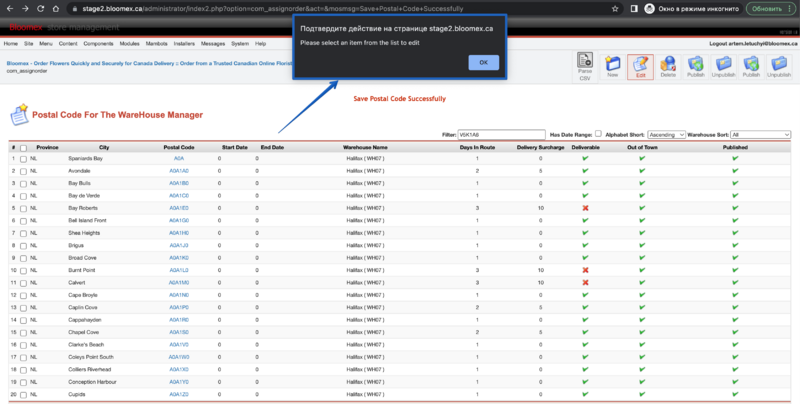
|The "Please select an item from the list to edit" message is displayed | |||
[[Image:89(4).png|800px]] | |||
|- | |||
|Precondition: | |||
Go to "Postal Code Warehouse manager" section | |||
Find your Postal Code | |||
Steps: | |||
1. Click on the your "Postal Code" checkbox | |||
2. Click on the "Edit" button | |||
3. Edit information and click on the "Cancel" button | |||
|1. The checkbox is selected | |||
[[Image:89(5).png|800px]] | |||
2. The page with template is opened | |||
[[Image:89(6).png|800px]] | |||
3. The "Postal Code Warehouse manager" page is opened and Postal Code is not edited | |||
|- | |||
| 90 | |||
| Publish postal code | |||
| Precondition: | |||
Go to "Postal Code Warehouse manager" section | |||
Find your Postal Code | |||
Steps: | |||
1. Click on the your Postal Code | |||
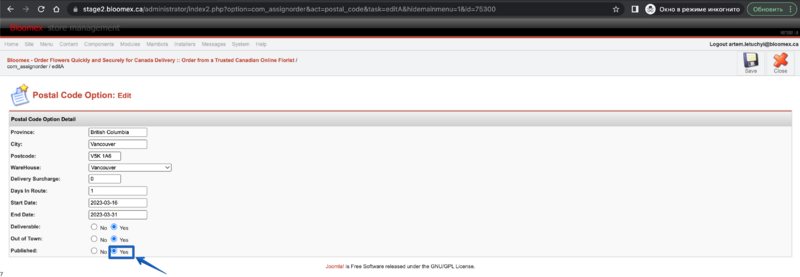
2. Select "Yes" published radio button | |||
3. Click on the "Save" button | |||
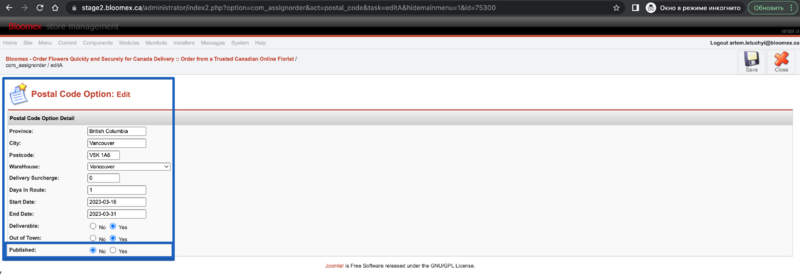
|1.The page with template is opened | |||
[[Image:90(1).png|800px]] | |||
2. The "Yes" published radio button is selected | |||
[[Image:90(2).png|800px]] | |||
3. Postal code is published and the "Save Postal Code Successfully" message is displayed | |||
|- | |||
|91 | |||
|Unpublish postal code | |||
|Precondition: | |||
Go to "Postal Code Warehouse manager" section | |||
Find your Postal Code | |||
Steps: | |||
1. Click on the your Postal Code | |||
2. Select "NO" published radio button | |||
3. Click on the "Save" button | |||
|1.The page with template is opened | |||
2. The "Yes" published radio button is selected | |||
3. Postal code is no published and the "Save Postal Code Successfully" message is displayed | |||
|- | |||
| rowspan="2" | 92 | |||
| rowspan="2" | Delete postal code | |||
| Precondition: | |||
Go to "Postal Code Warehouse manager" section | |||
Find your Postal Code | |||
Steps: | |||
1. Click on the your "Postal Code" checkbox | |||
2. Click on the "Delete" button | |||
3. Click on the "OK" button | |||
| 1. The checkbox is selected | |||
[[Image:92(1).png|800px]] | |||
2. The "Are you sure you want to delete selected items? " message is displayed | |||
[[Image:92(2).png|800px]] | |||
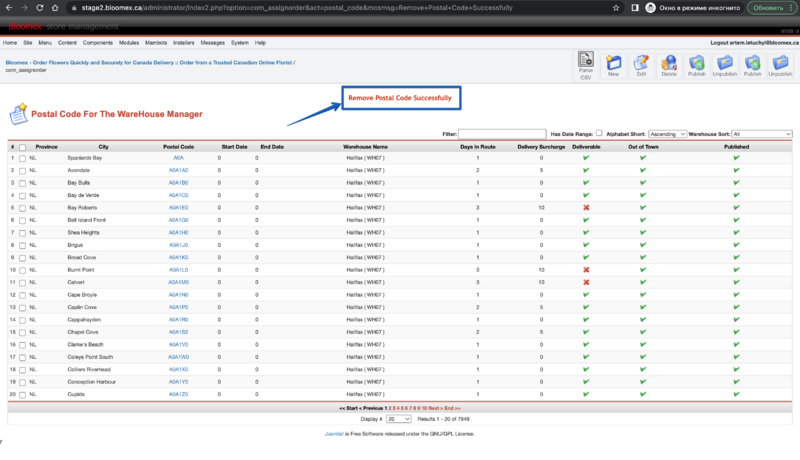
3. The "Remove Postal Code Successfully" message is displayed | |||
[[Image:92(3).png|800px]] | |||
|- | |||
| Precondition: | |||
Go to "Postal Code Warehouse manager" section | |||
Find your Postal Code | |||
Steps: | |||
1. Click on the your "Postal Code" checkbox | |||
2. Click on the "Delete" button | |||
3. Click on the "Cancel" button | |||
| 1. The checkbox is selected | |||
[[Image:92(4).png|800px]] | |||
2. The "Are you sure you want to delete selected items? " message is displayed | |||
[[Image:92(5).png|800px]] | |||
3. The postal code is stayed in system | |||
|- | |||
| rowspan="3" |93 | |||
| rowspan="3" |Parce SCV | |||
| Precondition: | |||
Go to "Postal Code Warehouse manager" section | |||
Find your Postal Code | |||
Steps: | |||
1. Click on the your "Postal Code" checkbox | |||
2. Click on the "Parse CSV" button | |||
3. Click on the "Select file" button and select CSV file | |||
4. Click on the "Upload File" button | |||
|1. The checkbox is selected | |||
[[Image:93(1).png|800px]] | |||
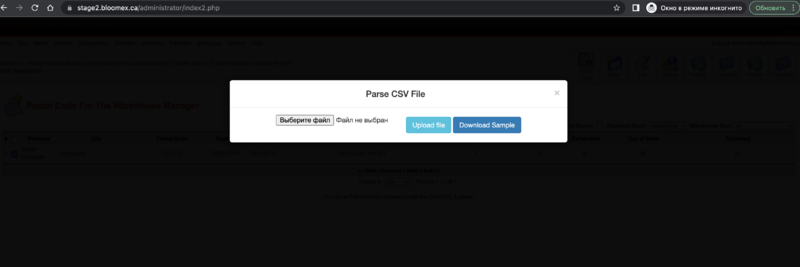
2. The window is opened and contain atributes(Select file, Download Sample, Upload file and save , close - buttons) | |||
[[Image:93(2).png|800px]] | |||
3. The window is opened and file is added | |||
[[Image:93(3).png|800px]] | |||
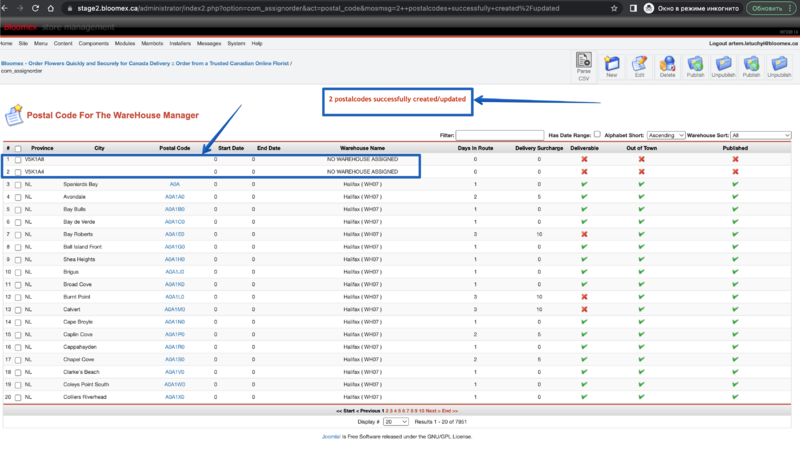
4. The postal codes are added and the "2 postalcodes successfully created/updated" message is displayed | |||
[[Image:93(4).png|800px]] | |||
|- | |||
|Precondition: | |||
Go to "Postal Code Warehouse manager" section | |||
Find your Postal Code | |||
Steps: | |||
1. Click on the your "Postal Code" checkbox | |||
2. Click on the "Parse CSV" button | |||
3. Click on the "Download Sample" button | |||
4. Click on "Save" button | |||
|1. The checkbox is selected | |||
2. The window is opened and contain atributes(Select file, Download template, Upload and save , close - buttons) | |||
3. The appropriate window is opened | |||
4. The CSV file is saved | |||
|- | |||
|Precondition: | |||
Go to "Postal Code Warehouse manager" section | |||
Find your Postal Code | |||
Steps: | |||
1. Click on the your "Postal Code" checkbox | |||
2. Click on the "Parse CSV" button | |||
3. Click on the "Close" button | |||
|1. The checkbox is selected | |||
2. The window is opened and contain atributes(Select file, Download template, Upload and save , close - buttons) | |||
3. The window is closed | |||
|- | |||
| rowspan="4" |94 | |||
| rowspan="4" |Filters | |||
| Precondition: | |||
Go to the "Postal Code Warehouse Manager" section | |||
Steps: | |||
1. In the "Filter" field, enter the desired postcode | |||
2. Click "Enter" on your keyboard | |||
| 1. The resulting code in the "Filter" field is displayed | |||
[[Image:Postal Code 1.jpg|800px]] | |||
2. Postal code - found | |||
[[Image:Postal Code 2.jpg|800px]] | |||
|- | |||
| (Has Date Range) | |||
Precondition: | |||
Go to the "Postal Code Warehouse Manager" section | |||
Check the box next to "Has Date Range" | |||
| "Has Date Range" - applied to the filter | |||
[[Image:Has Date Range.jpg|800px]] | |||
|- | |||
| (Alphabet Short) | |||
Precondition: | |||
Go to the "Postal Code Warehouse Manager" section | |||
Select Ascending or Descending from the list to sort | |||
| The list is sorted from Alphabet | |||
[[Image:Alphabet Short.jpg|800px]] | |||
|- | |||
| (Warehouse Sort) | |||
Precondition: | |||
Go to the "Postal Code Warehouse Manager" section | |||
Select a warehouse from the "Warehouse Sort" list | |||
| The list is sorted from Warehouse | |||
[[Image:Warehouse Sort.jpg|800px]] | |||
|- | |||
| colspan="4" style="background-color:#ffffed;" | | |||
=Driver rates= | |||
|- | |||
|95 | |||
|Create new zone | |||
| Steps: | |||
1. Click in the "Driver rates" section | |||
2. Click in the "New" button | |||
3. Click on the "Save" button | |||
|1. The appropriate page is opened | |||
[[Image:95(1).png|800px]] | |||
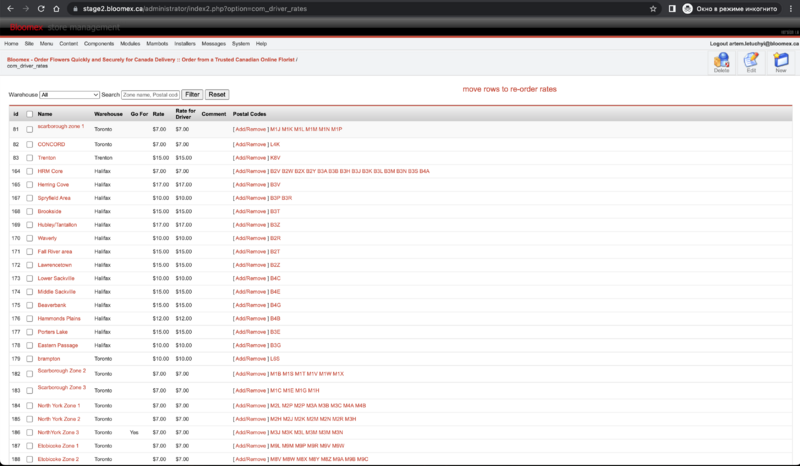
2. The page is opened and contain atributes (name, warehouse, rate, rate for driver, is gofor, comment - fields; save, close - buttons) | |||
[[Image:95(2).png|800px]] | |||
3. The new zone is created | |||
|- | |||
| rowspan="2" | 96 | |||
| rowspan="2" | Edit new zone | |||
| Precondition: | |||
Go to "Driver rates" section | |||
Find your zone | |||
Steps: | |||
1. Click your zone checkbox | |||
2. Click on the "Edit" button | |||
3. Click on the "Save" button | |||
| 1. The checkbox is selected | |||
[[Image:96(1).png|800px]] | |||
2. The page is opened and contain atributes (name, warehouse, rate, rate for driver, is gofor, comment - fields; save, close - buttons) | |||
[[Image:96(2).png|800px]] | |||
3. The zone is edited | |||
|- | |||
| Precondition: | |||
Go to "Driver rates" section | |||
Steps: | |||
Click on the "Edit" button | |||
| The "Please select an item from the list to edit" message is displayed | |||
[[Image:96(3).png|800px]] | |||
|- | |||
| rowspan="3" |97 | |||
| rowspan="3" |Delete new zone | |||
|Precondition: | |||
Go to "Driver rates" section | |||
Find your zone | |||
Steps: | |||
1. Click your zone checkbox | |||
2. Click on the "Delete" button | |||
3. Click on the "OK" button | |||
|1. The checkbox is selected | |||
[[Image:97(1).png|800px]] | |||
2. The "Are you sure you want to delete selected items? " message is displayed | |||
[[Image:97(2).png|800px]] | |||
3. The zone is deleted and the "Success."message is displayed | |||
[[Image:97(3).png|800px]] | |||
|- | |||
|Precondition: | |||
Go to "Driver rates" section | |||
Find your zone | |||
Steps: | |||
1. Click your zone checkbox | |||
2. Click on the "Delete" button | |||
3. Click on the "Cancel" button | |||
|1. The checkbox is selected | |||
[[Image:97(4).png|800px]] | |||
2. The "Are you sure you want to delete selected items? " message is displayed | |||
[[Image:97(5).png|800px]] | |||
3. The zone is stayed in system | |||
|- | |||
|Precondition: | |||
Go to "Driver rates" section | |||
Steps: | |||
Click on the "Delete" button | |||
|The "Please make a selection from the list to delete" message is displayed | |||
[[Image:97(6).png|800px]] | |||
|- | |||
| rowspan="3" |98 | |||
| rowspan="3" |Filters | |||
| Precondition: | |||
Go to "Driver rates" section | |||
Steps: | |||
1. Click on the "Warehouse" field | |||
2. Select warehouse | |||
(exsample "testing") | |||
|1. The drop-down list is opened | |||
[[Image:98(1).png|800px]] | |||
2. The "testing" warehouse is selected and all zone in "testing" warehouse is dislayed | |||
[[Image:98(2).png|800px]] | |||
|- | |||
|Precondition: | |||
Go to "Driver rates" section | |||
Steps: | |||
1. Fill in zone name in "Search" field | |||
(example "MY ZONE") | |||
2. Click on the "Filter" button | |||
|1. The "Search" field is filled in | |||
[[Image:98(3).png|800px]] | |||
2. The "MY ZONE" zone is displayed | |||
[[Image:98(4).png|800px]] | |||
|- | |||
|Precondition: | |||
Go to "Driver rates" section | |||
Steps: | |||
1. Fill in postal code in "Search" field | |||
(example "V5K") | |||
2. Click on the "Filter" button | |||
|1. The "Search" field is filled in | |||
[[Image:98(5).png|800px]] | |||
2. The zone with "V5K" postal code is displayed | |||
[[Image:98(6).png|800px]] | |||
|- | |||
| rowspan="2" |99 | |||
| rowspan="2" |Add postal code to zone | |||
| Precondition: | |||
Go to "Driver rates" section | |||
Select youre zone | |||
Steps: | |||
1. Click on the "Add/Remove" button | |||
2. Click on the checkbox | |||
3. Click on the "New" button | |||
4. Fill in the "postalcode" field and click on the "Save" button | |||
|1. The appropriate page is opened and contain atributes("Postalcode" checkbox; Delete, Edit, New, Parse CSV, Close - buttons) | |||
[[Image:99(1).png|800px]] | |||
2. Checkbox is selected | |||
3. The page with "postal code" field is opened | |||
[[Image:99(2).png|800px]] | |||
4. The "postalcode" field is filled in and postalcode is added | |||
[[Image:99(3).png|800px]] | |||
|- | |||
|Precondition: | |||
Go to "Driver rates" section | |||
Select youre zone | |||
Steps: | |||
1. Click on the "Add/Remove" button | |||
2. Click on the "New" button | |||
|1. The appropriate page is opened and contain atributes("Postalcode" checkbox; Delete, Edit, New, Parse CSV, Close - buttons) | |||
2. The page with "postal code" field is opened | |||
|- | |||
| rowspan="3" |100 | |||
| rowspan="3" |Parce SCV | |||
| Precondition: | |||
Go to "Driver rates" section | |||
Select youre zone | |||
Steps: | |||
1. Click on the "Add/Remove" button | |||
2. Click on the "Parse CSV" button | |||
3. Click on the "Select file" button and select CSV file | |||
4. Click on the "Upload and Save" button | |||
|1. The appropriate page is opened and contain atributes("Postalcode" checkbox; Delete, Edit, New, Parse CSV, Close - buttons) | |||
2. The window is opened and contain atributes(Select file, Download template, Upload and save , close - buttons) | |||
[[Image:100(1).png|800px]] | |||
3. The window is opened and file is added | |||
[[Image:100(2).png|800px]] | |||
4. The postalcodes are added | |||
[[Image:100(3).png|800px]] | |||
|- | |||
|Precondition: | |||
Go to "Driver rates" section | |||
Select youre zone | |||
Steps: | |||
1. Click on the "Add/Remove" button | |||
2. Click on the "Parse CSV" button | |||
3. Click on the "Download template" button | |||
4. Click on "Save" button | |||
|1. The appropriate page is opened and contain atributes("Postalcode" checkbox; Delete, Edit, New, Parse CSV, Close - buttons) | |||
2. The window is opened and contain atributes(Select file, Download template, Upload and save , close - buttons) | |||
3. The appropriate window is opened | |||
4. The CSV file is saved | |||
|- | |||
|Precondition: | |||
Go to "Driver rates" section | |||
Select youre zone | |||
Steps: | |||
1. Click on the "Add/Remove" button | |||
2. Click on the "Parse CSV" button | |||
3. Click on the "Close" button | |||
|1. The appropriate page is opened and contain atributes("Postalcode" checkbox; Delete, Edit, New, Parse CSV, Close - buttons) | |||
2. The window is opened and contain atributes(Select file, Download template, Upload and save , close - buttons) | |||
3. The window is closed | |||
|- | |||
| rowspan="2" |101 | |||
| rowspan="2" |Edit postal code in zone | |||
| Precondition: | |||
Go to "Driver rates" section | |||
Select youre zone | |||
Steps: | |||
1. Click on the "Add/Remove" button | |||
2. Click on the checkbox | |||
3. Click on the "Edit" button | |||
4. Edit postalcode and click on the "Save" button | |||
|1. The appropriate page is opened and contain atributes("Postalcode" checkbox; Delete, Edit, New, Parse CSV, Close - buttons) | |||
[[Image:101(1).png|800px]] | |||
2. Checkbox is selected | |||
3. The page is opened and contain atributes (Postalcode, Rate fields; Save, Close - buttons) | |||
[[Image:101(2).png|800px]] | |||
4. The postalcode is edited | |||
[[Image:101(3).png|800px]] | |||
|- | |||
|Precondition: | |||
Go to "Driver rates" section | |||
Select youre zone | |||
Steps: | |||
1. Click on the "Add/Remove" button | |||
2. Click on the "Edit" button | |||
|1. The appropriate page is opened and contain atributes("Postalcode" checkbox; Delete, Edit, New, Parse CSV, Close - buttons) | |||
[[Image:101(4).png|800px]] | |||
2. The "Please select an item from the list to edit"message is displayed | |||
[[Image:101(5).png|800px]] | |||
|- | |||
| rowspan="3" |102 | |||
| rowspan="3" |Delete postal code in zone | |||
| Precondition: | |||
Go to "Driver rates" section | |||
Select youre zone | |||
Steps: | |||
1. Click on the "Add/Remove" button | |||
2. Click on the checkbox | |||
3. Click on the "Delete" button | |||
4. Click on the "OK" button | |||
|1. The appropriate page is opened and contain atributes("Postalcode" checkbox; Delete, Edit, New, Parse CSV, Close - buttons) | |||
[[Image:102(1).png|800px]] | |||
2. Checkbox is selected | |||
3. The "Are you sure you want to delete selected items?"message is displayed | |||
[[Image:102(2).png|800px]] | |||
4. The postalcode is deleted and the "Success."message is displayed | |||
[[Image:102(3).png|800px]] | |||
|- | |||
|Precondition: | |||
Go to "Driver rates" section | |||
Select youre zone | |||
Steps: | |||
1. Click on the "Add/Remove" button | |||
2. Click on the checkbox | |||
3. Click on the "Delete" button | |||
4. Click on the "Cancel" button | |||
|1. The appropriate page is opened and contain atributes("Postalcode" checkbox; Delete, Edit, New, Parse CSV, Close - buttons) | |||
[[Image:102(4).png|800px]] | |||
2. Checkbox is selected | |||
3. The "Are you sure you want to delete selected items?"message is displayed | |||
[[Image:102(5).png|800px]] | |||
4. The postalcode is stayed in system | |||
|- | |||
|Precondition: | |||
Go to "Driver rates" section | |||
Select youre zone | |||
Steps: | |||
1. Click on the "Add/Remove" button | |||
2. Click on the "Edit" button | |||
|1. The appropriate page is opened and contain atributes("Postalcode" checkbox; Delete, Edit, New, Parse CSV, Close - buttons) | |||
[[Image:102(6).png|800px]] | |||
2. The "Please make a selection from the list to delete"message is displayed | |||
[[Image:102(7).png|800px]] | |||
|- <span id="Warehouse about new order"></span> | |||
|103 | |||
|Warehouse email | |||
|Precondition: | |||
Finish the order and Check the Warehouse email | |||
Click the “Save Order” button | |||
| A letter about a new order was sent to the warehouse's email address | |||
[[Image:Notify Production of Order Warhouse.jpg|800px]] | |||
|- <span id="Changing status for the recipient"></span> | |||
|104 | |||
|Changing status for the recipient | |||
|Precondition: | |||
Order was placed, order details page is opened in the Manage Orders module | |||
Steps: | |||
Select the "Notify Recipient?" checkbox, select status, and click on the "Update status" button | |||
| The checkbox is checked and the status is updated | |||
[[Image:Notify Recipient.jpg|800px]] | |||
A letter about "Change order status" is delivered to the recipient | |||
[[Image:Notify Recipient 1.jpg|800px]] | |||
|- | |||
! colspan="4" | | |||
== Sms module == | |||
|- | |||
| 105 | |||
| Create new sms chat | |||
| | |||
1. Go to Sms module | |||
2. Click on the "New" button | |||
3. Fill in "Phone Number", Order Number, Some Text (can choose from template or write in the SMS Text field) and click on the "Send SMS" button | |||
4. Send reply from phone | |||
| 1. Sms module opened | |||
[[Image:smsmodule.png|800px]] | |||
2. SMS Item: New page is opened | |||
[[Image:SMSItemNew.png|800px]] | |||
3. Sent text is displayed in the SMS CHAT field | |||
[[Image:smsoperator.png|800px]] | |||
<span id="Sms from agent"></span> | |||
Sms comes on phone number | |||
[[Image:smsphone.jpg|800px]] | |||
4. Reply from client should displayed in the SMS chat | |||
[[Image:smsreply.png|800px]] | |||
|- | |||
| 106 | |||
| Check View all checkbox | |||
| | |||
Precondition: SMS chats with and without reply are created | |||
1. Click View all checkbox | |||
| 1. Sms chats with and without reply are shown | |||
[[Image:smsWithAndWithoutReply.png|800px]] | |||
|- | |||
| 107 | |||
| Check filter | |||
| | |||
Precondition: SMS chat is created | |||
1. Enter the phone number from created chat and press Enter button by keyboard | |||
| 1. Chat was found with entered phone number | |||
[[Image:smsfilter.png|800px]] | |||
|- | |||
| 108 | |||
| Delete sms chat | |||
| | |||
Precondition: SMS chat is created | |||
1. Click on the "Delete" button | |||
| 1. Sms module deleted | |||
|- | |||
|} | |||
= Emails = | |||
[[#Confirmation|Confirmation]] | |||
[[#Resend Confirmation|Resend Confirmation]] | |||
[[#Warehouse about new order|Warehouse about new order]] | |||
[[#Warehouse letter about changing status|Warehouse letter about changing status]] | |||
| | |||
[[#Changing status for client|Changing status for client]] | |||
[[#Changing status for the recipient|Changing status for the recipient]] | |||
[[#Changed status to Hidden Comments|Changed status to Hidden Comments]] | |||
[[#About deleting the account (manage user)|About deleting the account (manage user)]] | |||
= SMS = | |||
| | [[#Changing status for client|Changing status for client]] | ||
[[#About Gift Certificate|About Gift Certificate]] | |||
[[#Sms from agent|Sms from agent]] | |||
| | |||
Latest revision as of 17:17, 25 July 2023
< Back to QA and Testing
Release notes of the Admin and Web system for bloomex.ca
| Number | Name | Steps | Expected result |
|---|---|---|---|
Homepage | |||
| 1 | Check the correct displaying all sections of the Control Panel | Go to the Homepage | All sections of the Control Panel are displayed correctly. |
Manage orders | |||
| 2 | Check your placed orders for missing data or incorrect in addresses, delivery date, instructions, signature, card message, occasion (funeral), order calculation is correct | Precondition:
order was placed 1. Go to the Manage Orders module 2. Click to view order details |
All necessary information is filled (addresses, delivery date, instructions, signature, card message, occasion, order calculation is correct) |
| 3 | Update billing and shipping information | Precondition:
order was placed, order details page is opened in Manage Orders module 1. Update fields in billing 2. Update shipping information |
1. Billing information was updated and a record about updating is shown in history of order (shown after refreshing)
2. Shipping information was updated and a record about updating is shown in history of order (shown after refreshing) |
| 4 | Update | Precondition:
order was placed, order details page is opened in Manage Orders module 1. Update delivery date |
Delivery date was updated and a record about updating is shown in history of order (shown after refreshing) |
| 5 | Update card message, signature, special instructions | Precondition:
order was placed, order details page is opened in Manage Orders module 1. Update card message 2. Update signature 3. Update special instructions |
Card message, signature, special instructions were updated and a record about updating is shown in the history of order (shown after refreshing) |
| 6 | Check View/NEWFORM/GIFT prints preview (Ctrl+P) | Precondition:
order was placed, order details page is opened in Manage Orders module 1. Click on the View button 2. View in print preview (Ctrl+P) 3. Click on the NEW FORM button 4. View in print preview (Ctrl+P) 5. Click on the GIFT button 6. View in print preview (Ctrl+P) |
1. "View" window with information about the order is opened
2. "View" in print preview displayed correctly 3. "NEW FORM" window with information about the order and QR-code is opened 4. "NEW FORM" in print preview displayed correctly 5. "GIFT" window with information about the order is opened 6. "Gift" in print preview displayed correctly |
| 7 | Check QR-code scaninng via mobile drive app | Precondition:
order was placed 1. Click on the "New form" button 2. Open https://new-driver.bloomex.ca/ 3. Scan barcode via mobile drive app |
1. New form page is opened
2. The Driver App is opened 3. The order was scanned |
| 8 | Changing statuses and information from driver app | Precondition:
order was placed, order details page is opened in Manage Orders module Steps: Select "Notify Driver Manager?" checkbox and Click on the "update status" button |
The checkbox is selected and status is updated |
| 9 | Order history | Precondition:
order was placed, order details page is opened in Manage Orders module Steps: Open details page is opened in Manage Orders module |
The Order history is displayed |
| 10 | Update order status is working | Precondition:
order was placed, order details page is opened in Manage Orders module Steps: 1. Click on the status dropdown list and choose any status 2. Click on the "update status" button |
1. The status dropdown list is opened and choose new status
2. The Status is updated and "Update Successful" message is displayed |
| 11 | Sending letter to warehouse (about created order and changing status) | Precondition:
Order was placed, order details page is opened in Manage Orders module Steps: Select the "Notify Warehouse?" checkbox, select status, and click on the "Update status" button |
The checkbox is selected and status is updated
The "Change Order Status" email is delivered |
| Precondition:
Order was placed, order details page is opened in the Manage Orders module Steps: Select the "Notify Customer?" checkbox, select status, and click on the "Update status" button |
The "Change Order Status" email is delivered
If customer enabled SMS tracking, SMS should come After order status changed to delivered SMS about Gift Certificate comes
| ||
| 12 | "Resend confirmation email" function | Precondition:
Order was placed, order details page is opened in Manage Orders module Steps: Click the "Resend Confirmation Email" button |
Confirmation email re-sent to Email specified in "Billing Information" |
| 13 | "Does customer have not resolved emails?" function | Precondition:
Order was placed, order details page is opened in Manage Orders module Steps: "Does customer have not resolved emails?" button |
The "No emails sent by this customer" message is displayed |
| 14 | "Mark Order" function | Precondition:
Order was placed, order details page is opened in the Manage Orders module Steps: 1. In the "Order Status Change" tab - select the required "Mark Order" 2. Click the “Mark” button |
1. The "Mark order" list - displayed
2. Notice - "Mark" has applied |
| (Mark unpublished)
Precondition: Order was placed, order details page is opened in the Manage Orders module Steps: 1. left click on activated - "Mark" 2. Enter a message and Click the “Save” button |
1. The field for entering a message has opened
2. Notice - "Mark unpublished” | ||
| (Mark published)
Precondition: Order was placed, order details page is opened in the Manage Orders module 1. left click on deactivated - "Mark" 2. Enter a message and Click the “Save” button |
1. The field for entering a message has opened
2. Notice - "Mark published” | ||
| 15 | "Rating of Customer" displaying | Precondition:
Order was placed, order details page is opened in the Manage Orders module Go to the "Rating of Customer" tab and look at the "Current Rating of Customer:" section |
"Rating of Customer" is displayed |
| 16 | "Subscription orders" displaying | Precondition:
Order was placed with a "subscription", order details page is opened in the Manage Orders module Go to the "Subscription orders" tab and make sure that the subscription is completed |
"Subscription orders" - are displayed |
| 17 | Searching order by filters | Precondition:
Order was placed in the Manage Orders module Specify the necessary information for the search by specifying them in the "Filter" and "Order by" sections |
The orders are filtered according to the specified information |
| 18 | Status filters | Precondition:
Order was placed in the Manage Orders module Select the wants status to filter |
Orders are filtered according to the selected status |
| 19 | Other menu tabs | Precondition:
Order was placed, order details page is opened in the Manage Orders module Go to the "Delivery and Payment Info" tab and look at the "Deliver Information" |
"Delivery and Payment Info" is displayed |
| 20 | Check Hidden Order Comments | Precondition:
Select "Customer Service Supervisor" group for account in "User Group" section Order was placed, order details page is opened in the Manage Orders module Steps: 1. Fill in "Comment" field and select "Hidden Order Comments" status 2. Click on the "Update Status" button 3. Log in as a user with rights and proceed to order with Hidden Order Comments
|
1. The "Comment" field is filled "Hidden Order Comments" status is selected
2. The "You are not allowed to see this comment." message is displayed in history
|
| 21 | Changed status to Hidden Comments | Precondition:
Order was placed, the order details page is opened in the Manage Orders module Steps: 1. Select "Hidden Order Comment" status 2. check the checkbox who needs to be notified and click the "Update Status" button |
1. Status "Hidden Order Comment" - displayed
2. The letter about the status change came to the mail |
Phone order manager | |||
| 22 | Place order with creating a new account | Precondition:
The user hasn't an existing account Steps: 1. Enter the name of the product and click the "Add Product" button 2. Click the "Create New Account" button and Fill in the recommended fields 3. Choose a delivery date 4. Click the "Save Order" button |
1. Product added
2. The information is filled in and displayed correctly 3. The date was successfully selected and confirmed 4. Message: "Save Phone Order Successfully and Payment Approved" |
| 23 | Place order with existing user | Precondition:
The user has an existing account Steps: 1. Enter the name of the product and click the "Add Product" button 2. Enter your email address to verify information in the "E-mail" field and Click the “Check Account Info” button 3. Fill in the recommended fields 4. Choose a delivery date 5. Click the "Save Order" button |
1. Product added
2. Account accepted 3. The information is filled in and displayed correctly 4. The date was successfully selected and confirmed 5. Message: "Save Phone Order Successfully and Payment Approved" |
| 24 | Several products adding | Precondition:
The order was created through the "Phone Order manager" Steps: 1. Enter the name of the product in the search field 2. Select a product from the drop-down list 3. Click the “Add Product” button |
1. Found all products with similar names
2. The selected product was displayed in the search field 3. Product added to "Phone Order Information Detail" |
| 25 | Several quantity calculations | Precondition:
The order was created through the "Phone Order manager" Steps: 1. Enter the name of the product in the search field 2. Select a product from the drop-down list 3. Click the “Add Product” button 4. Change the "Quantity" of the product and check the "Total price" |
1. Found all products with similar names
2. The selected product was displayed in the search field 3. Product added to "Phone Order Information Detail" 4. "Quantity" of the product has changed, the "Total Price" calculated correctly |
| 26 | Receive delivery updates via SMS | Precondition:
Proceed to the step of "Billing Information" Steps: 1. Fill in the recommended fields 2. In the "Receive Delivery Updates Via SMS", check the "Yes" |
1. The information is filled in and displayed correctly
2. Radio buttons "Receive Delivery Updates Via SMS" "No" and "Yes" is displayed |
| 27 | Submit coupon code | Precondition:
Proceed to the step of "COUPON DISCOUNT CODE" Steps: 1. Fill in the recommended fields 2. Enter the coupon code "Your code" field and Click "Check Coupon Code" |
1. The information is filled in and displayed correctly
2. Coupon activated. Message: "This coupon code will reduce $20.00 of order total price" |
| 28 | The system pulls correct and full user autocomplete address | Precondition:
Proceed to the step of "Billing Information" Steps: 1. Enter an existing address in the “Address Autocomplete” field 2. Select an address from the drop-down list |
1. Address found successfully
2. The address is displayed correctly |
| 29 | Choose any existing delivery information | Precondition:
Proceed to the step of "Delivery Information" Steps: 1. Sign in with an existing account 2. Place the radio button opposite the address |
1. The list of addresses is displayed
2. Address selected |
| 30 | Fill card message and special instructions | Precondition:
Proceed to the step of "Delivery Options" Steps: 1. Enter information in the “Card Message” field 2. Enter information in the “Signature” field 3. Enter information in the “Instructions and comments” field |
1. Information in the “Card Message” field is displayed
2. Information in the “Signature” field is displayed 3. Information in the “Instructions and comments” field is displayed |
| 31 | Confirmation email after creation order from Phone order | Precondition:
Finish the order using "Phone Order Manager" and check the order confirmation email Steps: Click the “Save Order” button |
The confirmation email is delivered
|
| 32 | Finish order and check order confirmation email:
i. Delivery date ii. Address iii. Card Message iv. Products (names, SKU, descriptions, quantities, and prices) |
Precondition:
Finish the order and check the order confirmation email Steps: 1. Click the “Save Order” button 2. Check email: Delivery date, Address, Card message, Products (names, SKU, descriptions, quantities, and prices) |
1. Order successfully created
2. The confirmation letter contains the following data: Delivery date, Address, Card message, Products (names, SKU, descriptions, quantities, and prices) |
| 33 | Check the correct functionality of all required and not required fields | Steps:
1. Enter the name of the product in the search field 2. Enter information in the required and not required fields |
1. The product is displayed
2. Information in all fields is displayed |
Create route | |||
| 34 | Сorrect choosing of order details(Search) | Precondition:
The route was created through the "Create Route" Steps: 1. Enter the basic information in the "Order details" section: a) Select Warehouse; b) Select Driver; c) Enter Order ID 2. Click the "Search" button 3. Check the information on the basis of which the route will be created |
1. Information in all fields is displayed 2. The route is optimized and is displayed |
| 35 | Optimization route function | Precondition:
The route was created through the "Create Route" Steps: 1. Enter the basic information in the "Order details" section: a) Select Warehouse; b) Select Driver; c) Enter Order ID 2. Click the "Search" button 3. Click the "Optimization Route" button |
1. Information in all fields is displayed
2. Information was found using the search and is displayed 3. The route is optimized and displayed on the map |
| 36 | Route creation(In transit) | Precondition:
The route was created through the "Create Route" Steps: 1. Enter the basic information in the "Order details" section: a) Select Warehouse; b) Select Driver; c) Enter Order ID 2. Click the "Search" button 3. Click the "Optimization Route" button 4. Click the "In transit" button |
1. Information in all fields is displayed
2. Information was found using the search and is displayed 3. The route is optimized and displayed on the map 4. The route is created and displayed on the "Route Manager" section |
| 37 | Do not return to the warehouse field | Precondition:
The route was created through the "Create Route" Steps: 1. Enter the basic information in the "Order details" section: a) Select Warehouse; b) Select Driver; c) Enter Order ID 2. Click the "Search" button 3. Check the box next to "Do not return to the warehouse?" and enter the return address 4. Click the "Optimization Route" button |
1. Information in all fields is displayed
2. Information was found using the search and is displayed 3. The check box and the entered address are displayed correctly 4. The route is created and displayed with a return point instead of a warehouse |
| 38 | Other functions | (Get CSV)
Precondition: The route was created through the "Create Route" Steps: 1. Enter the basic information in the "Order details" section: a) Select Warehouse; b) Select Driver; c) Enter Order ID 2. Click the "Get CSV" button |
Route downloaded to your device |
| (Clear function)
Precondition: The route was created through the "Create Route" Steps: 1. Enter the basic information in the "Order details" section: a) Select Warehouse; b) Select Driver; c) Enter Order ID 2. Click the "Clear" button |
Information about the route - cleared | ||
Route manager | |||
| 39 | Search for routes by warehouse | Precondition:
Click on the "Route Manager" section Steps: Select the drop-down list "Warehouse" |
The selected warehouse is sorted |
| 40 | Search by driver | Precondition:
Click on the "Route Manager" section Steps: 1. Select the drop-down list "Warehouse" 2. Select the drop-down list "Driver" |
1. The selected warehouse is sorted
2. The selected Driver is sorted |
| 41 | Search by order id/route id | Precondition:
Click on the "Route Manager" section Steps: Enter the order id or route id in the "Order id/Route id" field and click on the "Filter" button |
Search by order id or route id is displayed |
| 42 | Search by date | Precondition:
Click on the "Route Manager" section Steps: Select "Date From" and "Date To" and click on the "Filter" button |
Search by date is displayed |
| 43 | Correct displaying of information in a PDF file | Precondition:
Select a route and go to it Steps: 1. Click the "PDF" button 2. Check the information in the PDF file |
1. "PDF" file is downloaded
2. The information in the "PDF" file is displayed correctly |
| 44 | Unpublish route function | Precondition:
Click on the "Route Manager" section Steps: 1. Select a route using the checkbox 2. Click the "Unpublish" button |
1. The route is selected
2. The publication of the route canceled |
| 45 | Publish route function | Precondition:
Click on the "Route Manager" section Steps: 1. Select a route using the checkbox 2. Click the "Publish" button |
1. The route is selected
2. Selected route - published |
| 46 | Check Status | Precondition:
Click on the "Route Manager" section Steps: 1. Select a route 2. Check "Status" |
1. The route is selected
2. The status is displayed |
| 47 | Check billable | Precondition:
Click on the "Route Manager" section Steps: 1. Select a route 2. Check column "Billable" |
1. The route is selected
2. The "Billable" is displayed |
| 48 | Rates | Precondition:
Click on the "Route Manager" section Steps: 1. Select a route 2. Check "Rate and Driver Rate" |
1. The route is selected
2. The "Rate and Driver Rate" is displayed |
| 49 | History | Precondition:
Click on the "Route Manager" section Steps: 1. Select a route 2. Go to the “History” tab |
1. The route is selected
2. The change history is displayed |
| 50 | Remake function | Precondition:
Click on the "Route Manager" section and select a route Steps: 1. Click on the "Remake" button 2. Click on “ok” |
1. The "Remake" button is displayed
2. Route returned to the driver app. |
Employees | |||
| 51 | Transition to ORCA | Steps:
Click on the "Employees" section |
The "employee's" page opened |
Manage front end users | |||
| 52 | Add new user and log in with a new credentials on frontend (incognito mode) | Steps:
1. Click on the "Manage Frontend Users" section 2. Click on the "New" button 3. Fill in the information and click the "Save" button |
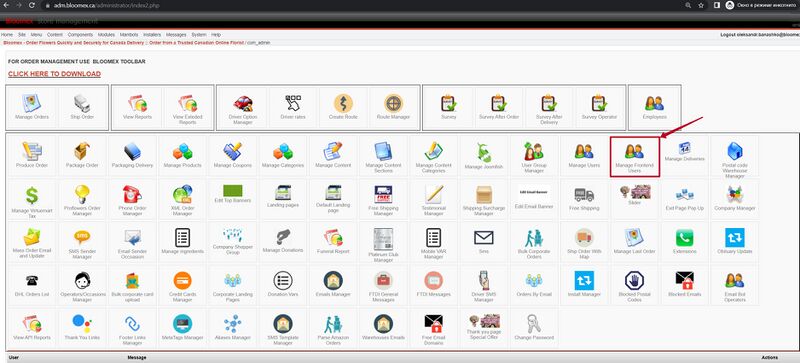
1. The "Manage Frontend Users" page opened 2. The "Add/Update User Information" page opened 3. Received Message: "New User was added successfully" |
| 53 | Delete user | Precondition:
Click on the "Manage Frontend Users" section Steps: 1. Enter the search field “User Name” and click on the "Search" button 2. Check the checkbox next to the desired user 3. Click on the "Remove" button |
1. The entered user was found
2. A check box is displayed in front of the user 3. Received Message: "User(s) was deleted successfully" |
| 54 | Change general user information | Precondition:
Click on the "Manage Frontend Users" section and select the user Steps: 1. Select the "General User information" tab and change the required information 2. Click on the "Save" button |
1. The "General User information" tab is displayed
2. Received Message: "User was updated successfully" |
| 55 | Change bill to information | Precondition:
Click on the "Manage Frontend Users" section and select the user Steps: 1. Select the "Bill To Information" tab and change the required information 2. Click on the "Save" button |
1. The "Bill To Information" tab is displayed
2. Received Message: "User was updated successfully" |
| 56 | Change shopper information | Precondition:
Click on the "Manage Frontend Users" section and select the user Steps: 1. Select the "Shopper Information" tab and change the required information 2. Click on the "Save" button |
1. The "Bill To Information" tab is displayed
2. Received Message: "User was updated successfully" |
Ship Order | |||
| 57 | Find order by id | Precondition:
Go to "Ship Order" section Steps: 1. Fill in "Order ID" field, select warehouse and driver (example 04016415, TEST, Artdriver) 2. Click on the "Search" button |
1. The "Order ID" field is filled
2. The order is shown |
| 58 | Transfer to transit | Precondition:
Go to "Ship Order" section Steps: 1. Fill in "Order ID" field , select warehouse and driver (example 04016415, TEST, Artdriver) 2. Click on the "Search" button 3. Click on the "In Transit" button |
1. The "Order ID" field is filled
2. The order is shown 3. The "The Driver Option of 4016415 is 'in transit'" message is displayed and the order moves to the "In Transit" status |
| 59 | Prints orders preview (Ctrl+P) | Precondition:
Go to "Ship Order" section Steps: 1. Fill in "Order ID" field , select warehouse and driver (example 04016415, TEST, Artdriver) 2. Click on the "Search" button 3. Click on the "Print" button |
1. The "Order ID" field is filled
2. The order is shown 3. The new page is opened |
Driver Option Manager | |||
| 60 | Create a new driver | Steps:
1. Click on the "Driver Option Manager" section 2. Click on the "New" button 3. Fill in the "Driver Option Detail", and click on the "Save" button |
1. The appropriate page is opened
2. The page is opened and contain ("Driver Option Detail" tamplate , Zone, Rate, Rate Driver, Rate this Driver titles) 3. The "Save Driver Option Successfully" message is displayed |
| 61 | Edit driver | Precondition:
Go to "Driver Option Manager" section Steps: 1. Select your "Name" checkbox 2. Click on the "Edit" button 3. Change "Service Name" field 4. Click on the "Save" button |
1. The "Name" checkbox is selected
2. The page is opened and contain ("Driver Option Detail" tamplate , Zone, Rate, Rate Driver, Rate this Driver titles) 3. The "Service Name" field is chenged 4. The "Save Driver Option Successfully" message is displayed |
| 62 | Delete driver | Precondition:
Go to "Driver Option Manager" section Steps: 1. Select your "Name" checkbox 2. Click on the "Delete" button 3. Change "Service Name" field 4. Click on the "Save" button |
1. The "Name" checkbox is selected
2. The "Are you sure you want to delete selected items? " message is displayed 3. The driver is deleted |
| 63 | Search by warehouse | Precondition:
Go to "Driver Option Manager" section Steps: 1. Click on the "All warehouses" drop-down list 2. Select on the "*" warehouse (example "TEST") |
1. The drop-down list is shown
2. All drivers attached to this warehouse are displayed |
| 64 | Search by filter | Precondition:
Go to "Driver Option Manager" section Steps: 1. Fill in the Driver name in the "Filter" field (example TestDV) 2. Click on the "Enter" button |
1. The "Filter" field is filled in
2. The driver is shown |
| Precondition:
Go to "Driver Option Manager" section Steps: 1. Fill in Service the "Filter" field (example QA__TEST__15.02.23) 2. Click on the "Enter" button |
1. The "Service" field is filled in
2. The driver is shown | ||
| Precondition:
Go to "Driver Option Manager" section Steps: 1. Fill in login the "Filter" field (example TestDV) 2. Click on the "Enter" button |
1. The "Filter" field is filled in
2. The driver is shown | ||
| Precondition:
Go to "Driver Option Manager" section Steps: 1. Fill in ID the "Filter" field (example 1865) 2. Click on the "Enter" button |
1. The "Filter" field is filled in
2. The driver is shown | ||
Manage Coupons | |||
| 65 | Creation new coupon | Steps:
1. Click on the "Manage Coupons" section 2. Click on the "New" button 3. Fill in the "New Coupon" tamplete, and click on the "Save" button |
1. The appropriate page is opened
2. The page is opened and contain atributes "New Coupon" tamplate 3. The Coupon is added |
| 66 | Search | Precondition:
Go to "Manage Users" section Steps: 1. Fill in the "Search" field Example "QAQAQAQA10" 2. Click on the "Search" button |
1. The "Search" field is filled in
2. The coupon name is displayed |
| 67 | Edit coupon | Precondition:
Go to "Manage Coupons" section Steps: 1. Fill in the "Search" field and click on the "Search" button 2. Click on the "Code" button Example (QAQAQAQA10) 3. Edit coupon and click on the "Save" button |
1. The coupon name is displayed
2. The update coupon tamplate is displayed 3. The Coupon is updated |
| 68 | Delete coupon | Precondition:
Go to "Manage Coupons" section Steps: 1. Fill in the "Search" field and click on the "Search" button 2. Select "Code" checkbox 3. Click on the "Delete" button 4. Click on the "Yes" button |
1. The coupon name is displayed
2. The "Code" checkbox is selected 3. The "Are you sure you want to delete selected items?" message is displayed 4. The coupon is deleted |
View Reports | |||
| 69 | View report result on screen | Steps:
1. Click on the "View Reports" section 2. Click on the Title name Example (blocked users list with history) 3. Click on the "Show Report on Screen" button |
1. The appropriate page is opened
2. The page is opened and contain ("Show Report on Screen" , "Export Report to MS Excel", "Export Report to Google Sheet", "Show Report on Screen with Explane" buttons) 3. The page with table about bloked users is opened |
| 70 | View report result in Excel | Steps:
1. Click on the "View Reports" section 2. Click on the Title name Example (blocked users list with history) 3. Click on the "Export Report to MS Excel" button |
1. The appropriate page is opened
2. The page is opened and contain ("Show Report on Screen" , "Export Report to MS Excel", "Export Report to Google Sheet", "Show Report on Screen with Explane" buttons) 3. The file is downloaded on your pc |
| 71 | View report result on screen (with Explain) | Steps:
1. Click on the "View Reports" section 2. Click on the Title name Example (blocked users list with history) 3. Click on the "Show Report on Screen with Explane" button |
1. The appropriate page is opened
2. The page is opened and contain ("Show Report on Screen" , "Export Report to MS Excel", "Export Report to Google Sheet", "Show Report on Screen with Explane" buttons) 3. The page is opened |
| 72 | Create report | Steps:
1. Click on the "New" button 2. Fill in fields and click on the "Save" button |
1. The new browser tab is opened and contain (New report and Joomla! Tables + Fields templates)
2. The "Report successfully inserted!" message is displayed and report is added |
| 73 | Edit report | Steps:
1. Select checkbox and click on the "Edit" button 2. Edit and click on the "Save" button |
1. The new browser tab is opened and contain (New report and Joomla! Tables + Fields templates)
2. The "Report successfully inserted!" message is displayed and report is edited |
| 74 | Publish report | Steps:
Select checkbox and click on the "Publish" button |
The page is refreshed and the title becomes red |
| 75 | Unpublish report | Steps:
Select checkbox and click on the "Unpublish" button |
The page is refreshed and the title becomes gray |
| 76 | Delete report | Steps:
1. Select checkbox and click on the "Delete" button 2. Click on "OK" button |
1. The "Are you sure you want to delete selected items? "message is displayed
2. The report is deleted |
Exteneded Reports | |||
| 77 | View report result on the screen | Steps:
1. Click on the report name 2. Fill in fields and click on the "Show report on Screen" button example (29 -30 , vancouver) |
1. The appropriate page is opened
2. The fields are filled in and page with result is opened |
| 78 | View report result in Excel | Steps:
1. Click on the report name 2. Fill in fields and click on the "Show report on Screen" button example (29 -30 , vancouver) |
1. The appropriate page is opened
2. The excel file is downloaded on pc |
Manage Users | |||
| 79 | Create user | Steps:
1. Click on the "Manage Users" section 2. Click on the "New" button 3. Fill in the "User Details" tamplete, and click on the "Save" button |
1. The appropriate page is opened
2. The page is opened and contain atributes (user details tamplate , User credits tamplate, Access to the warehouses tamplate) 3. The "Successfully Saved User: Middle QA" message is displayed and new user is created |
| 80 | Edit user | Precondition:
Go to "Manage Users" section Steps: 1. Select your "User Group" checkbox 2. Click on the "Edit" button 3. Select "Vancouver" checkbox 4. Click on the "Save" button |
1. The your "User" checkbox is selected
2. The page is opened and contain atributes (user details tamplate , User credits tamplate, Access to the warehouses tamplate) 3. The "Vancouver" checkbox is selected 4. The "Successfully Saved User: Middle QA" message is displayed and user is edited |
| 81 | Delete user | Precondition:
Go to "Manage Users" section Steps: 1. Select your "User" checkbox 2. Click on the "Delete" button 3. Click on the "OK" button |
1. The your "User" checkbox is selected
2. The "Are you sure you want to delete selected items? " message is displayed 3. The User Group is deleted and a deletion letter was sent to the mail |
| 82 | Filters | Preconditions
Go to "Manage Users" section Steps: Fill in User name in "Filter" field and click on the enter |
The "Filter" field is filled in and your user is displayed |
| Precondition:
Go to "Manage Users" section Steps: Select any option in first dropdown list (example "Email group") |
The Email group is selected and filtered users are displayed | ||
| Precondition:
Go to "Manage Users" section Steps: Select any option in second dropdown list (example "Full Menus") |
The Full Menus is selected and filtered users are displayed | ||
| 83 | Add DHL user | Precondition:
Go to "Manage Users" section Steps: 1. Click on the "Add DHL" button 2. Click on the "Choose file" button and select file |
1. The new page is opened
2. The window is opened and file is selected |
| Precondition:
Go to "Manage Users" section Steps: 1.Click on the "Add DHL" button 2. Click on the "Upload" button and click "save" button |
1. The new page is opened
2. The window is opened and file is saved | ||
User Group Manager | |||
| 84 | Create user group | Steps:
1. Click on the User Group Manager" section 2. Click on the "New" button 3. Fill in the "User Group Name" field, select checkboxes and click on the "Save" button (Example "Test QA" name, "User Group Manager", "Driver Rates", "Survey" checkboxes) |
1. The appropriate page is opened
2. The page is opened and contain atributes("User Group Name" field , Area Name checkboxses, "Save","Cancel" buttons) 3. The "User Group Name" field is filled in, the checkboxes is selected and the "Saved User Group info" message is displayed |
| Steps:
1. Click on the "User Group Manager" section 2. Click on the "New" button 3. Click on the "Cancel" button |
1. The appropriate page is opened
2. The page is opened and contain atributes("User Group Name" field , Area Name checkboxses, "Save","Cancel" buttons) 3. The appropriate page is opened | ||
| 85 | Edit user group | Precondition:
Go to "User Group Manager" section Steps: 1. Select your "User Group" checkbox 2. Click on the "Edit" button 3. Select "Survay After Order" checkbox 4. Click on the "Save" button |
1. The your "User Group" checkbox is selected
2. The page is opened and contain atributes("User Group Name" field , Area Name checkboxses, "Save","Cancel" buttons) 3. The "Survey After Order" checkbox is selected 4. The "Saved User Group info" message is displayed |
| 86 | Delete user group | Precondition:
Go to "User Group Manager" section Steps: 1. Select your "User Group" checkbox 2. Click on the "Delete" button 3. Click on the "OK" button |
1. The your "User Group" checkbox is selected
2. The "Are you sure you want to delete selected items? " message is displayed 3. The User Group is deleted |
| 87 | User group rights | Precondition:
Go to "User Group Manager" section Steps: 1. Click the "New" button and create a new user, select rights - by checking the box 2. Go to the "Manage User" section and select the created group 3. View the rights available to the user |
1. The "Create route" "Route Manager" "Driver rates" "Survey" and "Survey After Delivery" checkbox is selected
2. The user is selected and the group is added in "Manage Users" section 3. Only the rights that have been selected for this group are displayed |
Postal Code Warehouse Manager | |||
| 88 | Create postal code | Precondition:
Go to "Postal Code Warehouse manager" section Steps: 1. Click on the "New" button 2. Fill in all fields and click on the "Save" button |
1.The page with template is opened
2. All fields are filled in and the "Save Postal Code Successfully" message and Postal Code is added |
| Precondition:
Go to "Postal Code Warehouse manager" section Steps: 1. Click on the "New" button 2. Fill in all fields, except "Warehouse" field 3. Click on the "Save" button |
1.The page with template is opened
2. All fields are filled, except "Warehouse" field 3. The Postal code is added with "no warehouse assigned" warehouse name | ||
| Precondition:
Go to "Postal Code Warehouse manager" section Steps: 1. Click on the "New" button 2. Fill in all fields and click on the "Cancel" button |
1.The page with template is opened
2. The "Postal Code Warehouse manager" page is opened and Postal Code is not added | ||
| 89 | Edit postal code option page | Precondition:
Go to "Postal Code Warehouse manager" section Find your Postal Code Steps: 1. Click on the your "Postal Code" checkbox 2. Click on the "Edit" button 3. Edit information and click on the "Save" button |
1. The checkbox is selected
2. The page with template is opened 3. The postal code is edited and the "Save Postal Code Successfully" message is displayed |
| Precondition:
Go to "Postal Code Warehouse manager" section Steps: Click on the "Edit" button |
The "Please select an item from the list to edit" message is displayed | ||
| Precondition:
Go to "Postal Code Warehouse manager" section Find your Postal Code Steps: 1. Click on the your "Postal Code" checkbox 2. Click on the "Edit" button 3. Edit information and click on the "Cancel" button |
1. The checkbox is selected
2. The page with template is opened 3. The "Postal Code Warehouse manager" page is opened and Postal Code is not edited | ||
| 90 | Publish postal code | Precondition:
Go to "Postal Code Warehouse manager" section Find your Postal Code Steps: 1. Click on the your Postal Code 2. Select "Yes" published radio button 3. Click on the "Save" button |
1.The page with template is opened
2. The "Yes" published radio button is selected 3. Postal code is published and the "Save Postal Code Successfully" message is displayed |
| 91 | Unpublish postal code | Precondition:
Go to "Postal Code Warehouse manager" section Find your Postal Code Steps: 1. Click on the your Postal Code 2. Select "NO" published radio button 3. Click on the "Save" button |
1.The page with template is opened
2. The "Yes" published radio button is selected 3. Postal code is no published and the "Save Postal Code Successfully" message is displayed |
| 92 | Delete postal code | Precondition:
Go to "Postal Code Warehouse manager" section Find your Postal Code Steps: 1. Click on the your "Postal Code" checkbox 2. Click on the "Delete" button 3. Click on the "OK" button |
1. The checkbox is selected
2. The "Are you sure you want to delete selected items? " message is displayed 3. The "Remove Postal Code Successfully" message is displayed |
| Precondition:
Go to "Postal Code Warehouse manager" section Find your Postal Code Steps: 1. Click on the your "Postal Code" checkbox 2. Click on the "Delete" button 3. Click on the "Cancel" button |
1. The checkbox is selected
2. The "Are you sure you want to delete selected items? " message is displayed 3. The postal code is stayed in system | ||
| 93 | Parce SCV | Precondition:
Go to "Postal Code Warehouse manager" section Find your Postal Code Steps: 1. Click on the your "Postal Code" checkbox 2. Click on the "Parse CSV" button 3. Click on the "Select file" button and select CSV file 4. Click on the "Upload File" button |
1. The checkbox is selected
2. The window is opened and contain atributes(Select file, Download Sample, Upload file and save , close - buttons) 3. The window is opened and file is added 4. The postal codes are added and the "2 postalcodes successfully created/updated" message is displayed |
| Precondition:
Go to "Postal Code Warehouse manager" section Find your Postal Code Steps: 1. Click on the your "Postal Code" checkbox 2. Click on the "Parse CSV" button 3. Click on the "Download Sample" button 4. Click on "Save" button |
1. The checkbox is selected
2. The window is opened and contain atributes(Select file, Download template, Upload and save , close - buttons) 3. The appropriate window is opened 4. The CSV file is saved | ||
| Precondition:
Go to "Postal Code Warehouse manager" section Find your Postal Code Steps: 1. Click on the your "Postal Code" checkbox 2. Click on the "Parse CSV" button 3. Click on the "Close" button |
1. The checkbox is selected
2. The window is opened and contain atributes(Select file, Download template, Upload and save , close - buttons) 3. The window is closed | ||
| 94 | Filters | Precondition:
Go to the "Postal Code Warehouse Manager" section Steps: 1. In the "Filter" field, enter the desired postcode 2. Click "Enter" on your keyboard |
1. The resulting code in the "Filter" field is displayed
2. Postal code - found |
| (Has Date Range)
Precondition: Go to the "Postal Code Warehouse Manager" section Check the box next to "Has Date Range" |
"Has Date Range" - applied to the filter | ||
| (Alphabet Short)
Precondition: Go to the "Postal Code Warehouse Manager" section Select Ascending or Descending from the list to sort |
The list is sorted from Alphabet | ||
| (Warehouse Sort)
Precondition: Go to the "Postal Code Warehouse Manager" section Select a warehouse from the "Warehouse Sort" list |
The list is sorted from Warehouse | ||
Driver rates | |||
| 95 | Create new zone | Steps:
1. Click in the "Driver rates" section 2. Click in the "New" button 3. Click on the "Save" button |
1. The appropriate page is opened
2. The page is opened and contain atributes (name, warehouse, rate, rate for driver, is gofor, comment - fields; save, close - buttons) 3. The new zone is created |
| 96 | Edit new zone | Precondition:
Go to "Driver rates" section Find your zone Steps: 1. Click your zone checkbox 2. Click on the "Edit" button 3. Click on the "Save" button |
1. The checkbox is selected
2. The page is opened and contain atributes (name, warehouse, rate, rate for driver, is gofor, comment - fields; save, close - buttons) 3. The zone is edited |
| Precondition:
Go to "Driver rates" section Steps: Click on the "Edit" button |
The "Please select an item from the list to edit" message is displayed | ||
| 97 | Delete new zone | Precondition:
Go to "Driver rates" section Find your zone Steps: 1. Click your zone checkbox 2. Click on the "Delete" button 3. Click on the "OK" button |
1. The checkbox is selected
2. The "Are you sure you want to delete selected items? " message is displayed 3. The zone is deleted and the "Success."message is displayed |
| Precondition:
Go to "Driver rates" section Find your zone Steps: 1. Click your zone checkbox 2. Click on the "Delete" button 3. Click on the "Cancel" button |
1. The checkbox is selected
2. The "Are you sure you want to delete selected items? " message is displayed 3. The zone is stayed in system | ||
| Precondition:
Go to "Driver rates" section Steps: Click on the "Delete" button |
The "Please make a selection from the list to delete" message is displayed | ||
| 98 | Filters | Precondition:
Go to "Driver rates" section Steps: 1. Click on the "Warehouse" field 2. Select warehouse (exsample "testing") |
1. The drop-down list is opened
2. The "testing" warehouse is selected and all zone in "testing" warehouse is dislayed |
| Precondition:
Go to "Driver rates" section Steps: 1. Fill in zone name in "Search" field (example "MY ZONE") 2. Click on the "Filter" button |
1. The "Search" field is filled in
2. The "MY ZONE" zone is displayed | ||
| Precondition:
Go to "Driver rates" section Steps: 1. Fill in postal code in "Search" field (example "V5K") 2. Click on the "Filter" button |
1. The "Search" field is filled in
2. The zone with "V5K" postal code is displayed | ||
| 99 | Add postal code to zone | Precondition:
Go to "Driver rates" section Select youre zone Steps: 1. Click on the "Add/Remove" button 2. Click on the checkbox 3. Click on the "New" button 4. Fill in the "postalcode" field and click on the "Save" button |
1. The appropriate page is opened and contain atributes("Postalcode" checkbox; Delete, Edit, New, Parse CSV, Close - buttons)
2. Checkbox is selected 3. The page with "postal code" field is opened 4. The "postalcode" field is filled in and postalcode is added |
| Precondition:
Go to "Driver rates" section Select youre zone Steps: 1. Click on the "Add/Remove" button 2. Click on the "New" button |
1. The appropriate page is opened and contain atributes("Postalcode" checkbox; Delete, Edit, New, Parse CSV, Close - buttons)
2. The page with "postal code" field is opened | ||
| 100 | Parce SCV | Precondition:
Go to "Driver rates" section Select youre zone Steps: 1. Click on the "Add/Remove" button 2. Click on the "Parse CSV" button 3. Click on the "Select file" button and select CSV file 4. Click on the "Upload and Save" button |
1. The appropriate page is opened and contain atributes("Postalcode" checkbox; Delete, Edit, New, Parse CSV, Close - buttons)
2. The window is opened and contain atributes(Select file, Download template, Upload and save , close - buttons) 3. The window is opened and file is added 4. The postalcodes are added |
| Precondition:
Go to "Driver rates" section Select youre zone Steps: 1. Click on the "Add/Remove" button 2. Click on the "Parse CSV" button 3. Click on the "Download template" button 4. Click on "Save" button |
1. The appropriate page is opened and contain atributes("Postalcode" checkbox; Delete, Edit, New, Parse CSV, Close - buttons)
2. The window is opened and contain atributes(Select file, Download template, Upload and save , close - buttons) 3. The appropriate window is opened 4. The CSV file is saved | ||
| Precondition:
Go to "Driver rates" section Select youre zone Steps: 1. Click on the "Add/Remove" button 2. Click on the "Parse CSV" button 3. Click on the "Close" button |
1. The appropriate page is opened and contain atributes("Postalcode" checkbox; Delete, Edit, New, Parse CSV, Close - buttons)
2. The window is opened and contain atributes(Select file, Download template, Upload and save , close - buttons) 3. The window is closed | ||
| 101 | Edit postal code in zone | Precondition:
Go to "Driver rates" section Select youre zone Steps: 1. Click on the "Add/Remove" button 2. Click on the checkbox 3. Click on the "Edit" button 4. Edit postalcode and click on the "Save" button |
1. The appropriate page is opened and contain atributes("Postalcode" checkbox; Delete, Edit, New, Parse CSV, Close - buttons)
2. Checkbox is selected 3. The page is opened and contain atributes (Postalcode, Rate fields; Save, Close - buttons) 4. The postalcode is edited |
| Precondition:
Go to "Driver rates" section Select youre zone Steps: 1. Click on the "Add/Remove" button 2. Click on the "Edit" button |
1. The appropriate page is opened and contain atributes("Postalcode" checkbox; Delete, Edit, New, Parse CSV, Close - buttons)
2. The "Please select an item from the list to edit"message is displayed | ||
| 102 | Delete postal code in zone | Precondition:
Go to "Driver rates" section Select youre zone Steps: 1. Click on the "Add/Remove" button 2. Click on the checkbox 3. Click on the "Delete" button 4. Click on the "OK" button |
1. The appropriate page is opened and contain atributes("Postalcode" checkbox; Delete, Edit, New, Parse CSV, Close - buttons)
2. Checkbox is selected 3. The "Are you sure you want to delete selected items?"message is displayed 4. The postalcode is deleted and the "Success."message is displayed |
| Precondition:
Go to "Driver rates" section Select youre zone Steps: 1. Click on the "Add/Remove" button 2. Click on the checkbox 3. Click on the "Delete" button 4. Click on the "Cancel" button |
1. The appropriate page is opened and contain atributes("Postalcode" checkbox; Delete, Edit, New, Parse CSV, Close - buttons)
2. Checkbox is selected 3. The "Are you sure you want to delete selected items?"message is displayed 4. The postalcode is stayed in system | ||
| Precondition:
Go to "Driver rates" section Select youre zone Steps: 1. Click on the "Add/Remove" button 2. Click on the "Edit" button |
1. The appropriate page is opened and contain atributes("Postalcode" checkbox; Delete, Edit, New, Parse CSV, Close - buttons)
2. The "Please make a selection from the list to delete"message is displayed | ||
| 103 | Warehouse email | Precondition:
Finish the order and Check the Warehouse email Click the “Save Order” button |
A letter about a new order was sent to the warehouse's email address |
| 104 | Changing status for the recipient | Precondition:
Order was placed, order details page is opened in the Manage Orders module Steps: Select the "Notify Recipient?" checkbox, select status, and click on the "Update status" button |
The checkbox is checked and the status is updated
A letter about "Change order status" is delivered to the recipient
|
Sms module | |||
| 105 | Create new sms chat |
2. Click on the "New" button 3. Fill in "Phone Number", Order Number, Some Text (can choose from template or write in the SMS Text field) and click on the "Send SMS" button 4. Send reply from phone |
1. Sms module opened
2. SMS Item: New page is opened 3. Sent text is displayed in the SMS CHAT field
4. Reply from client should displayed in the SMS chat
|
| 106 | Check View all checkbox |
Precondition: SMS chats with and without reply are created 1. Click View all checkbox |
1. Sms chats with and without reply are shown
|
| 107 | Check filter |
1. Enter the phone number from created chat and press Enter button by keyboard
|
1. Chat was found with entered phone number
|
| 108 | Delete sms chat |
1. Click on the "Delete" button
|
1. Sms module deleted
|
Emails
Warehouse letter about changing status
Changing status for the recipient
Changed status to Hidden Comments
About deleting the account (manage user)
