Test-case WEB (full): Difference between revisions
No edit summary |
No edit summary |
||
| (47 intermediate revisions by 3 users not shown) | |||
| Line 24: | Line 24: | ||
| colspan="4" style="background-color:#ffffed;" | | | colspan="4" style="background-color:#ffffed;" | | ||
=Homepage= | =Homepage= | ||
|Eng | |Eng/FR | ||
|- | |- | ||
| 1 | | 1 | ||
| Line 46: | Line 46: | ||
[[Image:Flowers page is opened.png|800px]] | [[Image:Flowers page is opened.png|800px]] | ||
|Specials Section: http://cloud.necs.ca/s/NSWJjFJmEeLHdHb | |||
|ENG | |||
Specials Section: http://cloud.necs.ca/s/NSWJjFJmEeLHdHb | |||
Occasions Section: http://cloud.necs.ca/s/etoZDN6zcP9kkyw | Occasions Section: http://cloud.necs.ca/s/etoZDN6zcP9kkyw | ||
| Line 61: | Line 64: | ||
http://cloud.necs.ca/s/eZgLRrrR9eqPQz7 | http://cloud.necs.ca/s/eZgLRrrR9eqPQz7 | ||
Corporate Section: | |||
http://cloud.necs.ca/s/BmqCEiCtPEZCeDN | |||
By Price Section: | |||
http://cloud.necs.ca/s/pgBC5dasdDKA7iK | |||
Help/Account Section: | |||
http://cloud.necs.ca/s/6CAxLFpCbtqE5fe | |||
Policies Section (not actual now): | |||
http://cloud.necs.ca/s/o47jjK9KM8mNRne | |||
FR | |||
Aide_Compte | |||
http://cloud.necs.ca/s/pja5p8swMiePe86 | |||
Enterprise | |||
http://cloud.necs.ca/s/KH2aCPrxecsM6Q7 | |||
Fleurs | |||
http://cloud.necs.ca/s/AWxw2i9QabeWyRW | |||
FleursEnVrac | |||
http://cloud.necs.ca/s/R52XyKCLFKMfqHp | |||
Occasions | |||
http://cloud.necs.ca/s/3jcKnAbJRGRJMEG | |||
PaniersCadeaux | |||
http://cloud.necs.ca/s/4cQjSRq4QYs6GkM | |||
ParPrix | |||
http://cloud.necs.ca/s/4NxwogRpPNtkx4F | |||
Politiques | |||
http://cloud.necs.ca/s/bCqfEpekJtD6y37 | |||
PolitiquesSection | |||
http://cloud.necs.ca/s/5xweq8qLNpGaEk6 | |||
Spéciaux | |||
http://cloud.necs.ca/s/2BoWsoqqPzWq3GW | |||
|- | |- | ||
| | | 3 | ||
| | | Products landing page on the homepage | ||
| | | Check the products landing page and through all page | ||
| The product cart on the products landing page contains attributes ( image, review, title, old price, price, button) | |||
[[Image:The product cart on the products landing page contains attributes.jpg|800px]] | |||
|ENG | |||
http://cloud.necs.ca/s/BGiqe6XGE5K7R8q | |||
FR | |||
Landing Page | |||
http://cloud.necs.ca/s/i6eRJNiZB5WErbS | |||
|- | |- | ||
| | | 4 | ||
| | | Banners on the homepage | ||
| 1. Check all banners | |||
| | |||
2. Click the 20$ banner | |||
3. Click the arrow on all sliders | |||
4. Click the "Half price" banner | |||
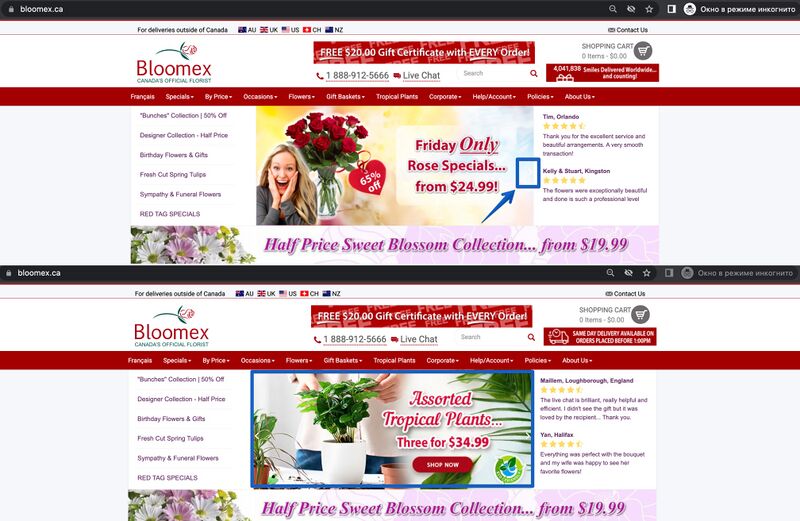
| 1. All banners are displayed (20$ gift certificate, smiles delivered, slider, half price) | |||
[[Image:All banners are displayed.png|800px]] | |||
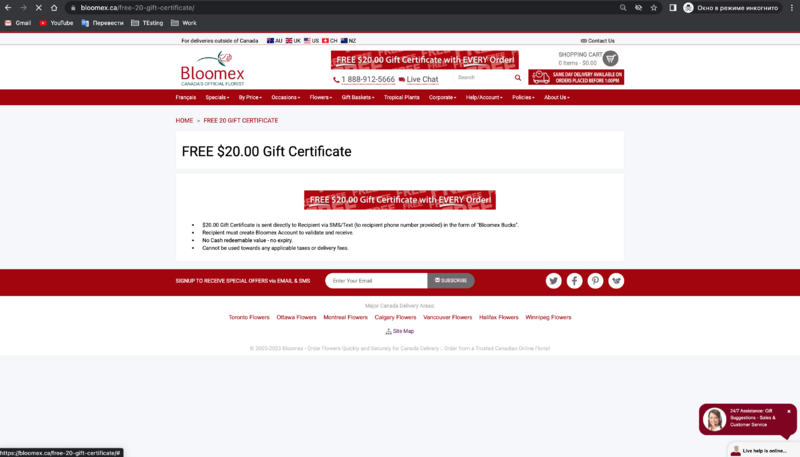
2. The page about the "free 20$ gift certificate" is opened | |||
[[Image:The | [[Image:The page is opened.png|800px]] | ||
3. All images when scrolling through the banners are displayed | |||
[[Image:All images when scrolling through the banners are displayed.jpg|800px]] | |||
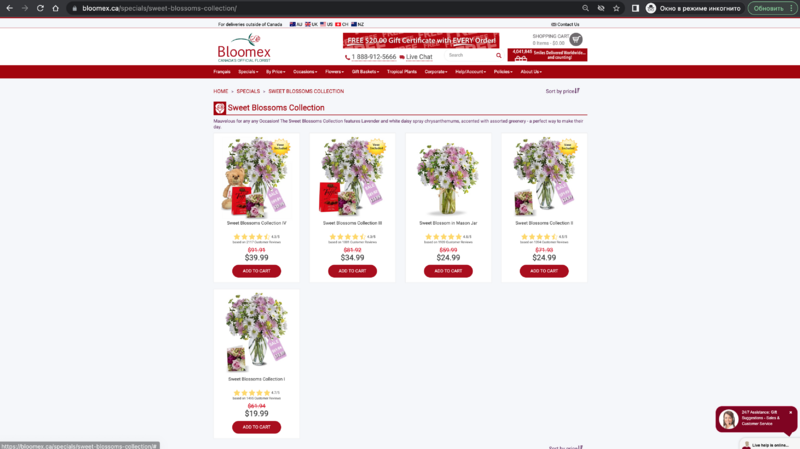
4. The "Sweet Blossoms Collection" page is opened | |||
[[Image: | [[Image:The Sweet Blossoms Collection page is opened.png|800px]] | ||
|ENG | |||
http://cloud.necs.ca/s/zHsc9k3Ae2fJGco | |||
FR | |||
Banners | |||
http://cloud.necs.ca/s/eNW9pZCXTKDx3ZY | |||
|- | |- | ||
| | | 5 | ||
| Contact us in the header | |||
| | | Click on the "Contact us" button | ||
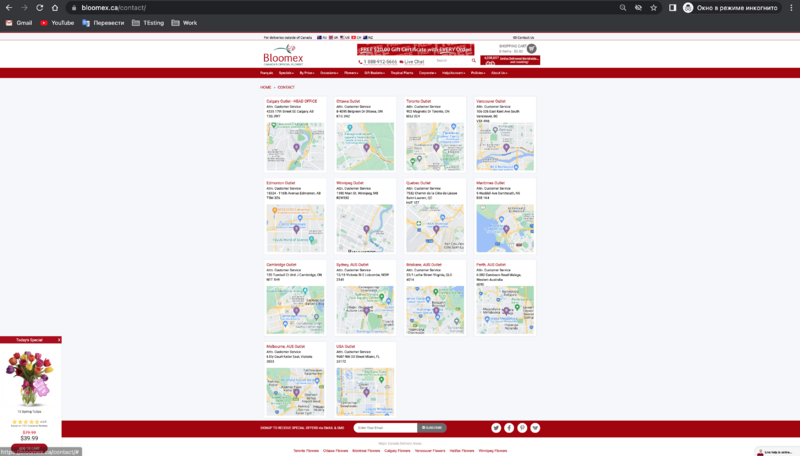
| | | The "Contact us" page is opened. | ||
[[Image:Contactuspage.png|800px]] | |||
| | |ENG | ||
| | |||
http://cloud.necs.ca/s/LJn3AWWm6cp9ek4 | |||
FR | |||
ContactUs | |||
http://cloud.necs.ca/s/KQgAmPqGP4CG3HY | |||
|- | |- | ||
| | | 6 | ||
| | | Link to the websites of the other countries in header site | ||
| | | Click on the country link | ||
| The | | The website of the country you have chosen is opened | ||
[[Image: | [[Image:Websiteothercountriesicon.png|800px]] | ||
|ENG | |||
http://cloud.necs.ca/s/p7fftQ57EoYdHwj | |||
FR | |||
Link Web sites Other Countries | |||
http://cloud.necs.ca/s/963YagZn7wLnAgk | |||
|- | |- | ||
| | | rowspan="3" | 7 | ||
| | | rowspan="3" | Search results (search by button and by keyboard) | ||
| | | Fill in the "search" field with a valid value and click the "search" button | ||
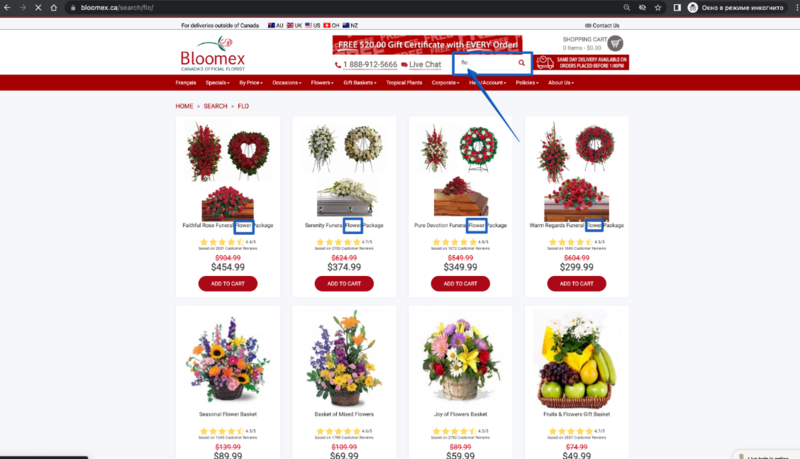
| The | | The search result shows products containing the searching value in the product title or SCU | ||
[[Image:searchresult.png|800px]] | |||
|ENG | |||
http://cloud.necs.ca/s/EWCqSHSRcKxmsEa | |||
FR | |||
Search Main | |||
http://cloud.necs.ca/s/bjGMF3Pkx4EaqRY | |||
[[Image: | |- | ||
| Fill in the "search" field with not a valid value (spaсe, special symbols, cyrillic symbols) | |||
| The "Nothing found on your request" message is displayed | |||
[[Image:Nothingfoundsearch.png|800px]] | |||
| | | | ||
|- | |- | ||
|- | |||
| Click by "search" button with an empty "search" field | |||
| The "The length of the search string must be at least 3 characters" message is displayed | |||
[[Image:lengthofthesearchstring.png|800px]] | |||
|- | |||
|- | |- | ||
| | | 8 | ||
| Check changing to the French language | |||
| Click on the "Francais" button | |||
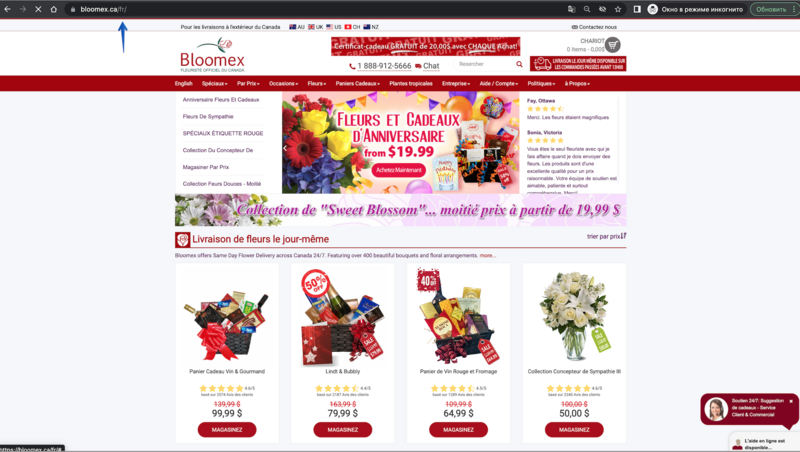
| All website is changed to the French language including the logo | |||
[[Image:FR button click.png|800px]] | |||
|ENG | |||
http://cloud.necs.ca/s/X4LQ85zg2C86JJA | |||
FR | |||
Change To Language | |||
http://cloud.necs.ca/s/LcRPTeLKRaWKiSx | |||
|- | |||
| 9 | |||
| Footer links | |||
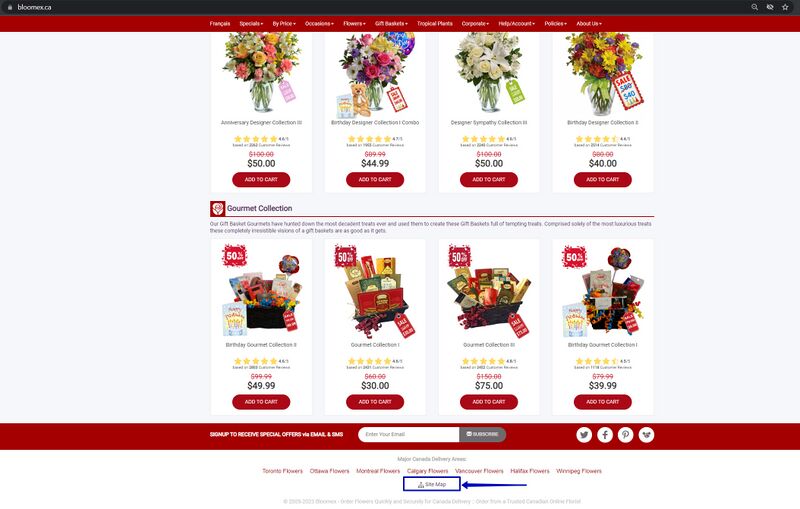
| 1. Scroll down to the bottom of the homepage. | |||
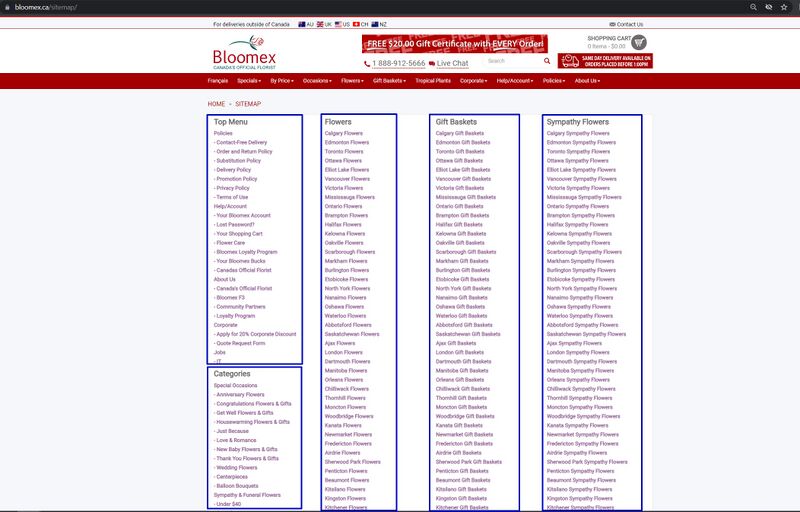
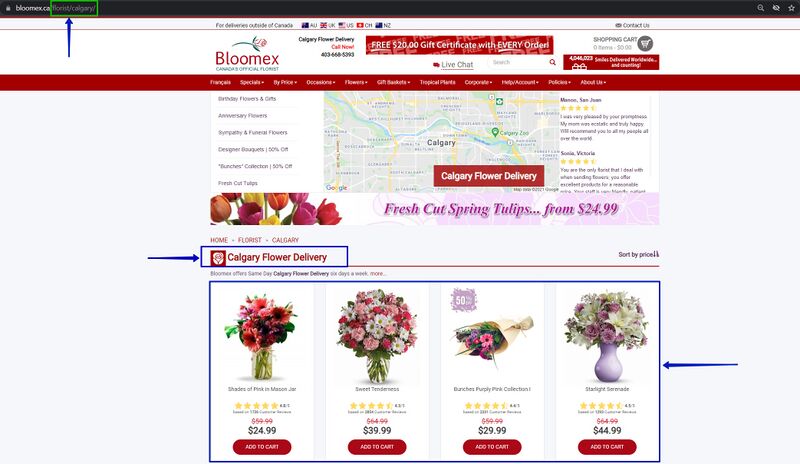
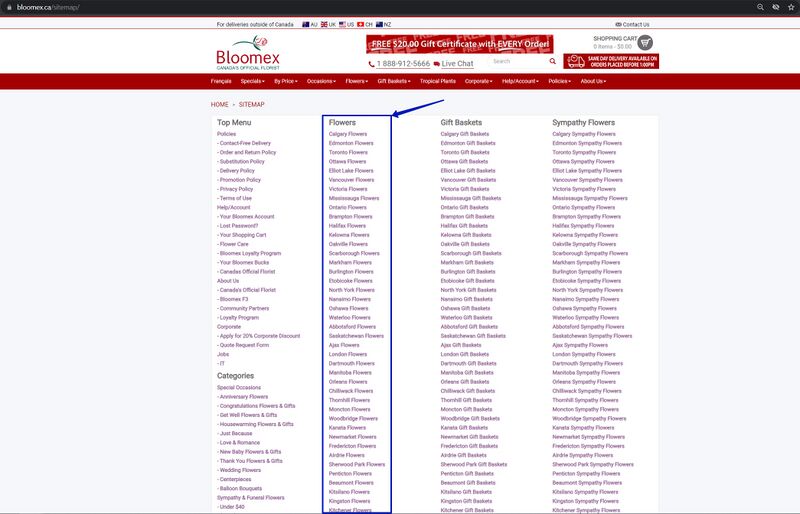
Click on the | 2. Click on the warehouse flowers links | ||
3. Click on the site map link | |||
4. Click on any link on a site map | |||
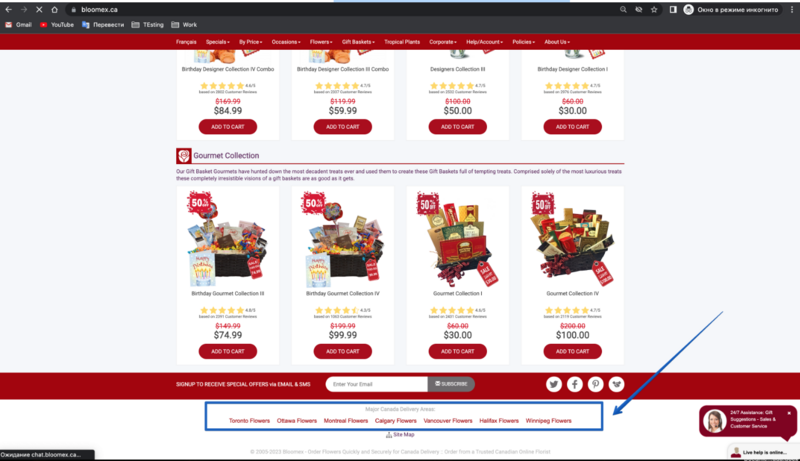
| 1. The Footer links are displayed | |||
[[Image:The Footer links are displayed .png|800px]] | |||
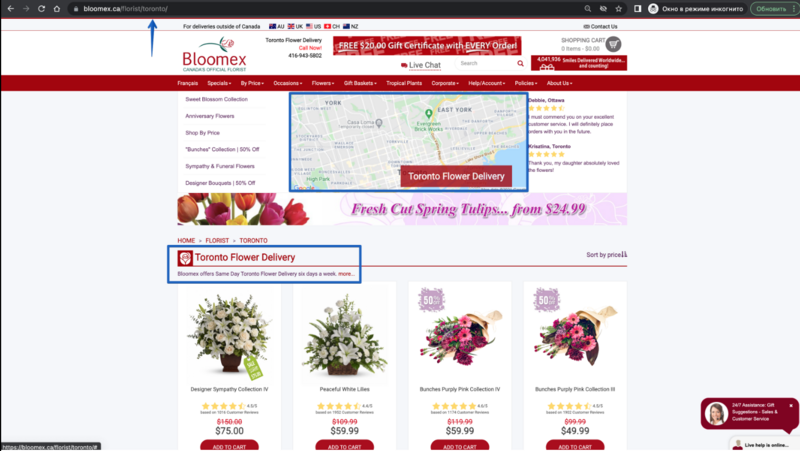
2. Warehouse flowers links redirect to the appropriate page | |||
[[Image:Warehouse flowers links redirect.png|800px]] | |||
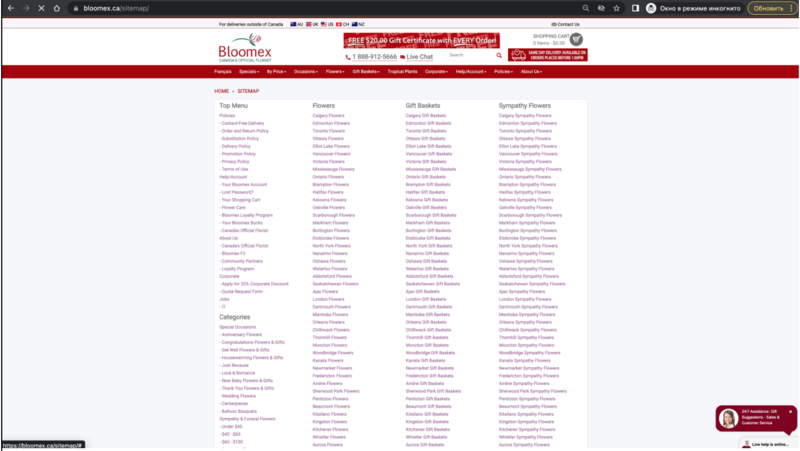
3. | 3. The site map page is opened and contains (Top Menu, Categories, Flowers, Gift Baskets, Sympathy Flowers) | ||
[[Image:The sitemap is opened.png|800px]] | |||
4. The appropriate page is opened. | |||
|ENG | |||
1-2: http://cloud.necs.ca/s/yxzQZ2SAmgL4w4y | |||
FR | |||
Footer WH Links | |||
http://cloud.necs.ca/s/CiL7NxzwBR23fKj | |||
|- | |- | ||
| | | 10 | ||
| | | Social links in footer | ||
| | | Click on the social links at the bottom of the homepage | ||
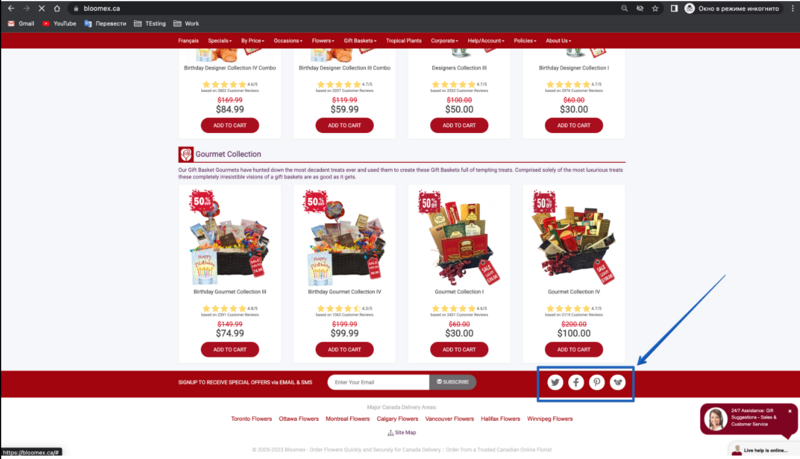
| Social links redirect to social networks and partnership link redirect to the partnership page | |||
[[Image:Social links redirect .png|800px]] | |||
|ENG | |||
http://cloud.necs.ca/s/JmzE5pDWEyNGSEE | |||
FR | |||
Social Footer Links | |||
http://cloud.necs.ca/s/G5sPEPFMjznxTZM | |||
|- | |||
| 11 | |||
| Function "subscribe" in the footer <span id="Subscribe"></span> | |||
| Steps: | |||
1. Scroll down to the bottom of the homepage | |||
2. Enter your email in the "Enter Your Email" field and click the "Subscribe" button | |||
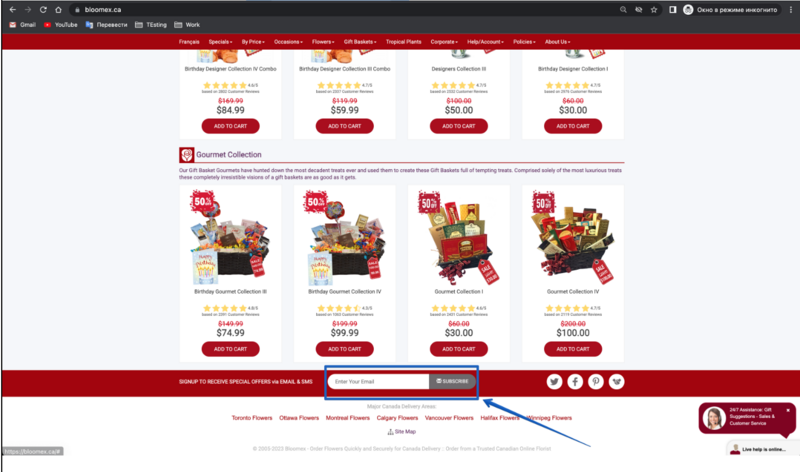
[[Image: | | 1. The "Subscribe" button and the "Email" field are displayed | ||
[[Image:The "subscribe" button.png|800px]] | |||
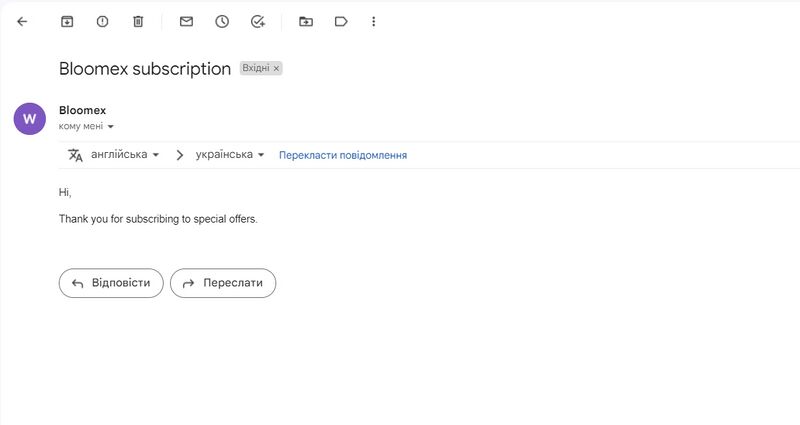
2. A "Subscription" letter has been sent to the mail | |||
[[Image:Bloomex subscription.jpg|800px]] | |||
|ENG | |||
http://cloud.necs.ca/s/WzjssyzTD2JgJe7 | |||
FR | |||
Subscription | |||
http://cloud.necs.ca/s/ZixyNpNzWw4MepT | |||
|- | |||
| 12 | |||
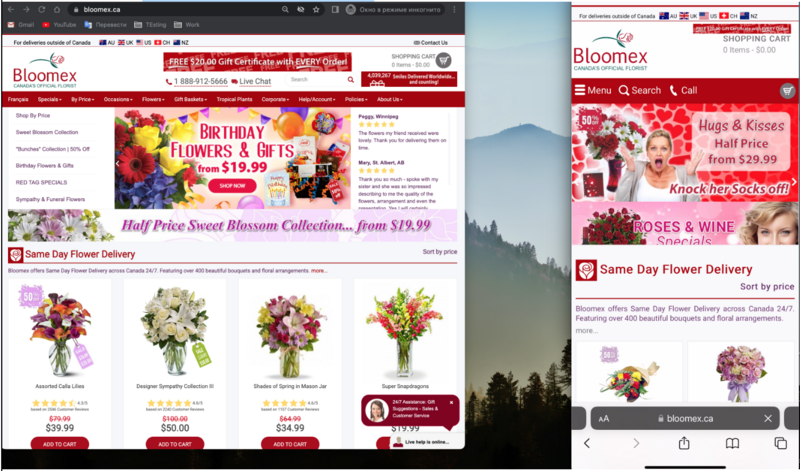
| The site displays correctly on different screen resolutions and on different devices | |||
| Open the website on different screen resolutions and different devices | |||
| The website on different devices with different screen resolutions is displayed correctly | |||
[[Image: | [[Image:The website on different devices.png|800px]] | ||
| | | | ||
|- | |- | ||
| | | 13 | ||
| | | Favicon | ||
| | | Check on the favicon display | ||
| The favicon is displayed in the bookmark | |||
[[Image:The favicon is displayed in the bookmark.png|800px]] | |||
| | |||
|- | |||
| colspan="4" style="background-color:#ffffed;" | | |||
=Product listing page= | |||
| | |||
|- | |||
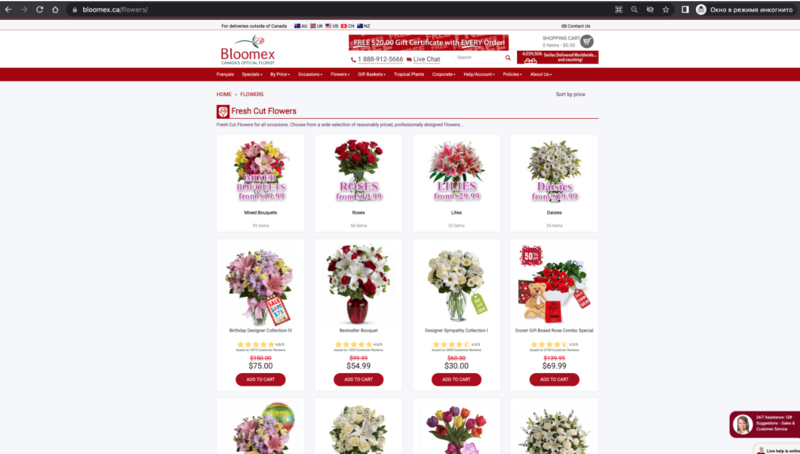
| 14 | |||
| Check category displaying | |||
(example Flowers, Gift basket, Shop for Good, by Price, Occasions landing page) | |||
| Click on any category (for example flowers category) | |||
| An appropriate landing page with catecories is opened ( for example flowers category) | |||
[[Image:An appropriate landing page.png|800px]] | |||
| | |||
|- | |||
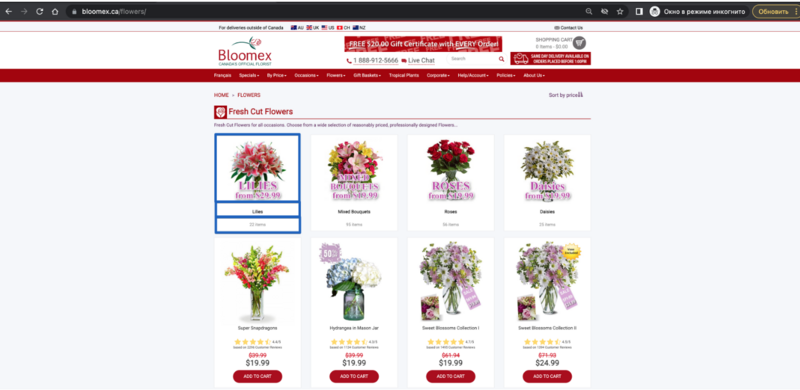
| 15 | |||
| Information on category carts | |||
| Choose any category | |||
| Category carts contain attributes ( image, title, number of items) | |||
[[Image:Category carts contain attributes.png|800px]] | |||
| | |||
|- | |||
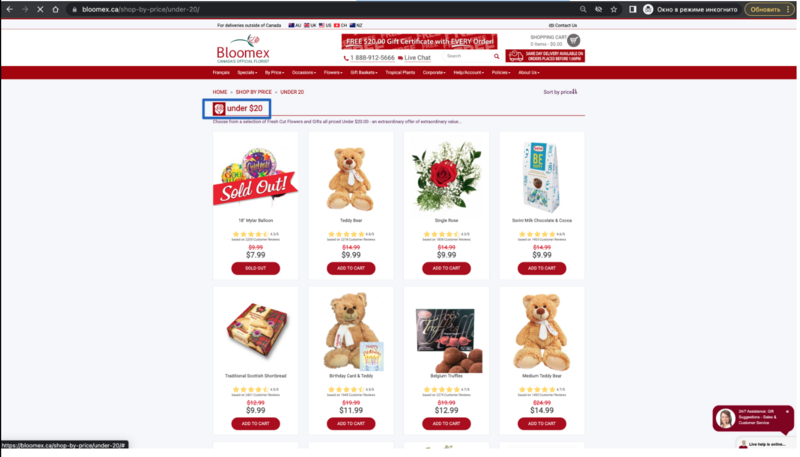
| 16 | |||
| Products sorting (by price) | |||
| 1. Click on the "by price" menu section | |||
2. Click on any category | |||
(example under 20) | |||
| 1. The "by price" button is worked and sorted the products from less to more and vice versa | |||
[[Image:The "by price" button is worked .png|800px]] | |||
2. Products is co-priced and the maximum and minimum price does not go out of the range | |||
[[Image:Maximum and minimum price .png|800px]] | |||
[[Image: | |||
| | | | ||
|- | |- | ||
| | | 17 | ||
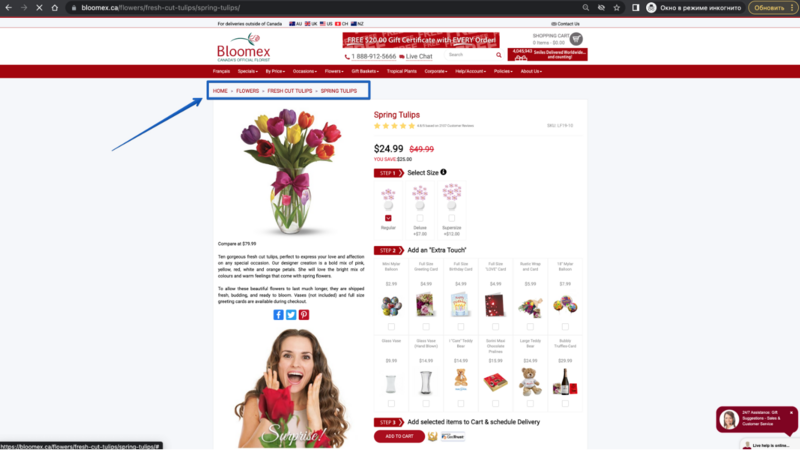
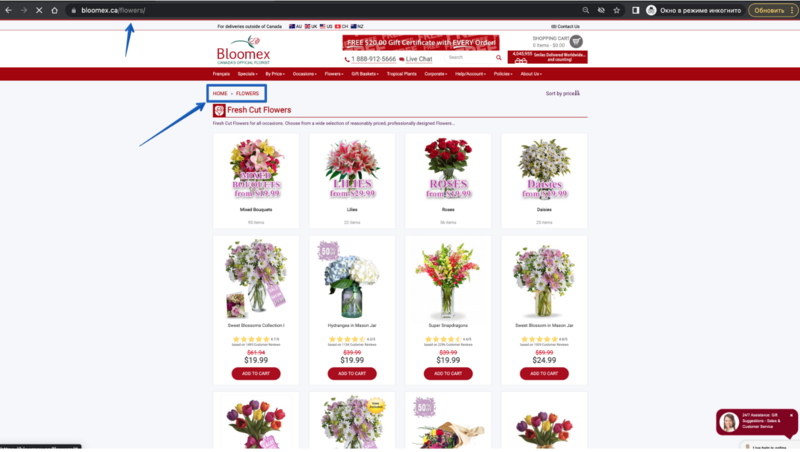
| | | Breadcrumbs on the product list page | ||
| | | 1. Go to the product list page | ||
2. Click on the breadcrumbs link | |||
( for example "flowers" breadcrumb) | |||
1. | | 1. Breadcrumbs are displayed correctly | ||
[[Image:Breadcrumbs are displayed correctly.png|800px]] | |||
| | |||
2. The appropriate page is opened. | |||
[[Image:Breadcrumbs page is opened..png|800px]] | |||
[[Image: | |||
| | | | ||
|- | |- | ||
| colspan="4" style="background-color:#ffffed;" | | | colspan="4" style="background-color:#ffffed;" | | ||
= | =Product details page= | ||
| | | | ||
|- | |- | ||
| | | 18 | ||
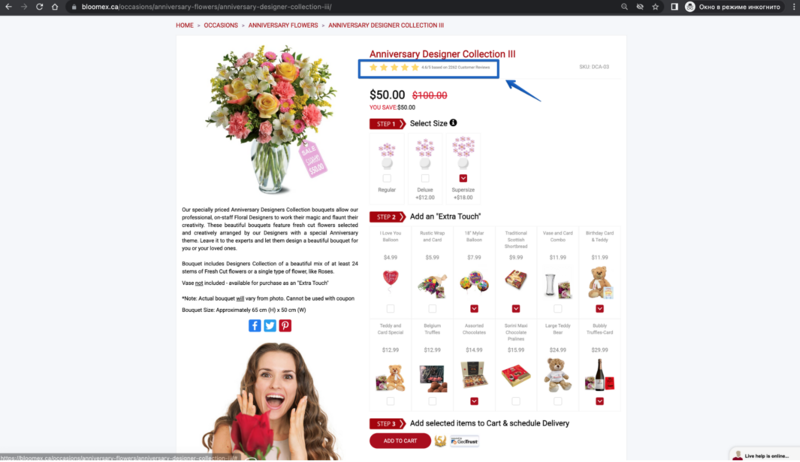
| | | Product attributes on the product details page ( breadcrumbs, image of product, review, title, SCU, price(old price elso), "select size", "extra touch", social links, buy button, description) | ||
| Go to the product details page | |||
| The product attributes on the product details page ( breadcrumbs, the image of the product, review, title, SCU, price(old price also), "select size", "extra touch", social links, buy button, description) are displayed | |||
[[Image:The product attributes on the product details page.png|800px]] | |||
| | |||
|- | |||
| 19 | |||
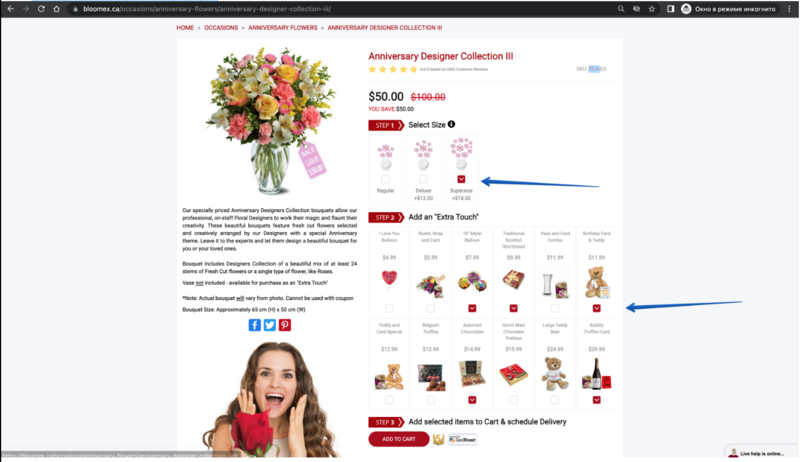
| Change product sizes and "Extra Touch" | |||
| Change "select size" and change "Extra Touch" | |||
| The "Select size" contains (regular, deluxe, supersize) options, and selected the "Extra Touch" can be added to the cart | |||
[[Image:The "Select size" contains .png|800px]] | |||
|ENG | |||
Buy product with product size - Supersize and "Extra Touch" | |||
http://cloud.necs.ca/s/bz4JWey6bijiFBo | |||
Buy product with product size - Deluxe and "Extra Touch" | |||
http://cloud.necs.ca/s/g6y7FtxtfHseEXK | |||
|- | |||
| 20 | |||
| Clients reviews | |||
| Go to the product details page | |||
| Clients reviews contain (5 stars and descriptions) are displayed | |||
[[Image:Clients reviews contain.png|800px]] | |||
[[Image: | |||
| | | | ||
|- | |- | ||
| 21 | |||
| Add product to the Shopping Cart | |||
| Go to the product details page and click the "Add to cart" button | |||
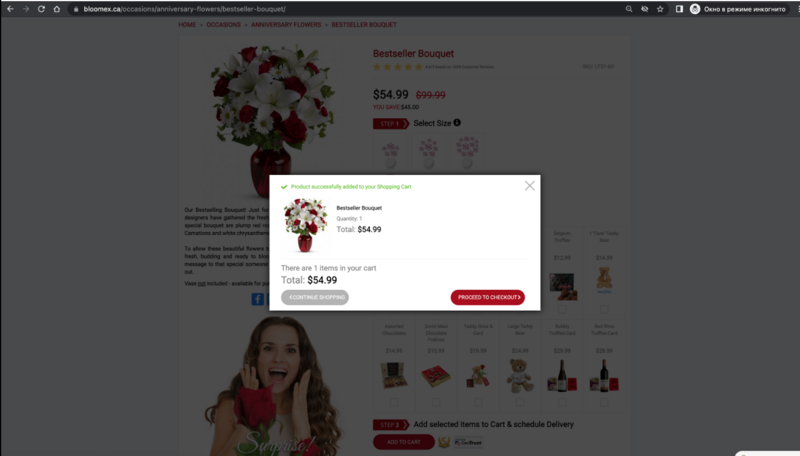
| The "cart modal inner" contains attributes ("Product successfully added to your Shopping Cart" message, title, quantity, total price, "continue shopping" button, "proceed to checkout" button) and is opened | |||
[[Image:Cart modal inner.png|800px]] | |||
| | |||
|- | |- | ||
| | | 22 | ||
| Check cart product that out of stock | |||
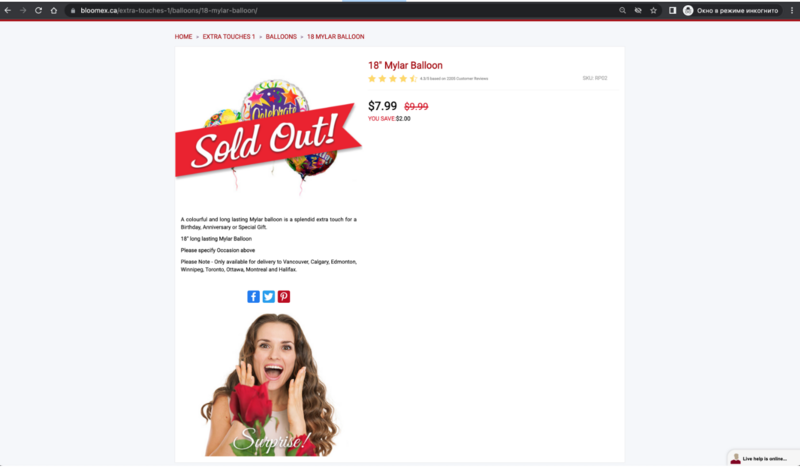
| Search for a product "Sold out"( example in "by price" - "under 20") and go to the product details page | |||
| The product details page with the "Sold Out" image and without any steps or buy button is displayed | |||
[[Image:Sold Out.png|800px]] | |||
| | |||
|- | |||
| 23 | |||
| Social links to share product | |||
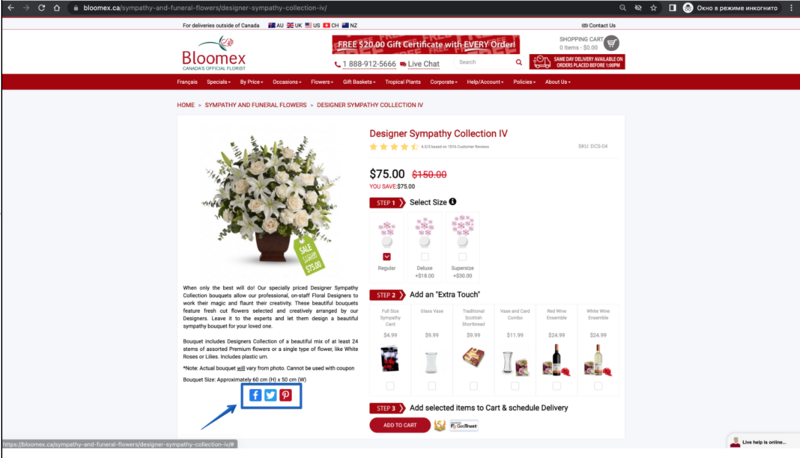
| Go to the product details page | |||
| The social links redirect to social networks | |||
[[Image:The social links PDP.png|800px]] | |||
| | |||
|- | |||
| 24 | |||
| Breadcrumbs on PDP | |||
| 1. Go to the product details page | |||
2. Click on the breadcrumbs link | |||
( for example "Occasions" breadcrumb) | |||
| 1. Breadcrumbs on the product details page are activated and displayed | |||
[[Image:Breadcrumbs on PDP.png|800px]] | |||
2. The appropriate page is opened. | |||
| | [[Image:Breadcrumbs page is opened..png|800px]] | ||
| | |||
|- | |||
| 25 | |||
| Glyph icon info sign | |||
| Go to the product details page and click the "Glyph icon info sign" | |||
| The Glyph icon info sign contains an info alert | |||
[[Image:The Glyph icon.png|800px]] | |||
| | |||
4 | |- | ||
| colspan="4" style="background-color:#ffffed;" | | |||
=Cart= | |||
| | | | ||
|- | |- | ||
| 26 | |||
| Check mini-cart displaying | |||
| Precondition: | | Precondition: | ||
Add to shopping cart any product and click "continue shopping" button | |||
Steps: | Steps: | ||
Hover on shopping cart | |||
| The mini-cart is displayed after hovering the mouse in the shopping cart and contains attributes (total, "view cart" button, "checkout" button) | |||
[[Image:Check mini-cart displaying.png|800px]] | |||
| | |||
|- | |||
| rowspan="2" | 27 | |||
| rowspan="2" | Proceed to checkout/cart from the mini-cart | |||
| Precondition: | |||
Add to shopping cart any product and click "continue shopping" button | |||
Steps: | |||
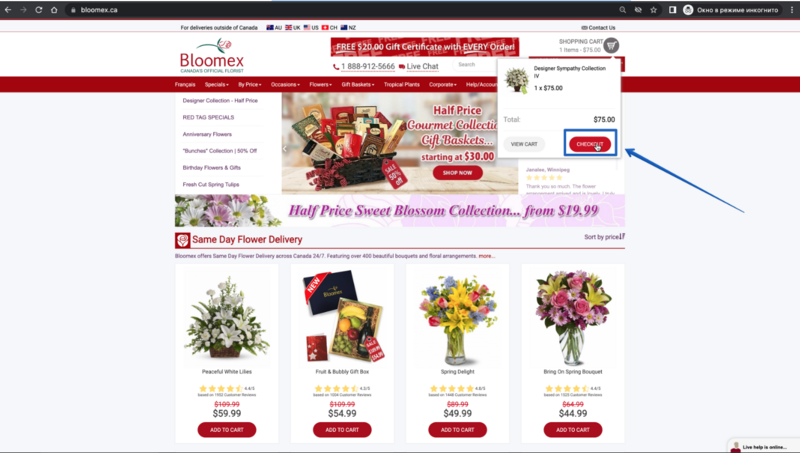
Click on "checkout" button on the mini-cart | |||
| The cart page with the selected product is opened | |||
[[Image:The | [[Image:The cart page with the selected product is opened.png|800px]] | ||
[[Image:The cart page with the selected product is opened 1.png|800px]] | |||
| | |||
|- | |- | ||
| Precondition: | | Precondition: | ||
Hover on shopping cart | |||
Steps: | Steps: | ||
Click on the " | Click on the "checkuot" button with empty mini-cart | ||
| The cart page is opened with the "Your Cart is empty" message | |||
[[Image:"Your Cart is empty" message .png|800px]] | |||
[[Image: | |||
| | | | ||
|- | |- | ||
| | | 28 | ||
| | | Check products displaying in cart | ||
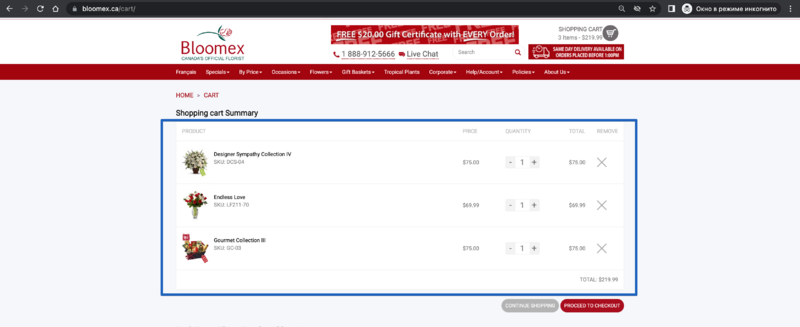
| Precondition: | | Precondition: | ||
Add to cart some products | |||
Steps: | |||
Click on the mini-cart "Checkuot" button | |||
| The products are displayed with contain attributes (shopping cart summary table, product, price, quantity, total, remove, product title, SCU, image, "continue shopping" button, "proceed to checkout" button) | |||
[[Image:Check products displaying in cart.png|800px]] | |||
| | |||
|- | |||
| 29 | |||
| Edit product in the cart (quantity, remove) | |||
| Precondition: | |||
Add some products to the cart and open cart page | |||
Steps: | Steps: | ||
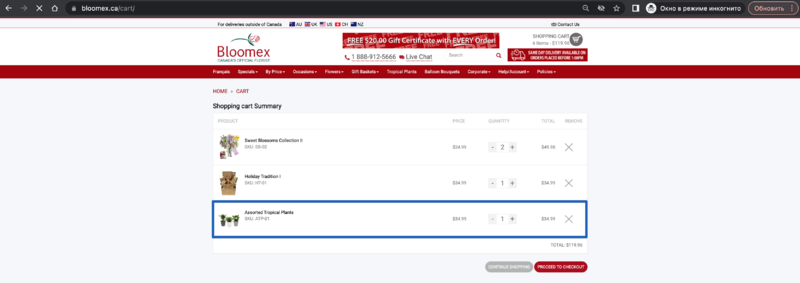
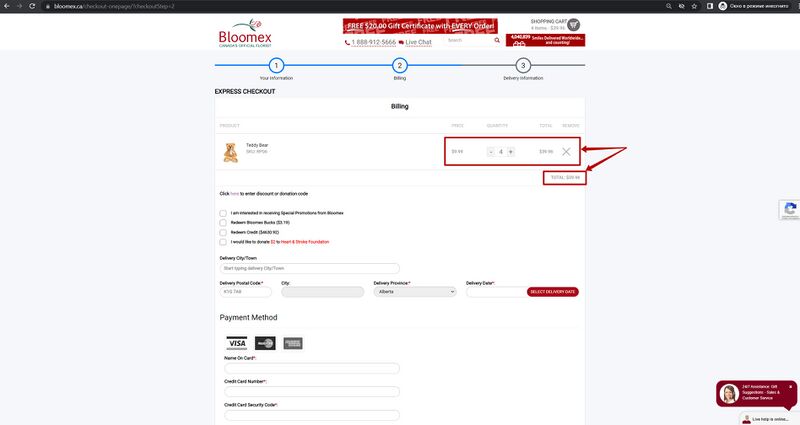
1. | 1. Click on the "plus" button | ||
2. | 2. Click on the "minus" button | ||
3. | 3. Click on "remove" button | ||
| 1. The quantity of product is increased, and the total cost is adjusted accordingly | |||
[[Image:The quantity of product is increased.png|800px]] | |||
[[Image: | 2. The quantity of product is reduced, and the total cost is adjusted accordingly | ||
[[Image:The quantity of product is reduced.png|800px]] | |||
3. The product is removed, and the total cost is adjusted accordingly. | |||
| | | | ||
|- | |- | ||
| | | 30 | ||
| | | Check totals calculation | ||
| Precondition: | | Precondition: | ||
Add some products to the shopping cart and open the cart page | |||
Steps: | Steps: | ||
Click on the "plus" button | |||
| The total price is adjusted accordingly based on the quantity and price of the products | |||
[[Image:Check totals calculation.png|800px]] | |||
| | |||
|- | |||
| 31 | |||
| Remove product from the cart | |||
| 1. Go to Homepage | |||
2. Add to Cart any product | |||
3. Click proceed to checkout | |||
4. Remove product from the cart | |||
| Product from the cart was been removed successfully | |||
[[Image:Remove product from the cart.png|800px]] | |||
[[Image: | |||
| | | | ||
|- | |- | ||
| | | 32 | ||
| | | Proceed order from cart to continue shopping and add product | ||
| Precondition: | | Precondition: | ||
Proceed to the cart | |||
Steps: | |||
1. Click on the "continue shopping" button | |||
2. Choose any product and click on the "add to cart" button | |||
3. Click on the "proceed to checkout" button | |||
| 1. The homepage is opened | |||
2. The "cart modal inner" is opened | |||
3. The cart page is opened with the product that has been selected | |||
[[Image: | [[Image:Proceed order from cart to continue shopping and add product.png|800px]] | ||
| | |||
|- | |||
| 33 | |||
| Proceed to checkout from cart to checkout | |||
| Precondition: | |||
Add any product to the cart and proceed to the cart | |||
Steps: | |||
1. Click on the "proceed to checkout" button | |||
2. Click on the "proceed to checkout" button | |||
3. Fill in the valid value "create account" form | |||
4. Click on the "register" button | |||
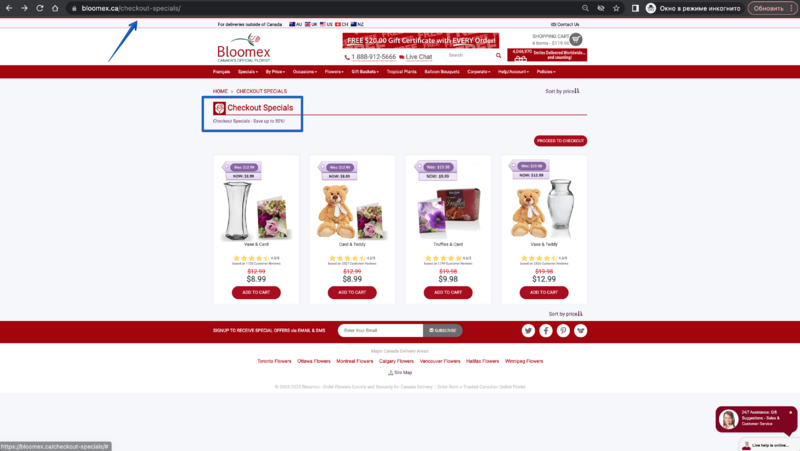
| 1. The checkout specials page is opened | |||
[[Image:The checkout specials page is opened.png|800px]] | |||
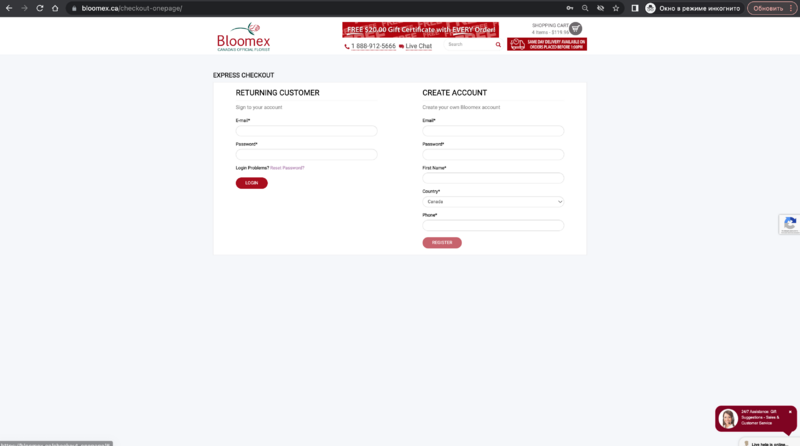
2. The express checkout page in opened and contain attributes ("returning customer" form for registered users and "create account" form for not registered users) | |||
[[Image:The express checkuot page in opened .png|800px]] | |||
3. The form is filled in valid value | |||
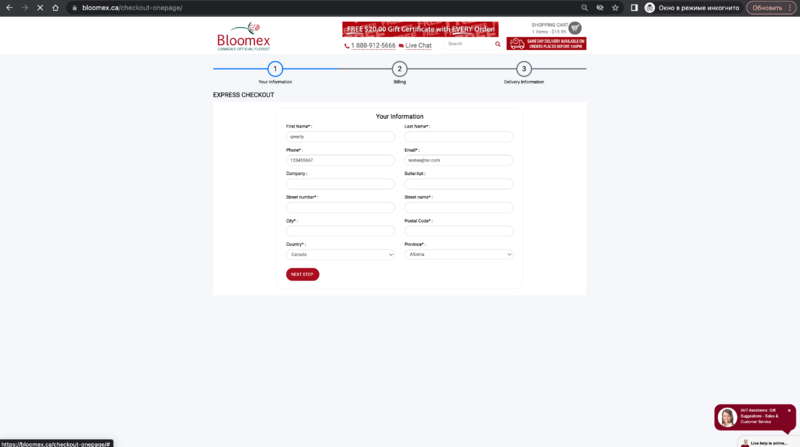
4. The "your information" step 1 is opened which contains a form with fields to fill in | |||
[[Image:The "your information" step 1 is opened.png|800px]] | |||
| | |||
|- | |||
| 34 | |||
| Checkout specials before checkout | |||
| Precondition: | |||
Proceed to specials before checkout | |||
Steps: | |||
1. Click on the "add to cart" button | |||
2. The | 2. Click on the "proceed to checkout" button | ||
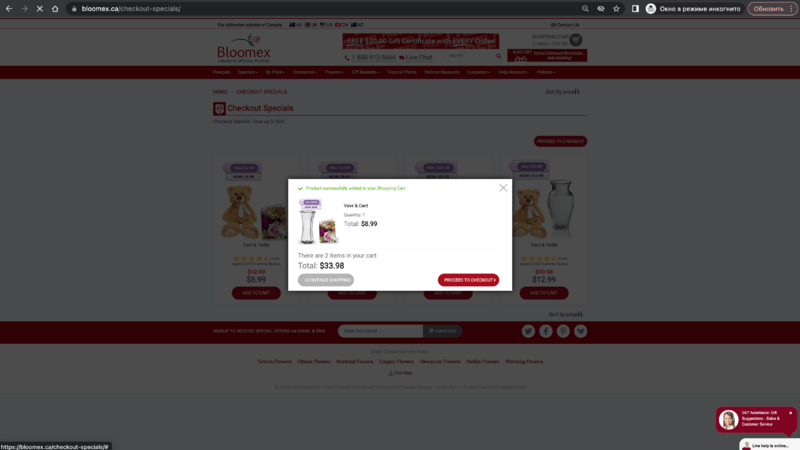
| 1. The "cart modal inner" is opened with a specials product | |||
[[Image: | [[Image:The "cart modal inner" is opened with a specials product.png|800px]] | ||
2. Specials product is added to cart | |||
[[Image: | [[Image:Specials product is added to cart.png|800px]] | ||
| | | | ||
|- | |- | ||
| | | colspan="4" style="background-color:#ffffed;" | | ||
=Checkout= | |||
| | |||
|- | |||
| rowspan="3" | 35 | |||
| rowspan="3" | Place order as Login user (by credit card) | |||
| 1 | |||
Precondition: | |||
Sign in on a user account | Sign in on a user account | ||
Proceed to step 2 of "Billing" | Proceed to step 2 of "Billing" | ||
Steps: | Steps: | ||
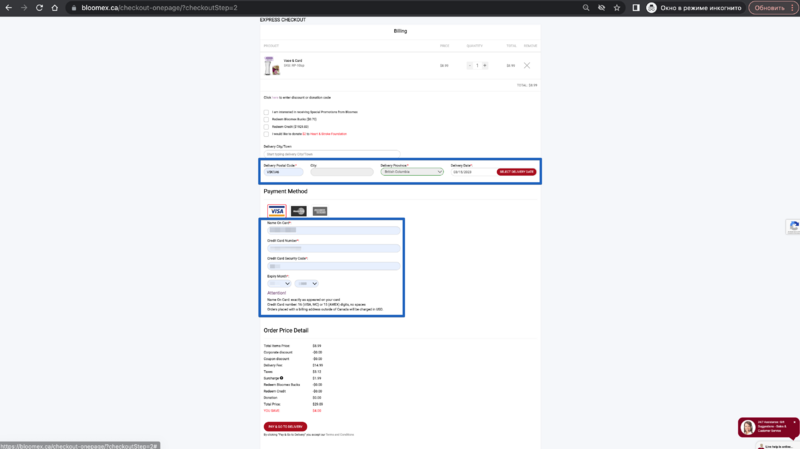
1. Click on the " | 1. Fill in all the required fields (including valid values credit card fields) | ||
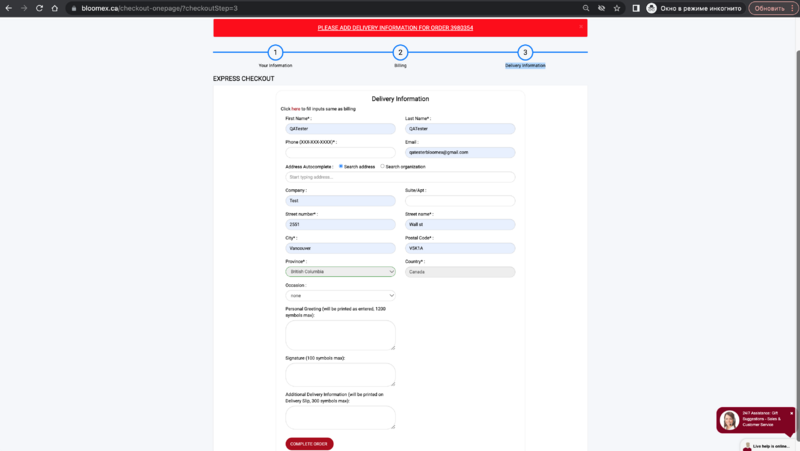
2. Click on the "pay & go to delivery" button | |||
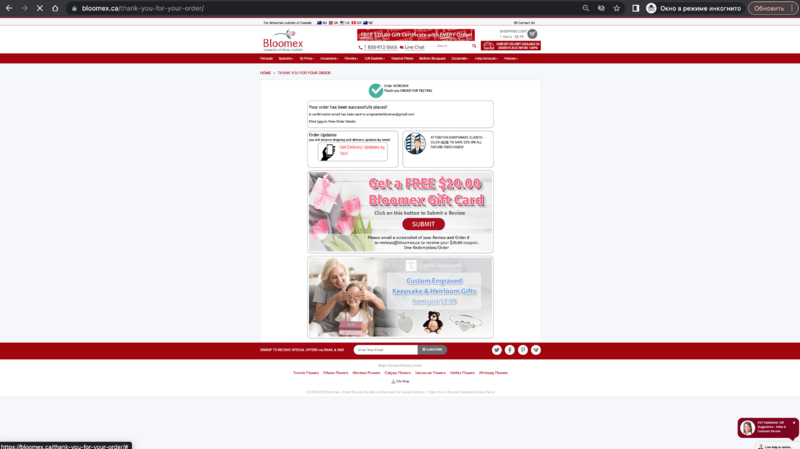
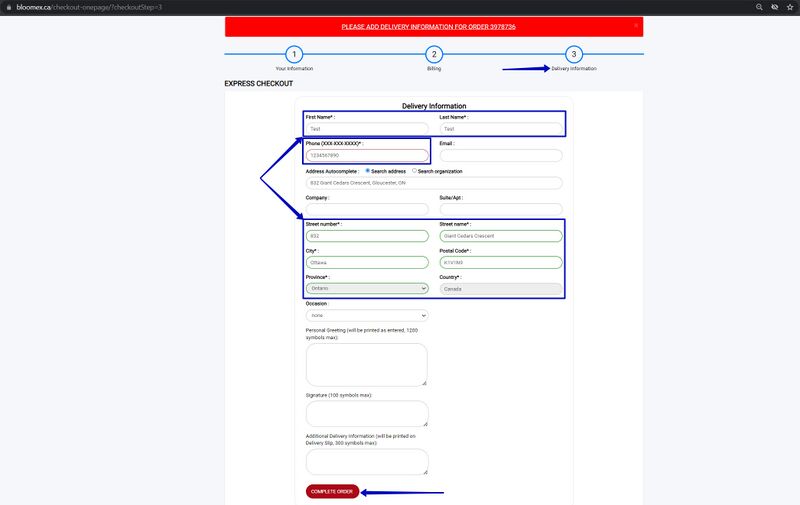
3. Fill in all the required fields and click on the "Complete order" button | |||
| 1. All required fields are filled in valid value (including valid values credit card fields) | |||
[[Image:All required fields are filled in valid value (including valid values credit card fields).png|800px]] | |||
2. | 2. Moved to step 3 of "Delivery Information" | ||
[[Image:Moved to step 3 of "Delivery Information".png|800px]] | |||
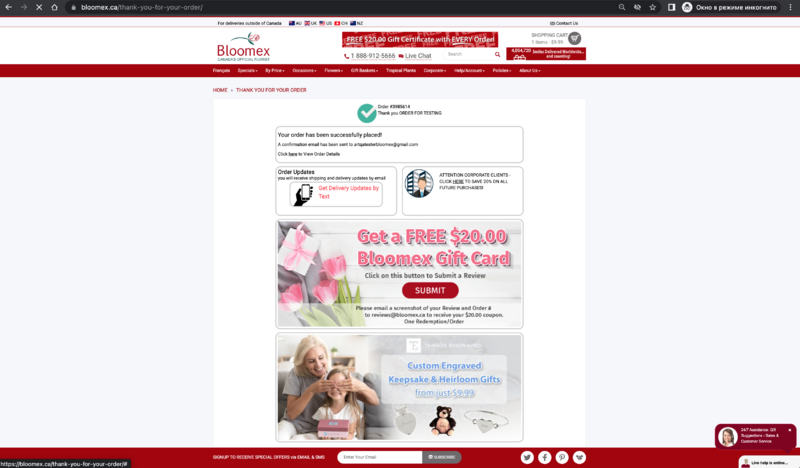
3. All required fields are filled in with valid values and the "Thank you for your order" page is opened | |||
[[Image:All required fields are filled in with valid values and the "Thank you for your order" page is opened.png|800px]] | |||
| | | | ||
|- | |- | ||
|- | |- | ||
| | | 2 | ||
Precondition: | |||
Sign in on a user account | Sign in on a user account | ||
Proceed to step 2 of "Billing" | Proceed to step 2 of "Billing" | ||
Steps: | Steps: | ||
1. | 1. Fill in all the required fields(delivery postal code, delivery date) | ||
2. | 2. Fill in incorrect "Name of card" field and correct "Credit Card Number, CVV, Expiry Month" fields | ||
3. Click on the "pay & go to delivery" button | |||
2. | 4. Fill in all the required fields and click on the "Complete order" button | ||
| 1. All required fields are filled | |||
2. All fields are filled | |||
3. Moved to step 3 of "Delivery Information" | |||
4. All required fields are filled in with valid values and the "Thank you for your order" page is opened | |||
| | | | ||
|- | |- | ||
| | | 3 | ||
Precondition: | |||
Sign in on a user account | Sign in on a user account | ||
| Line 818: | Line 769: | ||
Proceed to step 2 of "Billing" | Proceed to step 2 of "Billing" | ||
Steps: | |||
1. Fill in all the required fields(delivery postal code, delivery date) | |||
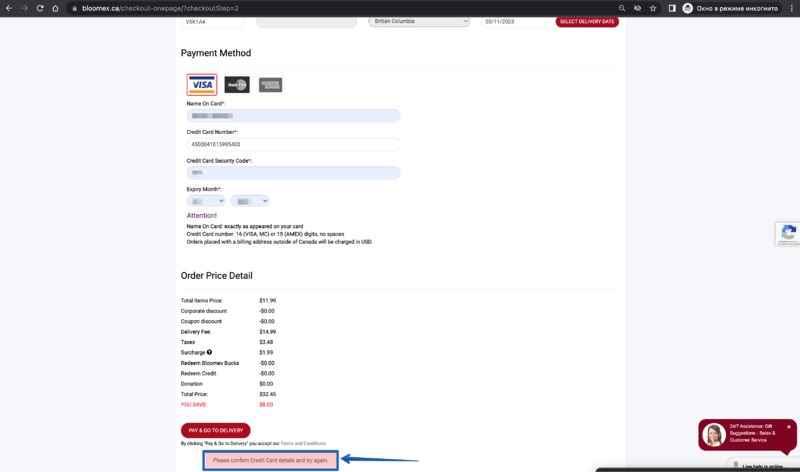
2. Fill in incorrect "Credit Card Number" field and correct "Name of card, CVV, Expiry Month" fields | |||
3. Click on the "pay & go to delivery" button | |||
| 1. All required fields are filled | |||
2. | 2. All fields are filled | ||
3. The "Please confirm Credit Card details and try again." message is displayed | |||
[[Image:The "Please confirm Credit Card details and try again." message is displayed.png |800px]] | |||
|- | |- | ||
|- | |- | ||
| | | 36 | ||
| | | Place order with as login user (by redeem credit) | ||
| Precondition: | | Precondition: | ||
Proceed to step | Sign in on a user account | ||
Proceed to step 2 of "Billing" | |||
Steps: | Steps: | ||
1. Select the "Redeem credit" checkbox | |||
2. Fill in all the required fields and click on the "Pay & go to delivery" button | |||
3. Fill in all the required fields and click on the "Complete order" button | |||
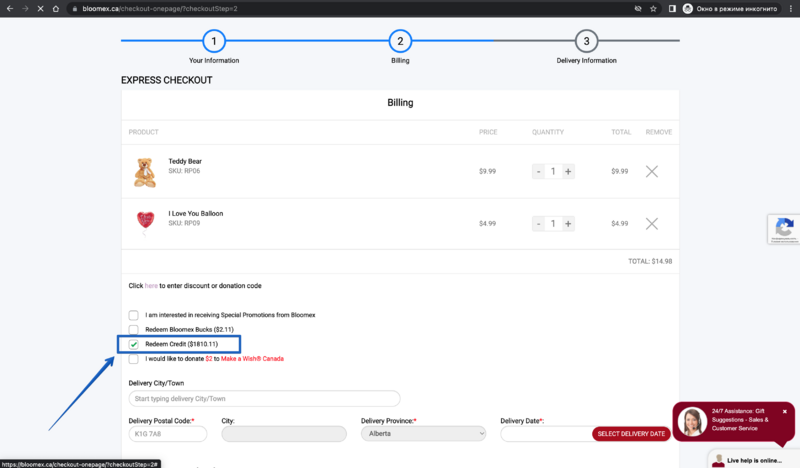
| 1. The "Redeem credit" checkbox is selected | |||
[[Image:The "Redeem credit" checkbox is selected.png |800px]] | |||
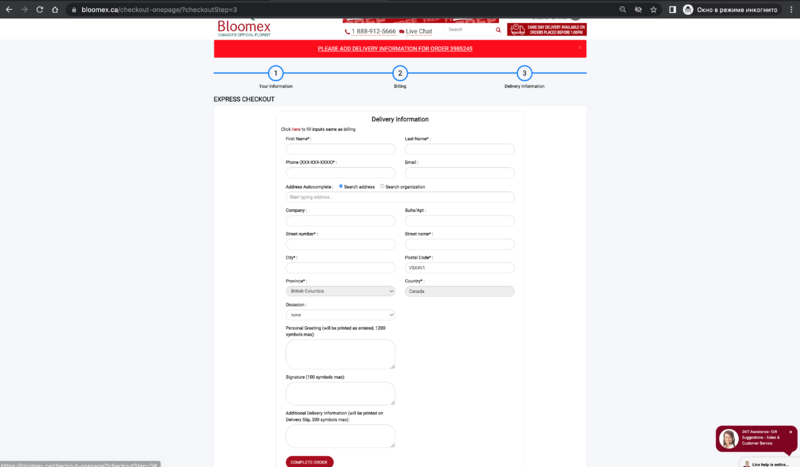
2. All the required fields are filled in and moved to step 3 of "Delivery Information" | |||
| | [[Image:All the required fields are filled in and moved to step 3 of "Delivery Information".png |800px]] | ||
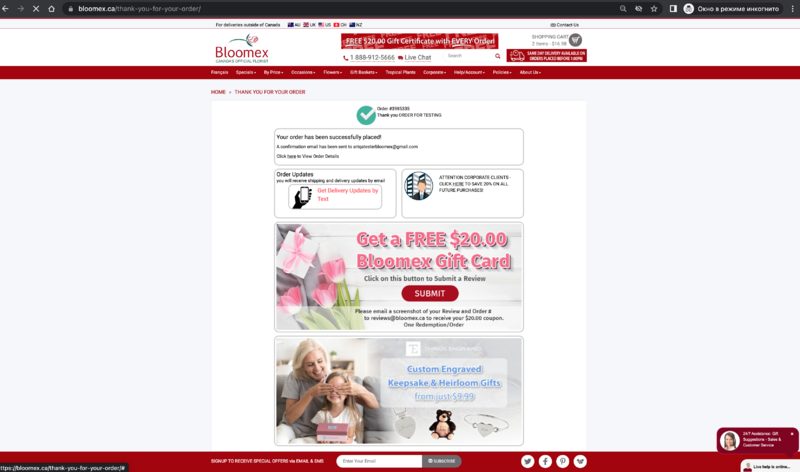
3. All the required fields are filled in and moved to the "Thank you for your order" page | |||
[[Image:All the required fields are filled in and moved to the "Thank you for your order" page.png|800px]] | |||
|http://cloud.necs.ca/s/KXdX9R32eP9Z4DB | |||
|- | |||
|- | |- | ||
| rowspan="1" | 37 | |||
| rowspan="1" | Place order as user with registration (by credit card) | |||
| | |||
Precondition: | |||
Create new user account | |||
Proceed to step 2 of "Billing" | Proceed to step 2 of "Billing" | ||
Steps: | Steps: | ||
1. Fill in all the required fields (including valid values credit card fields) | |||
2. Click on the "pay & go to delivery" button | |||
3. Fill in all the required fields and click on the "Complete order" button | |||
| 1. All required fields are filled in valid value (including valid values credit card fields) | |||
[[Image:All required fields are filled in valid value (including valid values credit card fields).png|800px]] | |||
2. Moved to step 3 of "Delivery Information" | |||
[[Image:Moved to step 3 of "Delivery Information".png|800px]] | |||
3. All required fields are filled in with valid values and the "Thank you for your order" page is opened | |||
[[Image:All required fields are filled in with valid values and the "Thank you for your order" page is opened.png|800px]] | |||
|ENG | |||
31(1) - Place order as user with registration - Morning delivery | |||
http://cloud.necs.ca/s/CJpSDak5tME9tLs | |||
|- | |||
| 38 | |||
| | | Place order with "Extra Touch" as login user (by redeem credit) | ||
| Precondition: | | Precondition: | ||
Sign in on a user account | |||
Go to the product details page and add the "Extra Touch" product | |||
Proceed to step 2 of "Billing" | |||
Steps: | |||
1. Select the "Redeem credit" checkbox | |||
2. | 2. Fill in all the required fields and click on the "Pay & go to delivery" button | ||
3. Fill in all the required fields and click on the "Complete order" button | |||
| | | 1. The "Redeem credit" checkbox is selected | ||
| | [[Image:The "Redeem credit" checkbox is selected.png |800px]] | ||
2. All the required fields are filled in and moved to step 3 of "Delivery Information" | |||
[[Image:All the required fields are filled in and moved to step 3 of "Delivery Information".png |800px]] | |||
3. All the required fields are filled in and moved to the "Thank you for your order" page | |||
[[Image:All the required fields are filled in and moved to the "Thank you for your order" page.png|800px]] | |||
| | |||
|- | |||
|- | |||
| rowspan="2" | 39 | |||
| rowspan="2" | Place order as login user with Coupone code | |||
| <span style="color:#000000;background:#ffffed;">BY CREDIT CARD</span> | |||
Precondition: | |||
Create new user account | |||
Proceed to step 2 of "Billing" | Proceed to step 2 of "Billing" | ||
Steps: | Steps: | ||
1. Fill in all the required fields (including valid values credit card fields) | |||
2. Click on the "pay & go to delivery" button | |||
3. Fill in all the required fields and click on the "Complete order" button | |||
| 1. All required fields are filled in valid value (including valid values credit card fields) | |||
[[Image:All required fields are filled in valid value (including valid values credit card fields).png|800px]] | |||
2. | 2. Moved to step 3 of "Delivery Information" | ||
3. | [[Image:Moved to step 3 of "Delivery Information".png|800px]] | ||
3. All required fields are filled in with valid values and the "Thank you for your order" page is opened | |||
[[Image:All required fields are filled in with valid values and the "Thank you for your order" page is opened.png|800px]] | |||
| | | | ||
|- | |- | ||
| <span style="color:#000000;background:#ffffed;">BY REEDEM CREDIT</span> | |||
Precondition: | |||
Sign in on a user account | |||
Proceed to step 2 of "Billing" | |||
Steps: | |||
1. Select the "Redeem credit" checkbox | |||
2. | 2. Fill in all the required fields and click on the "Pay & go to delivery" button | ||
3. Fill in all the required fields and click on the "Complete order" button | |||
| | | 1. The "Redeem credit" checkbox is selected | ||
[[Image:The "Redeem credit" checkbox is selected.png |800px]] | |||
2. All the required fields are filled in and moved to step 3 of "Delivery Information" | |||
[[Image:All the required fields are filled in and moved to step 3 of "Delivery Information".png |800px]] | |||
" | |||
3. All the required fields are filled in and moved to the "Thank you for your order" page | |||
[[Image:All the required fields are filled in and moved to the "Thank you for your order" page.png|800px]] | |||
| | | | ||
|- | |- | ||
| | |||
| | |||
| rowspan="2" | 40 | |||
| rowspan="2" | Use discount(coupon) | |||
| Precondition: | | Precondition: | ||
Proceed to step 2 of "Billing" | Proceed to step 2 of "Billing" | ||
Steps: | Steps: | ||
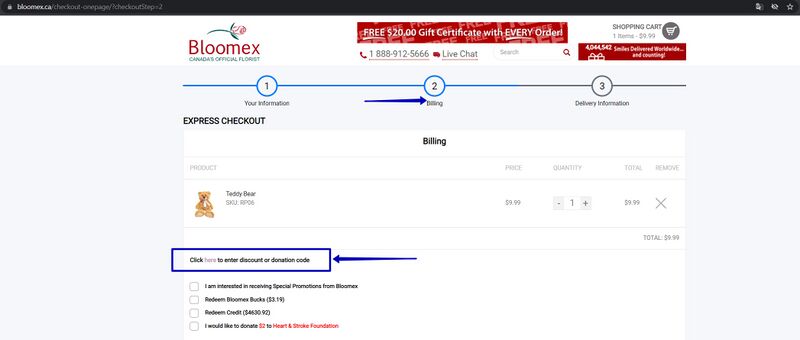
1. | 1. Click “here” to enter a discount or donation code | ||
2. | 2. Enter the code sent to the specified email in the field | ||
3. | 3. Click Submit | ||
4. Check whether the discount is activated | |||
| Discount(coupon) successfully activated | |||
[[Image:Discount(coupon) successfully activated.jpg|800px]] | |||
[[Image:Discount(coupon) successfully activated 1.jpg|800px]] | |||
[[Image: | |||
[[Image: | |||
| | | | ||
|- | |- | ||
| Precondition: | | Precondition: | ||
Proceed to step 2 of "Billing" | Proceed to step 2 of "Billing" | ||
Steps: | Steps: | ||
1. Click “here” to enter a discount or donation code | |||
2. Enter the not-valid code | |||
| 1. The field and "Submit" button is displayed | |||
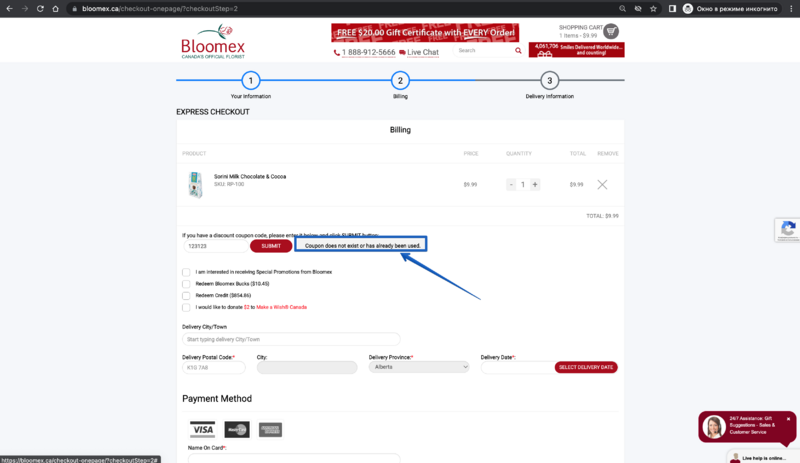
2. The "Coupon does not exist or has already been used." message is displayed | |||
[[Image:The field and button is displayed.png|800px]] | |||
| | |||
|- | |||
|- <span id="Confirmation"></span> | |||
| 41 | |||
| Check Confirmation email | |||
|- <span id=" | |||
| | |||
| | |||
| Precondition: | | Precondition: | ||
Sign in on a user account | |||
Proceed to step 3 of "Delivery Information" and | |||
Steps: | Steps: | ||
Click on the "Complete order" button | |||
| The confirmation email is delivered | |||
[[Image:OrderConfirmation.png|800px]] | |||
| | | | ||
|- | |- | ||
| 42 | |||
| Add/edit delivery address by Address Autocomplete | |||
| Precondition: | |||
Sign in on a user account | |||
Proceed to step 3 of "Delivery Information" | |||
Steps: | |||
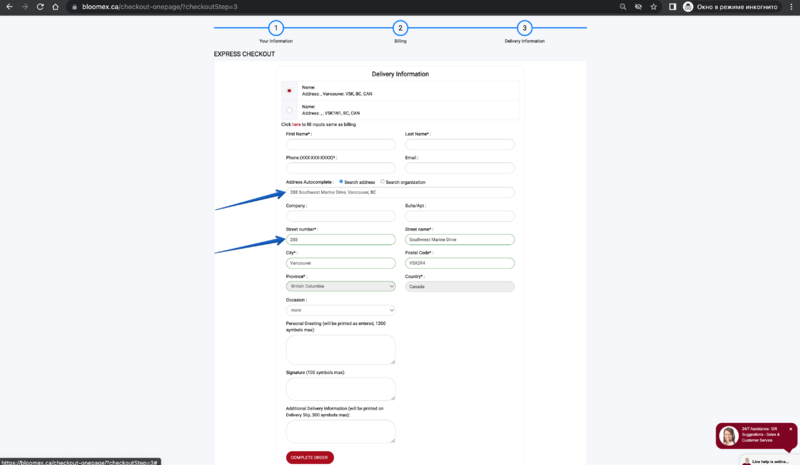
1. Fill in the delivery address by "Address Autocomplete" field | |||
2. Click on your address in the drop-down list | |||
3. Edit the delivery address by "Address Autocomplete" field | |||
4. Click on your address in the drop-down list | |||
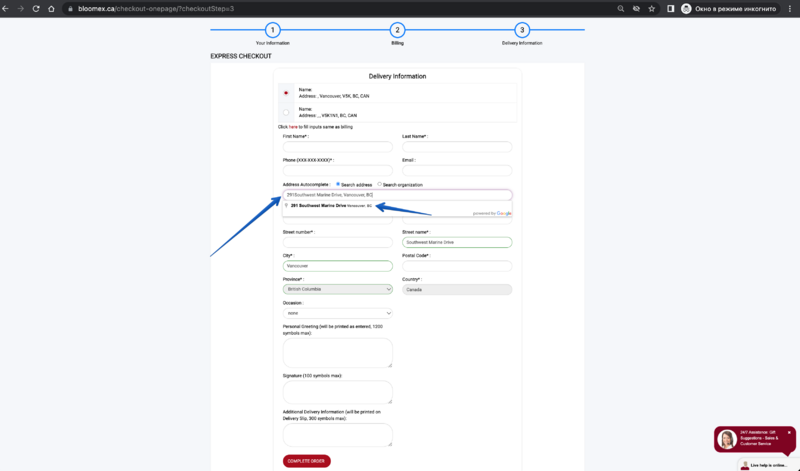
| 1. The drop-down list with your address is displayed | |||
[[Image:The drop-down list with your address is displayed.png|800px]] | |||
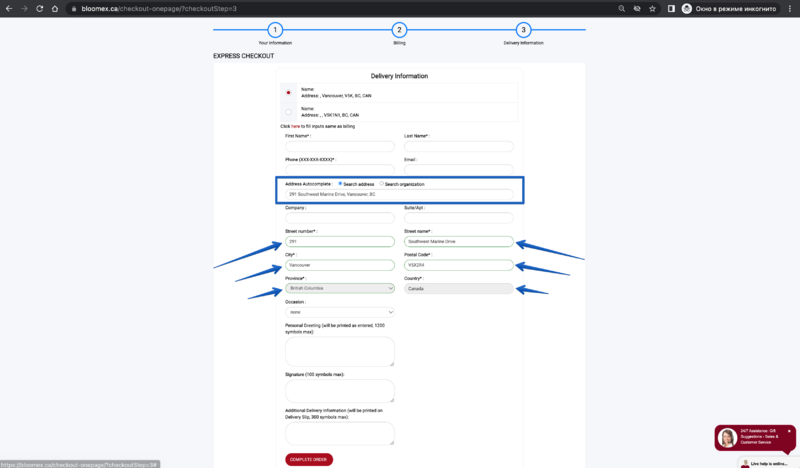
2. | 2. All appropriate fields are automatically filled in | ||
[[Image:All appropriate fields are automatically filled in.png|800px]] | |||
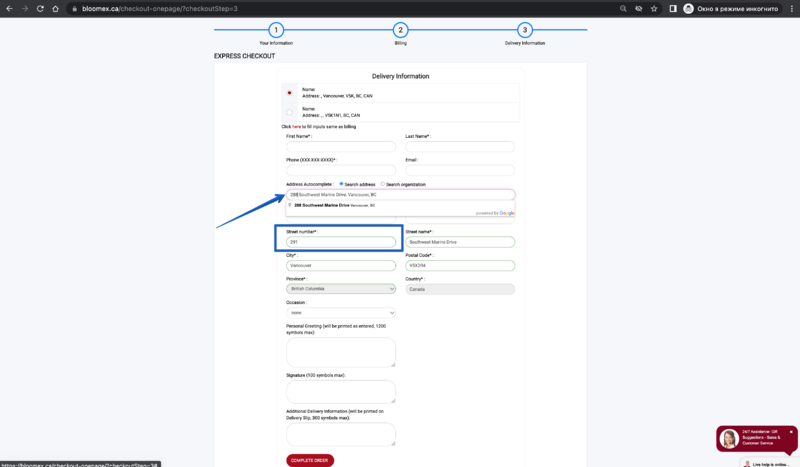
3. The drop-down list with your edited address is displayed | |||
[[Image:The drop-down list with your edited address is displayed.png|800px]] | |||
4. All appropriate fields are automatically filled in | |||
[[Image:All fields are automatically filled in.png |800px]] | |||
| | | | ||
|- | |- | ||
| | | rowspan="4" | 43 | ||
| rowspan="4" | Select delivery date (pay attention to suspicious deliver dates available like same day after offset) and time (before 1 pm and after 1pm) | |||
| | |||
| | |||
| | |||
| Precondition: | | Precondition: | ||
Proceed to step | |||
Test before 1 p.m. Vancouver | |||
Sign in on a user account | |||
Proceed to step 2 of "Billing" | |||
Type in "Vancouver, BC" in the "delivery city/town" field | |||
Steps: | Steps: | ||
1. Click on the "Delivery Date" button | |||
2. Select today's date | |||
3. Place an order | |||
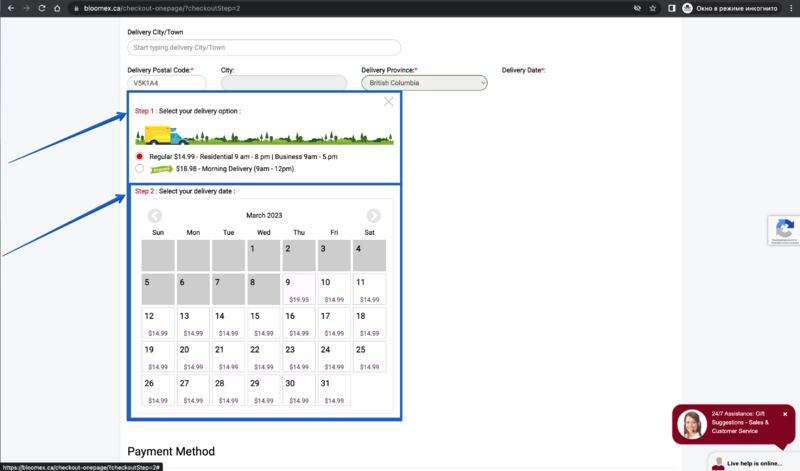
| 1. The table contain attributes(step 1: Select your delivery option, step 2: Select your delivery date) is opened | |||
[[Image: | [[Image:1. The table contain attributes(step 1- Select your delivery option, step 2- Select your delivery date) is opened.png|800px]] | ||
2. The today date is displayed and selected | |||
[[Image:2. The today date is displayed and selected.png|800px]] | |||
3. The order is placed | |||
[[Image:3. The order is placed.png |800px]] | |||
| | | | ||
|- | |- | ||
| Precondition: | | Precondition: | ||
Test after 1 p.m. Vancouver | |||
Sign in on a user account | |||
Proceed to step 2 of "Billing" | |||
Type in "Vancouver, BC" in the "delivery city/town" field | |||
Steps: | |||
1. Click on the "Delivery Date" button | |||
2. Select today's date | |||
2. Place an order | |||
| The | | 1. The table contain attributes(step 1: Select your delivery option, step 2: Select your delivery date) is opened | ||
2. The today date is not displayed | |||
| | | | ||
|- | |||
|- | |- | ||
| Precondition: | | Precondition: | ||
Test before 1 p.m. Vancouver | |||
Sign in on a user account | |||
Proceed to step 2 of "Billing" | |||
Type in "Vancouver, BC" in the "delivery city/town" field | |||
Steps: | |||
1. Click on the "Delivery Date" button | |||
2. Select tomorrow's date | |||
2. Place an order | |||
| 1. The table contain attributes(step 1: Select your delivery option, step2: Select your delivery date) is opened and tomorrow date is selected | |||
2. The tomorrow date is displayed and selected | |||
3. The order is placed | |||
| | |||
3. | |- | ||
| | |||
|- | |- | ||
| Precondition: | | Precondition: | ||
Test after 1 p.m. Vancouver | |||
Sign in on a user account | |||
Proceed to step 2 of "Billing" | |||
Type in "Vancouver, BC" in the "delivery city/town" field | |||
Steps: | |||
1. Click on the "Delivery Date" button | |||
2. Select tomorrow's date | |||
2. Place an order | |||
| 1. The table contain attributes(step 1: Select your delivery option, step2: Select your delivery date) is opened and tomorrow date is selected | |||
2. The tomorrow date is displayed and selected | |||
3. The order is placed | |||
|- | |||
|- | |- | ||
| rowspan="3" | 44 | |||
| rowspan="3" | Fill in Personal Greeting, Signature, and Delivery Information | |||
| Precondition: | | Precondition: | ||
Proceed to step 3 of "Delivery Information" | |||
Steps: | Steps: | ||
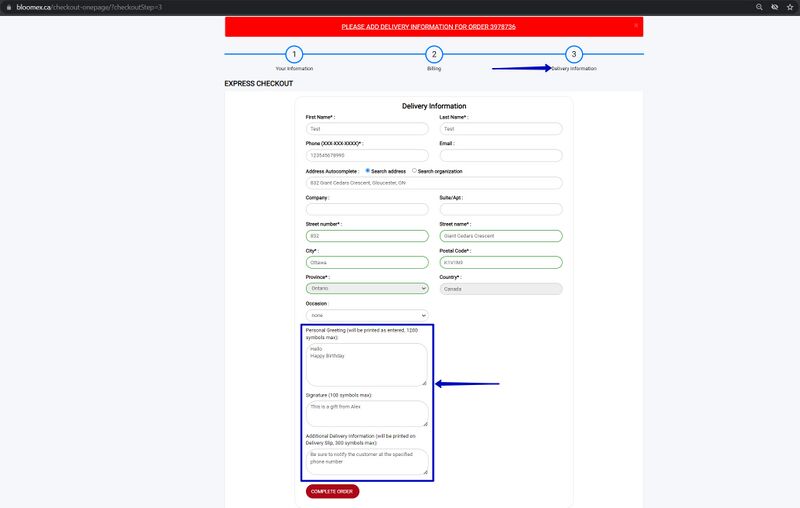
Enter valid data in fields: Personal Greeting, Signature, Additional Delivery Information | |||
| Personal Greeting, Signature, and Delivery Information are displayed correctly | |||
[[Image:Personal Greeting, Signature, and Delivery Information are displayed correctl.jpg|800px]] | |||
| | |||
|- | |||
| Precondition: | |||
3 | Proceed to step 3 of "Delivery Information" | ||
Steps: | |||
Click on the "Pay & go to delivery" button with empty Personal Greeting, Signature, and Delivery Information fields | |||
| The order is placed | |||
[[Image:3. The order is placed.png |800px]] | |||
| | | | ||
|- | |- | ||
| | |- | ||
| Precondition: | | Precondition: | ||
Proceed to step 3 of "Delivery Information" | |||
Steps: | Steps: | ||
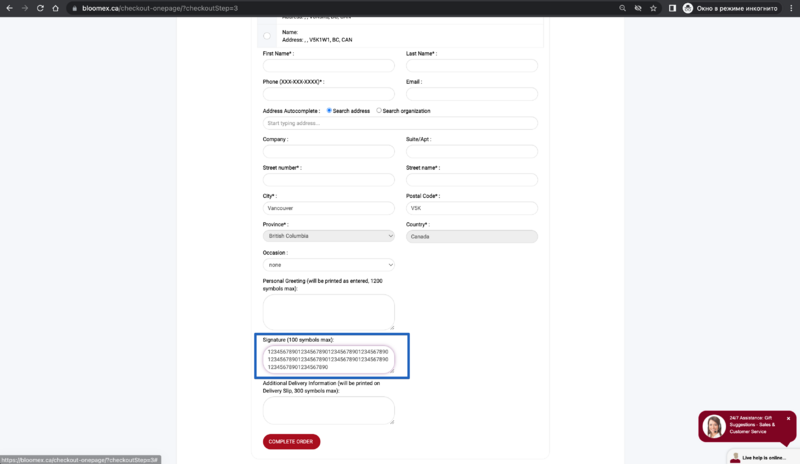
Enter in the "Personal Greeting" field or "Signature" field or "Delivery Information" field max + 1 symbols | |||
(example: enter 101 symbols in the "Signature" field) | |||
| 101 characters cannot be entered | |||
[[Image:101 characters cannot be entered.png|800px]] | |||
|- | |||
|- | |- | ||
| | | 45 | ||
| | | Check order totals calculations | ||
| Precondition: | | Precondition: | ||
Proceed to step 2 of "Billing" | |||
Steps: | Steps: | ||
Check the order calculation data | |||
| Calculations with parameters: | |||
| | |||
Total Items Price, Corporate discount, Coupon discount, Delivery Free, Taxes, Surcharge, Redeem Bloomex Bucks, Redeem Credit, Donation, Total Price - are correct and true | |||
[[Image:Calculations with parameters.jpg|800px]] | |||
| | | | ||
|- | |- | ||
| rowspan="3" | | | rowspan="3" | 46 | ||
| rowspan="3" | | | rowspan="3" | Check required and not required fields during checkout | ||
| Precondition: | | Precondition: | ||
Proceed to | Proceed to step 2 of "Billing" | ||
Steps: | Steps: | ||
1. | 1. Enter valid data in the required fields | ||
2. | 2. Click "Pay & Go To Delivery" | ||
| 1. The data is received | |||
2. Moved to step 3 of "Delivery Information" | |||
[[Image:The data is received .jpg|800px]] | |||
| | |||
| | |||
|- | |- | ||
| Precondition: | | Precondition: | ||
Proceed to | Proceed to step 1 of "Your Information" | ||
Steps: | Steps: | ||
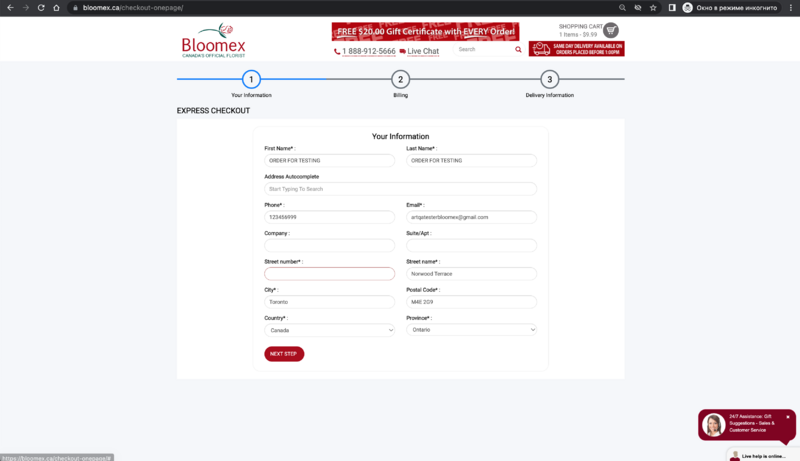
1. | 1. Enter valid data in the required fields and leave the "Street number" field empty | ||
2. | 2. Click "Next Step" | ||
| 1. All required fields are filled in and the "Street number" field is empty | |||
2. The unfilled field is highlighted in red | |||
[[Image:The unfilled field is highlighted in red.png|800px]] | |||
| | |||
|- | |||
|- | |- | ||
| Precondition: | | Precondition: | ||
Proceed to | Proceed to step 3 of "Delivery Information" | ||
Steps: | Steps: | ||
1. | 1. Enter valid data in the required fields | ||
2. | 2. Click "Complete Order" | ||
| 1. The data is received | |||
2. The order is created and a confirmation letter is sent to the email | |||
[[Image:The order is created and a confirmation letter is sent to the email.jpg|800px]] | |||
|- | |- | ||
| | | 47 | ||
| | | Edit products in the checkout (quantity, remove) | ||
| Precondition: | | Precondition: | ||
Proceed to | Proceed to step 2 of "Billing" | ||
Steps: | Steps: | ||
Check the possibility of changing the quantity of the product, removing the product, and the total price of the product | |||
| | | Functions: remove, quantity, price, total, and calculations - work | ||
[[Image: | [[Image:Remove, quantity, price, total, and calculations - work.jpg|800px]] | ||
| | | | ||
|- | |- | ||
| | |||
| | | 48 | ||
| Check to select receiving Special promotions from Bloomex | |||
| Precondition: | | Precondition: | ||
Proceed to | Proceed to step 2 of "Billing" | ||
Steps: | Steps: | ||
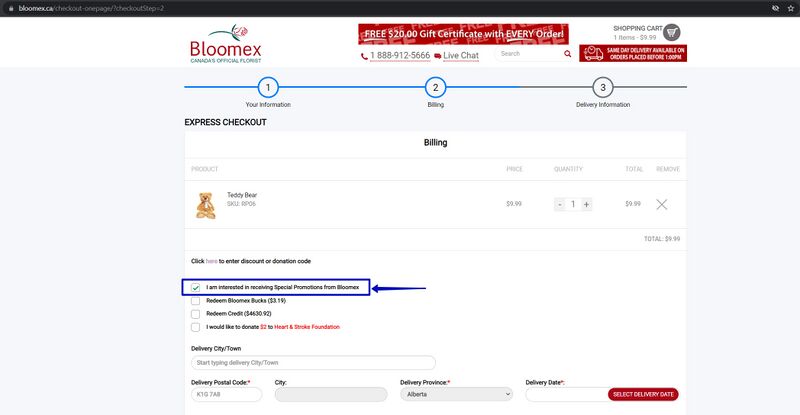
Activate the check box opposite the inscription | |||
"I am interested in receiving Special promotions from Bloomex" | |||
| | | Special promotions from Bloomex are sent to the specified mail | ||
[[Image: | [[Image:Special promotions from Bloomex are sent to the specified mail.jpg|800px]] | ||
| | | | ||
|- | |- | ||
| | | 49 | ||
| | | Check to redeem Bloomex bucks | ||
| Precondition: | | Precondition: | ||
Proceed to | Proceed to step 2 of "Billing" | ||
Steps: | Steps: | ||
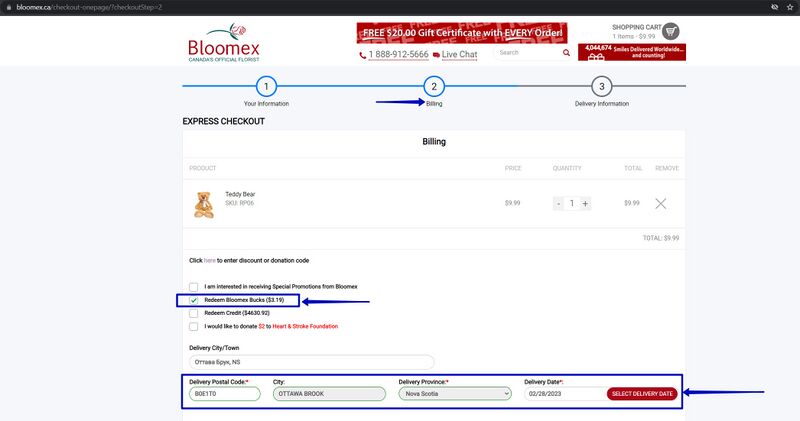
1. | 1. Activate the check box opposite the inscription "Redeem Bloomex Bucks" | ||
2. | 2. Fill in the recommended fields and "Select Delivery Date" | ||
3. | 3. Check "Order Price Detail" whether this function is activated | ||
| 1. The check box has been successfully activated | |||
2. The delivery date works correctly | |||
3. The calculations are correct and correspond to reality | |||
[[Image:The check box has been successfully activated.jpg|800px]] | |||
[[Image:The calculations are correct and correspond to reality.jpg|800px]] | |||
[[Image: | |||
[[Image: | |||
| | | | ||
|- | |- | ||
| 50 | |||
| Сheck dotation to "Make a Wish Canada" | |||
| Precondition: | | Precondition: | ||
Proceed to | Proceed to step 2 of "Billing" | ||
Steps: | Steps: | ||
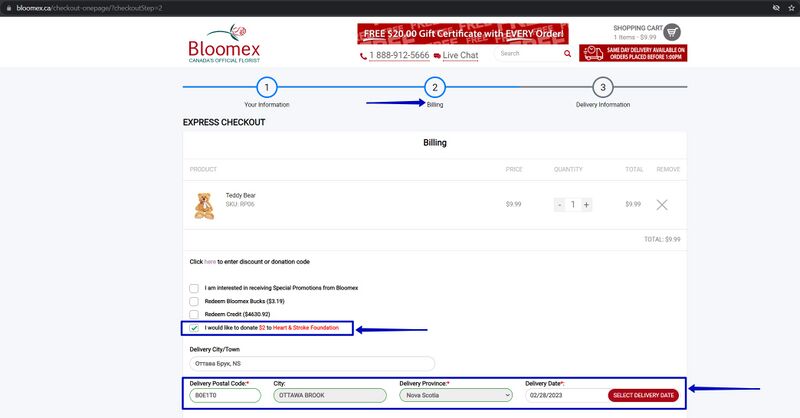
1. | 1. Activate the check box opposite the inscription “I would like to donate" | ||
2. | 2. Fill in the recommended fields and "Select Delivery Date" | ||
3. | 3. Check "Order Price Detail" whether this function is activated | ||
| 1. The check box has been successfully activated | |||
2. The delivery date works correctly | |||
3. The calculations are correct and correspond to reality | |||
[[Image:The check box has been successfully activated 1.jpg|800px]] | |||
[[Image:Calculations are correct and correspond to reality 1.jpg|800px]] | |||
[[Image: | |||
| | | | ||
|- | |- <span id="Voucher"></span> | ||
| | | 51 | ||
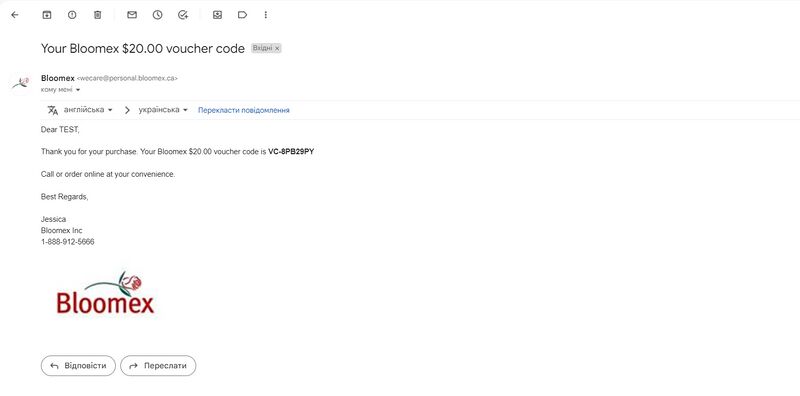
| | | Buy Bloomex $20.00 voucher code (https://bloomex.ca/extra-touches-1/) | ||
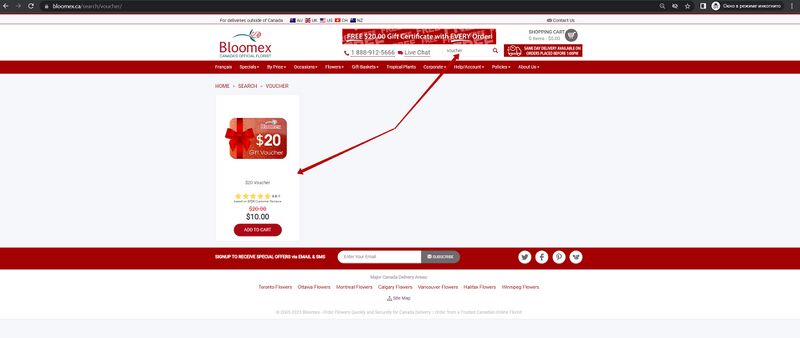
| Precondition: | | Precondition: | ||
Find a voucher on the website and purchase it | |||
Steps: | Steps: | ||
1. | 1. Choose a $20 voucher and checkout | ||
2. | 2. Check your email for confirmation with the given code | ||
| 1. Voucher successfully purchased | |||
| | [[Image:Voucher successfully purchased.jpg|800px]] | ||
2. The " | 2. The "Your Bloomex 20$ Voucher code" letter has been successfully sent to the mail | ||
[[Image:Voucher code.jpg|800px]] | |||
[[Image: | |||
| | | | ||
|- | |- | ||
| | | 52 | ||
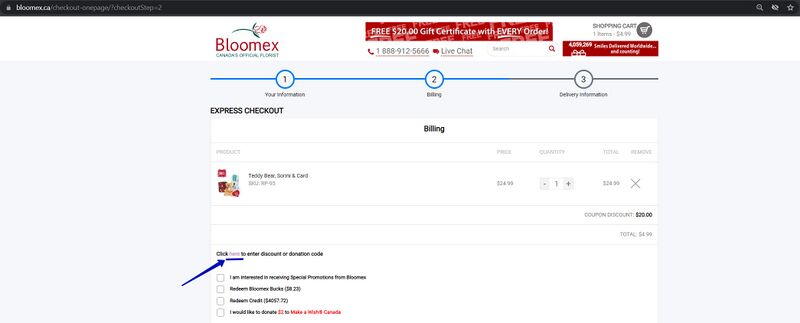
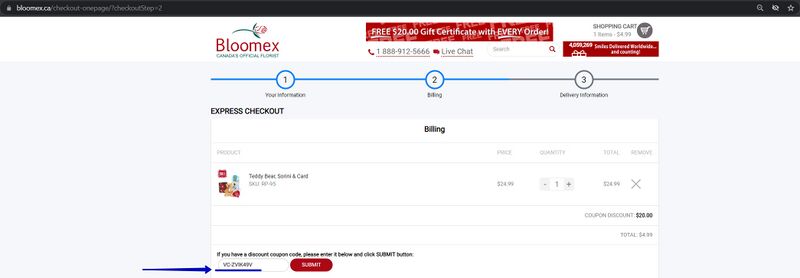
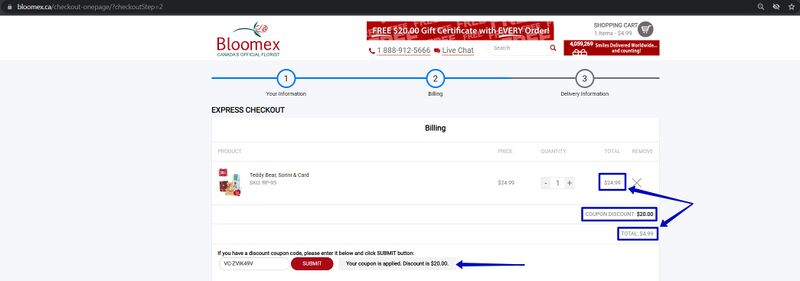
| | | Place order with voucher code | ||
| Precondition: | | Precondition: | ||
Proceed to | Proceed to step 2 of "Billing" | ||
Steps: | Steps: | ||
1. Click "here" on the link: "Click here to enter discount or donation code" | |||
2. Enter a voucher code and click the "Submit" button | |||
| 1. The field for entering the "voucher code" is displayed | |||
[[Image:The field for entering the voucher code is displayed 1.jpg|800px]] | |||
[[Image:The field for entering the voucher code is displayed 2.jpg|800px]] | |||
2. The voucher code has accepted the price reduced | |||
[[Image:The | [[Image:The voucher code was accepted the price reduced.jpg|800px]] | ||
| | | | ||
|- | |- | ||
| | | 53 | ||
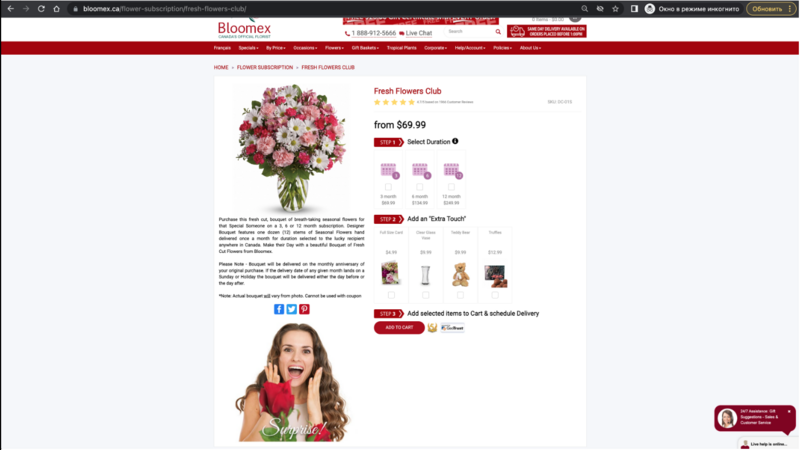
| | | Flower with subscription | ||
| Steps: | |||
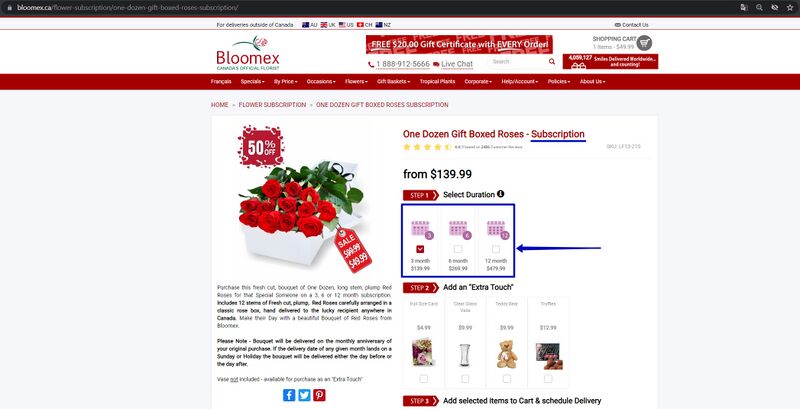
1. | 1. Go to the product details page with the subscription | ||
2. | 2. Select Duration subscription by checking the checkbox | ||
3. Click the "Add to cart" button | |||
| 1. The page with information about the product has content and is displayed | |||
2. Duration subscription is selected | |||
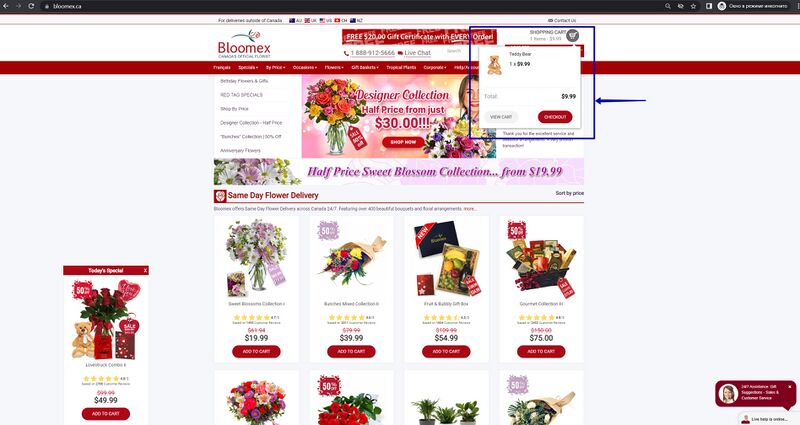
3. The product added to the cart | |||
[[Image:The page with information about the product has content and is displayed.jpg|800px]] | |||
[[Image:The product added to the cart.jpg|800px]] | |||
[[Image:The | | | ||
|- | |||
|colspan="4" style="background-color:#ffffed;" | | |||
=Abandonment= | |||
| | | | ||
|- | |- | ||
| | | 54 | ||
| | | Add product to the cart page and leave it, you should get an sms and email in about 15-20 mins <span id="Abandonment"></span> | ||
| Steps: | |||
1. Add the product to the cart and leave it there for 15-20 minutes | |||
2. Check your mail for a reminder letter | |||
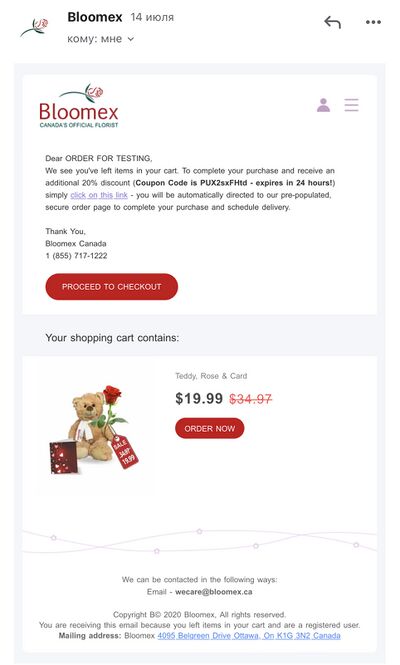
| The reminder letter was successfully sent to the post office | |||
| | [[Image:The reminder letter was successfully sent to the post office.jpg|800px]] | ||
[[Image: | [[Image:Abandosment mail.jpeg|400px]] | ||
[[Image:SMSAbandonment.jpg|400px]] | |||
| | |||
|- | |||
|colspan="4" style="background-color:#ffffed;" | | |||
=We haven't received Delivery Information for your order= | |||
| | |||
|- <span id="We haven't received Delivery Information for your order"></span> | |||
| 55 | |||
| Check "We haven't received Delivery Information for your order" email | |||
| Precondition: | | Precondition: | ||
Proceed to step 3 of "Delivery Information" | |||
Steps: | |||
Leave step 3 of "Delivery Information" - without information for 5-7 minutes | |||
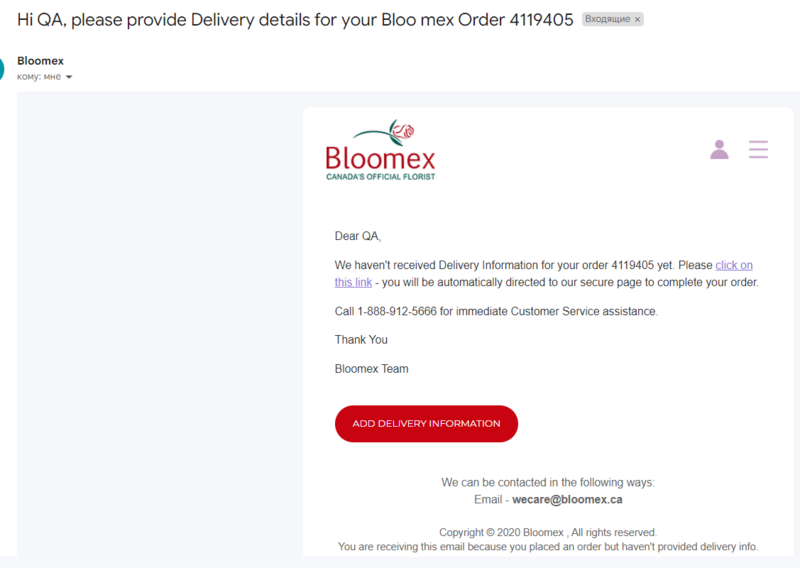
| The reminder letter was received | |||
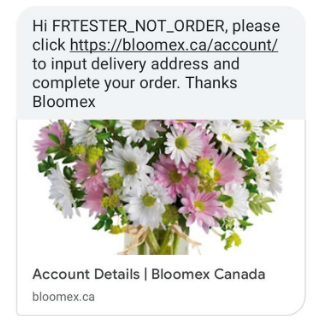
[[Image:provideDeliverydetails.png|800px]] | |||
Sms was received | |||
| | [[Image:InputDeliveryAdress.png|800px]] | ||
| | | | ||
|- | |- | ||
|colspan="4" style="background-color:#ffffed;" | | |colspan="4" style="background-color:#ffffed;" | | ||
= | |||
=My account= | |||
| | | | ||
|- | |- | ||
| | | rowspan="2" | 56 | ||
| | | rowspan="2" | Account login/logout | ||
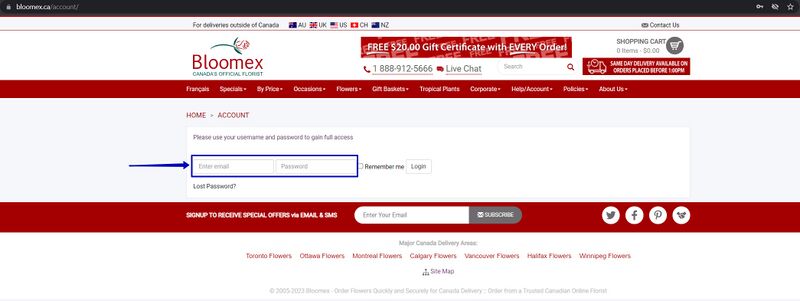
| Precondition: | | Precondition: | ||
The user | The user is registered on the site | ||
Steps: | Steps: | ||
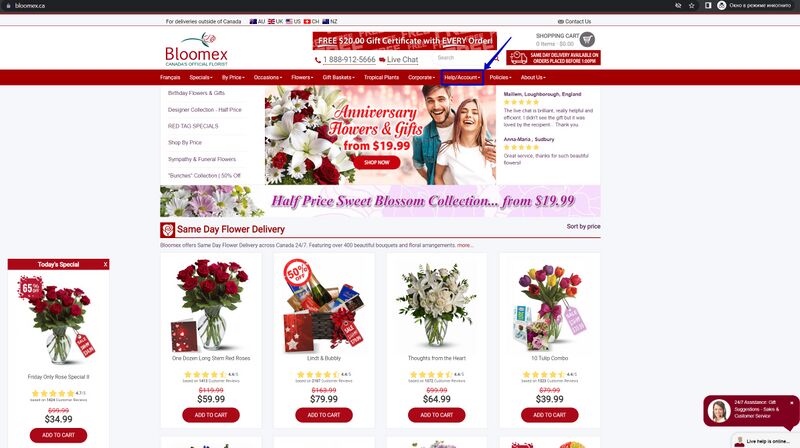
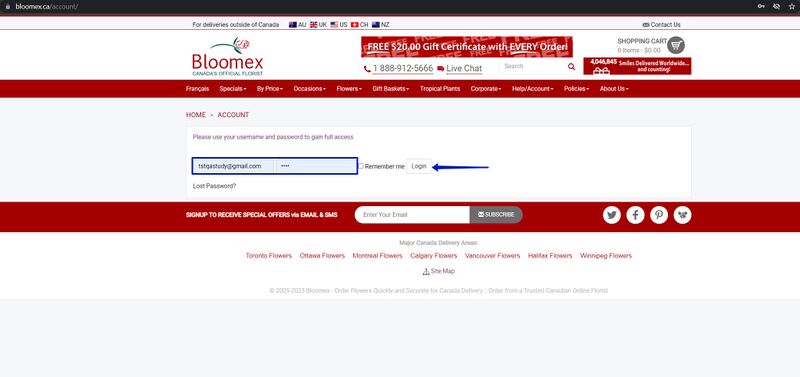
1. Go to the menu | 1. Go to the menu sections and click "Help/Account" | ||
2. | 2. Enter a valid email in the "Enter email" field | ||
3. | 3. In the "Password" field, enter a password | ||
4. | 4. Click the "Login" button | ||
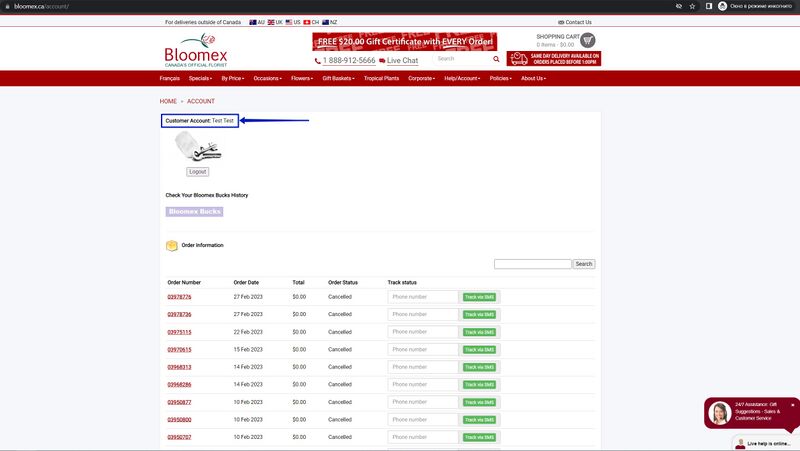
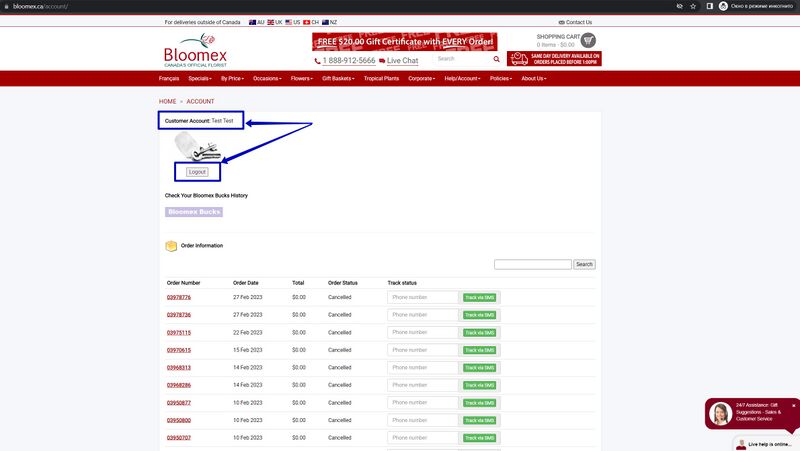
| | | The user successfully authenticated on site | ||
1. The | [[Image:The user successfully authenticated on site 1.jpg|800px]] | ||
[[Image:The user successfully authenticated on site 2.jpg|800px]] | |||
[[Image:The user successfully authenticated on site 3.jpg|800px]] | |||
| | |||
|- | |||
| Precondition: | |||
The user is Authorization on the site | |||
Steps: | |||
Click the "Logout" button | |||
| The user successfully log out of the account | |||
[[Image:The user successfully log out of the account 1.jpg|800px]] | |||
[[Image:The user successfully log out of the account 2.jpg|800px]] | |||
[[Image: | |||
| | | | ||
|- | |- | ||
| rowspan="3" | 57 | |||
| rowspan="3" | Authorization on the site without data | |||
| rowspan=" | |||
| rowspan=" | |||
| Precondition: | | Precondition: | ||
Authorization on the site without the "email" and "password" | |||
Steps: | Steps: | ||
1. | 1. Go to the menu sections and click "Help/Account" | ||
2. | 2. Leave the "Enter email" and "Password" fields empty | ||
3. | 3. Click the "Login" button | ||
| | | The user is not authorized on the site. Message: "Please complete the username and password fields" | ||
1. | [[Image:The user successfully authenticated on site 1.jpg|800px]] | ||
[[Image:Message Please complete the username and password fields 2 .jpg|800px]] | |||
| | |||
|- | |||
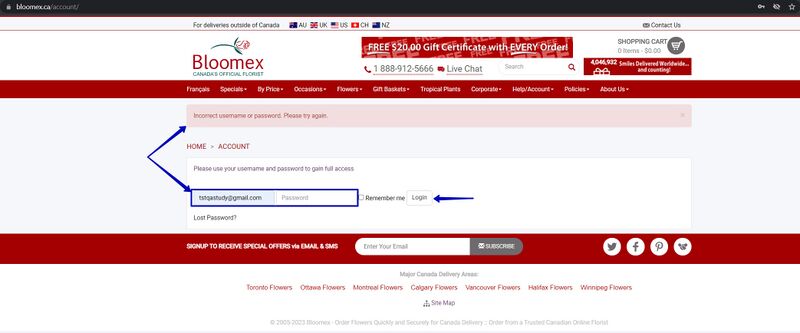
| Precondition: | |||
Authorization on the site with a valid "email" and without the "password" | |||
Steps: | |||
1. Go to the menu sections and click "Help/Account" | |||
2. Enter a valid email in the "Enter email" field | |||
3. Leave the "Password" field empty | |||
4. Click the "Login" button | |||
| The user is not authorized on the site. Message: "Incorrect username or password. Please try again." | |||
| | [[Image:The user successfully authenticated on site 1.jpg|800px]] | ||
[[Image:Message Incorrect username or password. Please try again 2.jpg|800px]] | |||
| | | | ||
|- | |- | ||
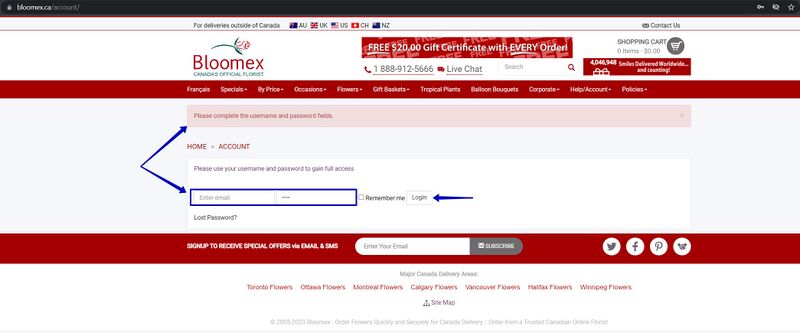
| Precondition: | | Precondition: | ||
Authorization on the site with a valid "password" and without the "email" | |||
Steps: | Steps: | ||
1. Go to the menu | 1. Go to the menu sections and click "Help/Account" | ||
2. | 2. Enter a valid Password in the "Password" field | ||
3. Enter | 3. Leave the "Enter email" field empty | ||
4. Click the " | 4. Click the "Login" button | ||
| | | The user is not authorized on the site. Message: "Please complete the username and password fields" | ||
[[Image:The user successfully authenticated on site 1.jpg|800px]] | |||
[[Image:Please complete the username and password fields.jpg|800px]] | |||
[[Image: | |||
[[Image: | |||
| | | | ||
|- | |- | ||
| 58 | |||
| Authorization on the site with an invalid email | |||
| Precondition: | | Precondition: | ||
Authorization on the site with an invalid "email" (email without @) and a valid "password" | |||
Steps: | Steps: | ||
1. Go to the menu | 1. Go to the menu sections and click "Help/Account" | ||
2. | 2. Enter an invalid email in the "Enter email" field | ||
3. | 3. Enter a valid Password in the "Password" field | ||
4. | 4. Click the "Login" button | ||
| | | The user is not authorized on the site. Message: "Incorrect username or password. Please try again" | ||
[[Image:The user successfully authenticated on site 1.jpg|800px]] | |||
[[Image:2.jpg|800px]] | |||
[[Image: | |||
[[Image: | |||
| | | | ||
|- | |- | ||
| | | 59 | ||
| Authorization on the site with an incorrect password | |||
| | |||
| Precondition: | | Precondition: | ||
Authorization on the site with an invalid "password" and a valid "email" | |||
Steps: | Steps: | ||
1. | 1. Go to the menu sections and click "Help/Account" | ||
2. | 2. Enter a valid email in the "Enter email" field | ||
3. | 3. Enter an invalid Password in the "Password" field | ||
4. Click the "Login" button | |||
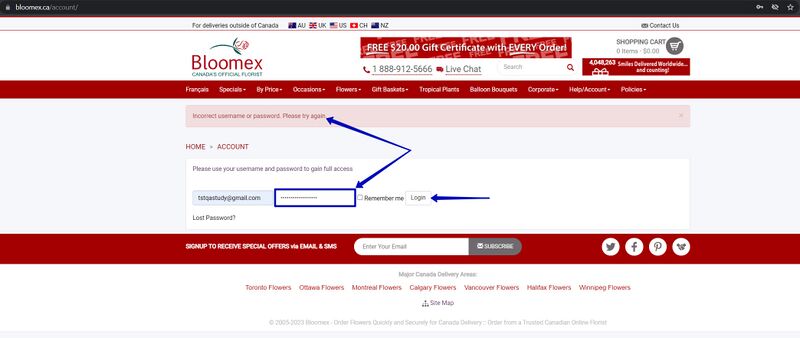
| The user is not authorized on the site. Message: "Incorrect username or password. Please try again" | |||
[[Image:The user successfully authenticated on site 1.jpg|800px]] | |||
[[Image:1.jpg|800px]] | |||
[[Image: | |||
| | | | ||
|- | |- | ||
| | | rowspan="3" | 60 | ||
| | | rowspan="3" | The appearance of verification messages | ||
| Precondition: | |||
Proceed to the "Account" page | |||
Steps: | |||
1. Fill in the valid email in the "email" field | |||
2. Fill in the invalid password in the "password" field | |||
3. Click on the "Login" button | |||
| 1. The "email" field is filled in | |||
2. The "password" field is filled in | |||
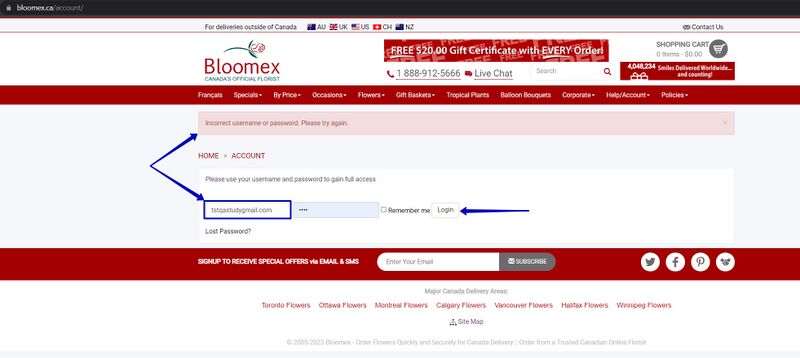
3. The "Incorrect username or password. Please try again." message is displayed | |||
[[Image:Please try again. message is displayed.png|800px]] | |||
[[Image: | |||
| | | | ||
|- | |- | ||
| Precondition: | | Precondition: | ||
Proceed to the " | Proceed to the "Account" page | ||
Steps: | Steps: | ||
1. Fill in the invalid email in the "email" field | |||
2. Fill in the valid password in the "password" field | |||
3. Click on the "Login" button | |||
| 1. The "email" field is filled in | |||
2. The "password" field is filled in | |||
3. The "Incorrect username or password. Please try again." message is displayed | |||
[[Image: | [[Image:Please try again. message is displayed.png|800px]] | ||
| | | | ||
|- | |- | ||
| Precondition: | | Precondition: | ||
Proceed to the " | Proceed to the "Account" page | ||
Steps: | Steps: | ||
1. | 1. Fill in the invalid email in the "email" field | ||
2. | 2. Fill in the valid password in the "password" field | ||
3. Click | 3. Click on the "Login" button | ||
4. Click on the "close" button | |||
| 1. The "email" field is filled in | |||
2. The "password" field is filled in | |||
3. The "Incorrect username or password. Please try again." message is displayed | |||
4. The "Incorrect username or password. Please try again." message is not displayed | |||
| | | | ||
|- | |- | ||
| 61 | |||
| Check that the password is displayed in an encrypted format | |||
| Precondition: | | Precondition: | ||
Proceed to the " | Proceed to the "Account" page | ||
Steps: | Steps: | ||
Fill in the "password" field | |||
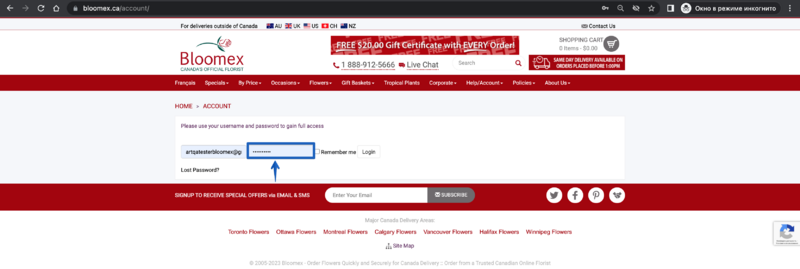
| The password is displayed in an encrypted format | |||
[[Image:The password is displayed in an encrypted format.png|800px]] | |||
[[Image: | |||
| | | | ||
|- | |- | ||
| 62 | |||
| View order details information | |||
| Precondition: | | Precondition: | ||
Proceed to the " | Proceed to the "Account" page | ||
Login in site | |||
Steps: | Steps: | ||
Click on the "Order Number" | |||
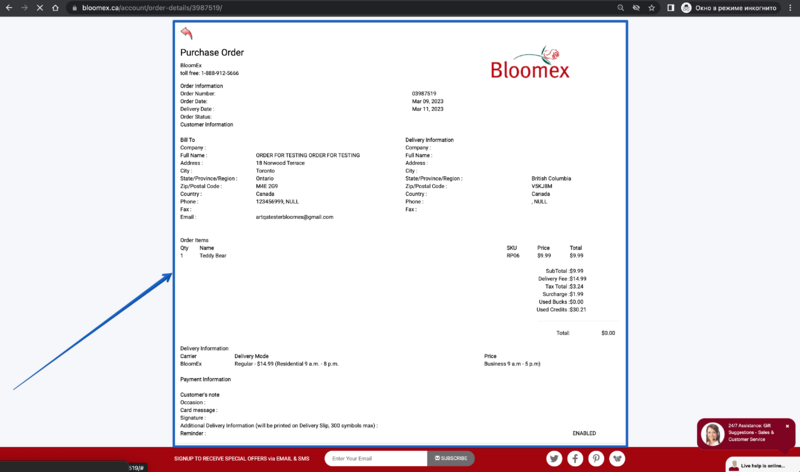
| The appropriate page is opened | |||
[[Image:The appropriate page is opened.png|800px]] | |||
| | |||
|- <span id="Lost your password"></span> | |||
| rowspan="2" | 63 | |||
| rowspan="2" | Lost your password function | |||
| Precondition: | |||
Proceed to the "lost password" page | |||
Steps: | |||
1. Fill in the valid email in the "email" field | |||
2. Click on the "Login" button | |||
3. Click on the link in your e-mail | |||
4. Fill in the valid value of all fields and click on the "Update" button | |||
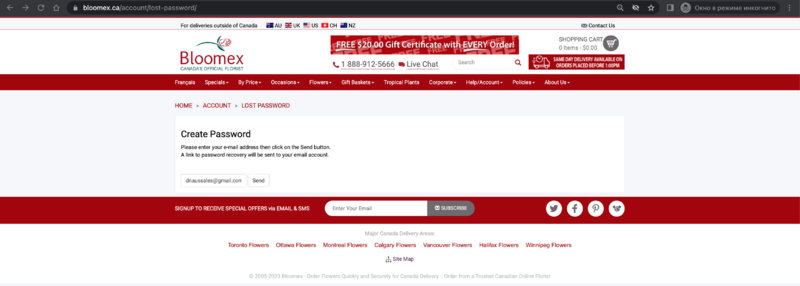
| 1. The "email" field is filled in | |||
[[Image:1. The email field is filled in.png|800px]] | |||
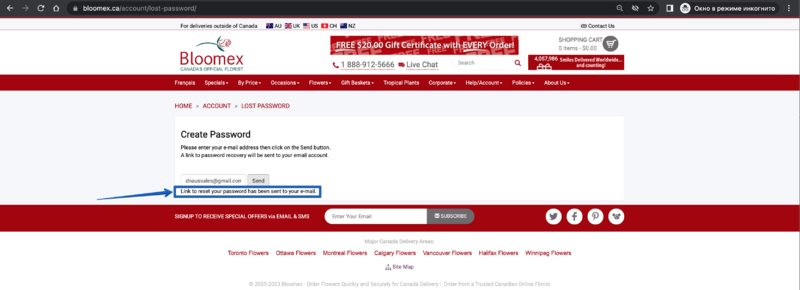
2. The "Link to reset your password has been sent to your e-mail." message is displayed and the reset link is sent to your e-mail | |||
[[Image: | [[Image:2. The Link to reset your password has been sent to your e-mail.png|800px]] | ||
[[Image:2. The Link to reset your password has been sent to your e-mail 1.png|800px]] | |||
| | |||
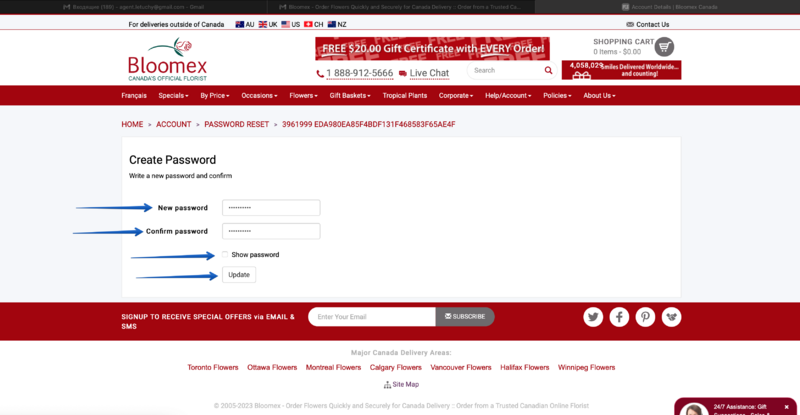
3. The appropriate page is opened and contains attributes (the "New password" field, the "Confirm password" field, the "Show password" checkbox, "Update" button) | |||
[[Image:3. The appropriate page is opened and cantains attributes.png|800px]] | |||
[[Image: | |||
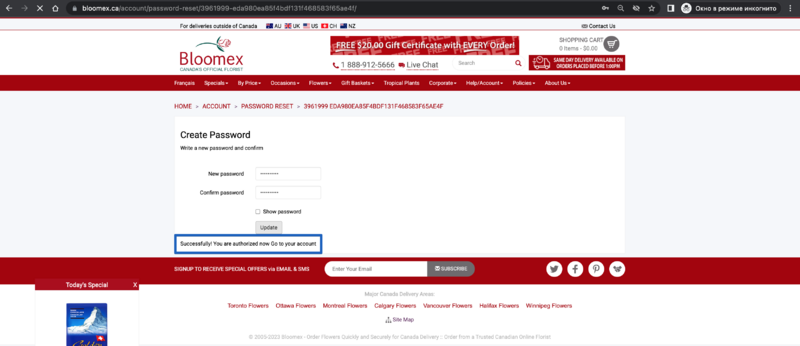
4. All fields are filled in and the "Successfully! You are authorized now Go to your account" message is displayed | |||
[[Image:4. All fields are filled in and the Successfully! You are authorized now Go to your account message is displayed.png|800px]] | |||
| | | | ||
|- | |- | ||
| Precondition: | | Precondition: | ||
Proceed to the " | Proceed to the "lost password" page | ||
Steps: | Steps: | ||
1. | 1. Fill in the valid email in the "email" field | ||
2. | 2. Click on the "Login" button | ||
3. Click on the link in your e-mail | |||
4. Fill in the correct "New password" field, and the incorrect "Confirm password" field and click on the "Update" button | |||
| 1. The "email" field is filled in | |||
2. The "Link to reset your password has been sent to your e-mail." message is displayed and the reset link is sent to your e-mail | |||
3. The appropriate page is opened and contains attributes (the "New password" field, the "Confirm password" field, the "Show password" checkbox, "Update" button) | |||
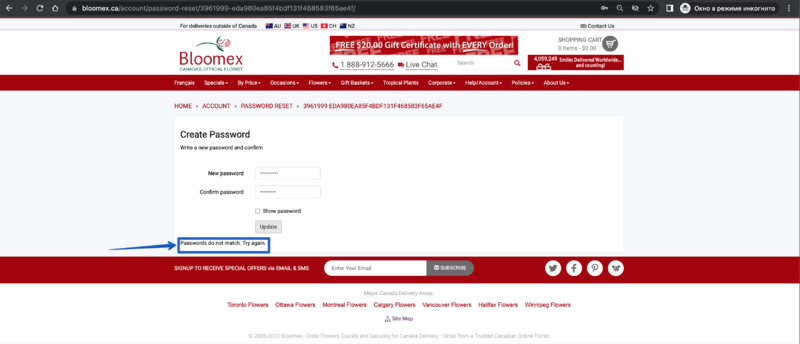
4. All fields are filled in and the "Passwords do not match. Try again." message is displayed | |||
[[Image:4. All fields are filled in and the Passwords do not match.png|800px]] | |||
| | | | ||
|- | |- | ||
| | | 64 | ||
| Changing the password and logging in under the old password | |||
| | |||
| Precondition: | | Precondition: | ||
Changing the password | |||
Proceed to the "login" page | |||
Steps: | Steps: | ||
1. Fill in the valid email in the "email" field | |||
| The | 2. Fiil in the old password in the "password" field | ||
3. Click on the "Login" button | |||
| 1. The "email" field is filled in | |||
2. The "password" field is filled in | |||
3. The "Incorrect username or password. Please try again." message is displayed | |||
[[Image: | [[Image:Please try again. message is displayed.png|800px]] | ||
| | | | ||
|- | |- | ||
| | | 65 | ||
| | | Check the "Search" field | ||
| Precondition: | | Precondition: | ||
Proceed to the "login" page | |||
Steps: | Steps: | ||
Fill in the order number in the "Search" field | |||
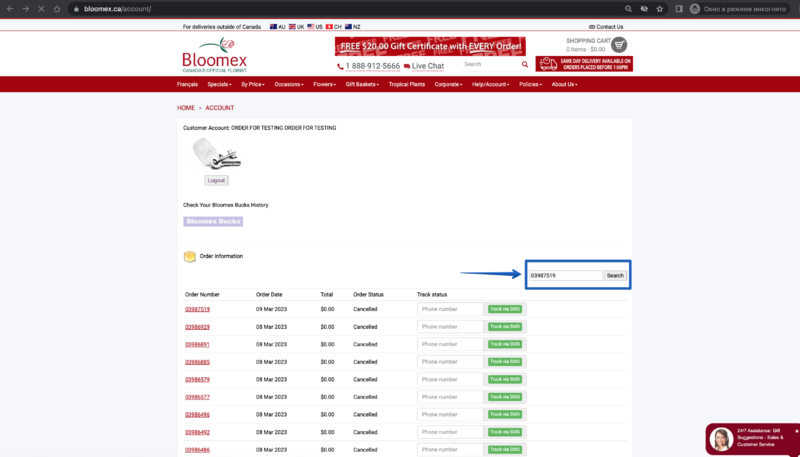
| The | | The "email" field is filled in and displayed | ||
[[Image:The | [[Image:The email field is filled in and displayed.png|800px]] | ||
| | | | ||
|- | |- | ||
| | | 66 | ||
| | | Check the control elements: | ||
1. << Start < Prev 1 2 Next > End >> | |||
2. Change the number of orders per page (Select name = "Limit") | |||
| Precondition: | |||
Proceed to the "login" page | |||
Steps: | |||
Scroll down | |||
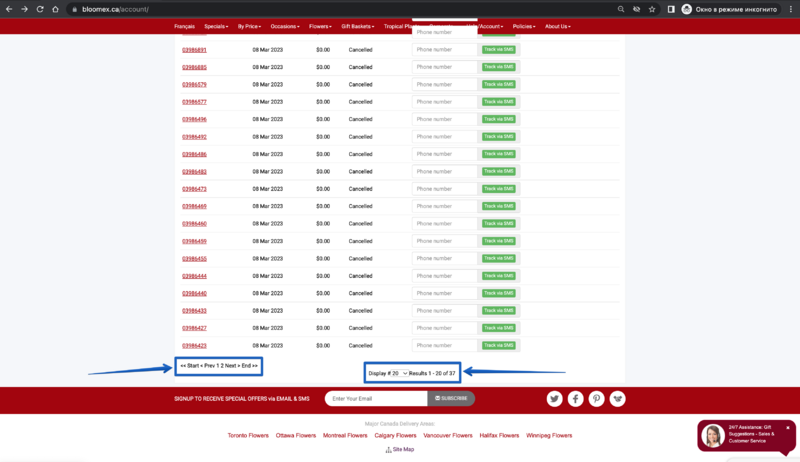
| The "<< Start, < Prev, 1, 2 , Next > , End >>" buttons is displayed | |||
[[Image:The Start, Prev, 1, 2 , Next, End buttons is displayed.png|800px]] | |||
| | |||
|- | |||
| 67 | |||
| Bloomex buck history | |||
| Precondition: | | Precondition: | ||
In the menu section select "Policies" | The user is authorized on the site | ||
Steps: | Steps: | ||
Select from the drop-down list "Delivery Policy" and check the information on the page | 1. Go to the menu sections and click "Help/Account" | ||
| The information is correctly reproduced on the page | 2. Click the "Bloomex Bucks" link | ||
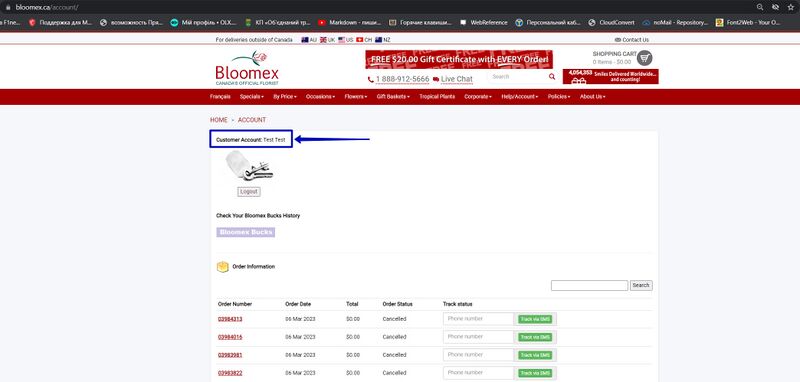
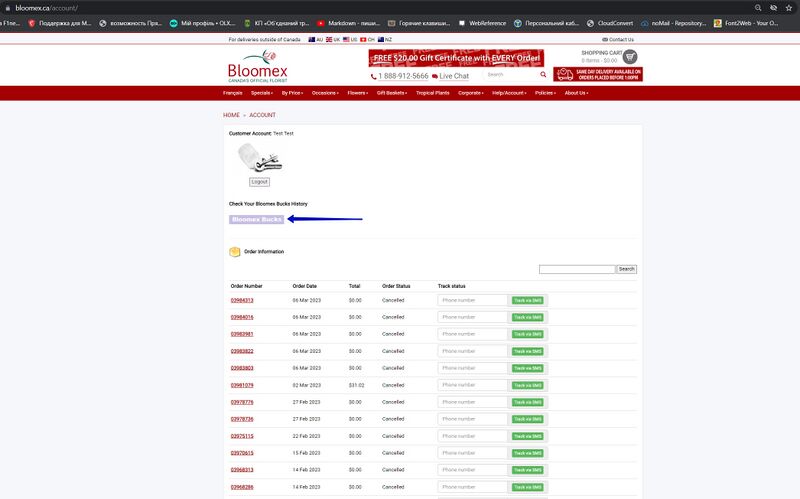
[[Image:The information is correctly reproduced on the page77.jpg|800px]] | | 1. The page opened "Customer Account" | ||
| | |||
|- | [[Image:The page opened Customer Account 1.jpg|800px]] | ||
| | [[Image:The page opened Customer Account 2.jpg|800px]] | ||
| Promotion Policy | [[Image:The page opened Customer Account 3.jpg|800px]] | ||
| Precondition: | |||
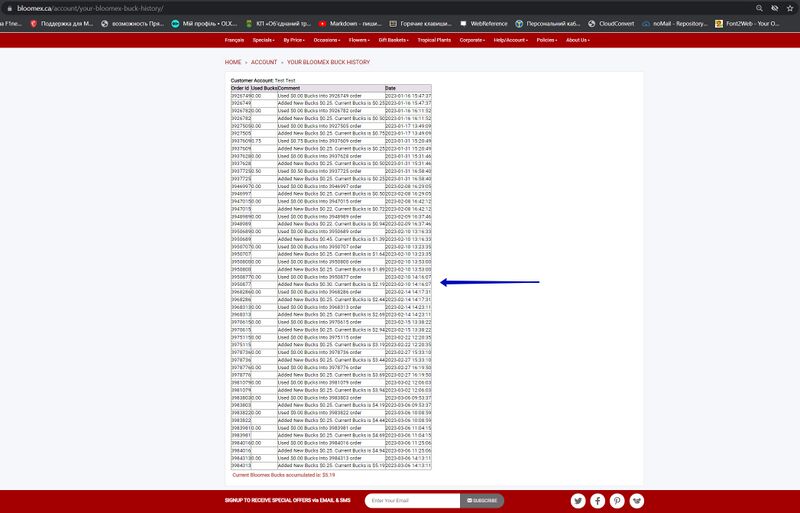
2. The full story of "YOUR BLOOMEX BUCK HISTORY" is uploaded successfully | |||
In the menu section select "Policies" | |||
[[Image:The full story of YOUR BLOOMEX BUCK HISTORY is uploaded successfully.jpg|800px]] | |||
Steps: | | | ||
|- | |||
Select from the drop-down list "Promotion Policy" and check the information on the page | | 68 | ||
| Flower care page | |||
| The information is correctly reproduced on the page | | Precondition: | ||
[[Image:The information is correctly reproduced on the page78.jpg|800px]] | The user is authorized on the site | ||
| | |||
|- | Steps: | ||
| | |||
1. Go to the menu sections "Help/Account" | |||
2. Select the category "Flower Care" and Click | |||
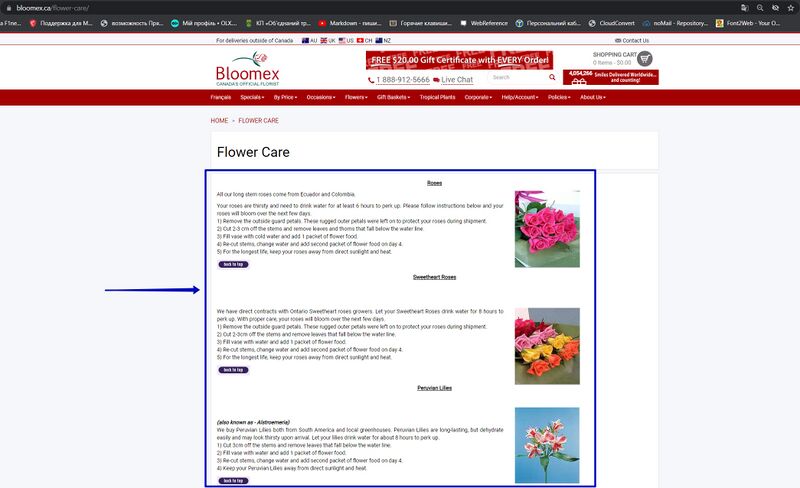
| 1. The appropriate page is opened | |||
[[Image:The appropriate Page is opened.jpg|800px]] | |||
2. The page with information about "Flower care" has content and is displayed correctly | |||
[[Image:The page with information about Flower care has content and is displayed correctly.jpg|800px]] | |||
| | |||
|- | |||
|colspan="4" style="background-color:#ffffed;" | | |||
=Apply for 20 corporate discount= | |||
| | |||
|- | |||
| 69 | |||
| Check to send the application <span id="20 Corporate Discount"></span> | |||
| Precondition: | |||
The user has not previously issued a "Bloomex Corporate Account" | |||
Steps: | |||
1. Go to the menu section "Corporate" | |||
2. Select the category "Apply for 20% Corporate Discount" and click | |||
3. Enter valid data in the required fields and click the "Send Application" button | |||
4. Check your email | |||
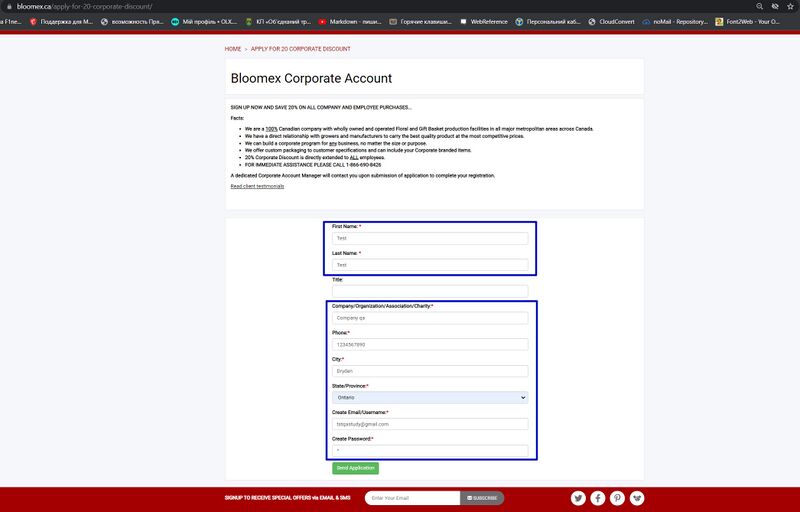
| [[Image:66 The appropriate page is opened.jpg|800px]] | |||
1. The appropriate page is opened | |||
2. The page with information about "Apply for 20% Corporate Discount" has content and is displayed correctly | |||
[[Image:66 The page with information about Flower care has content and is displayed correctly.jpg|800px]] | |||
3. Message received - "Thank You - your application for a Bloomex Corporation Account has been received" | |||
[[Image:20 Corporate Discount mess.png - Фотографии.jpg|800px]] | |||
4. A message sent to the mail "New Corporate Account Pending" | |||
[[Image:20 Corporate Discount.png|800px]] | |||
|ENG | |||
Positive | |||
http://cloud.necs.ca/s/BpwZnobM2kCD7LQ | |||
Negative | |||
http://cloud.necs.ca/s/mJdTdLFKaMXbHwC | |||
|- | |||
|colspan="4" style="background-color:#ffffed;" | | |||
=Customer Service Survey= | |||
| | |||
|- | |||
| rowspan="2" | 70 | |||
| rowspan="2" | Check to send customer service survey form <span id="Service survey form"></span> | |||
| Precondition: | |||
Proceed to step "Your order has been successfully placed" | |||
Steps: | |||
1. After placing the order Click "YES" in Google review | |||
2. Click on the survey link in the message in your email | |||
3. Fill in all fields and click on the "Submit survey" button | |||
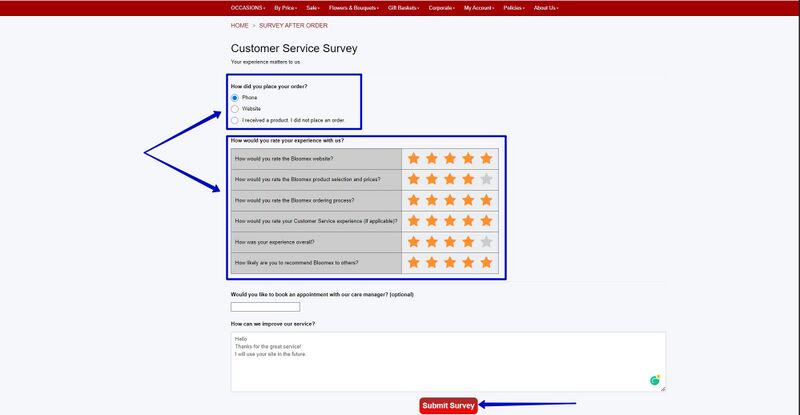
| [[Image:1. The letter Your opinion matters most to us! arrived in the mail.jpg|800px]] | |||
1. The letter "Your opinion matters most to us!" arrived in the mail | |||
2. The appropriate page is opened | |||
[[Image:2. The appropriate page is opened 67.jpg|800px]] | |||
3. The message: "Successfully Submitted!" | |||
[[Image:3. The message Successfully Submitted!.jpg|800px]] | |||
| | |||
|- | |||
| Precondition: | |||
Proceed to step "Your order has been successfully placed" | |||
Steps: | |||
After placing the order Click "NO" in Google review | |||
| Google review is closed | |||
| | |||
|- | |||
|colspan="4" style="background-color:#ffffed;" | | |||
=Quote Form= | |||
| | |||
|- | |||
| rowspan="2" | 71 | |||
| rowspan="2" | Check sending quote form <span id="Quote form"></span> | |||
| Precondition: | |||
Fill in and send the "Quote Form" | |||
Steps: | |||
1. Go to the menu section "Corporate" | |||
2. Select the category "Quote Request Form" and click | |||
3. Enter valid data in the required fields | |||
4. Click the "Send quote request" button | |||
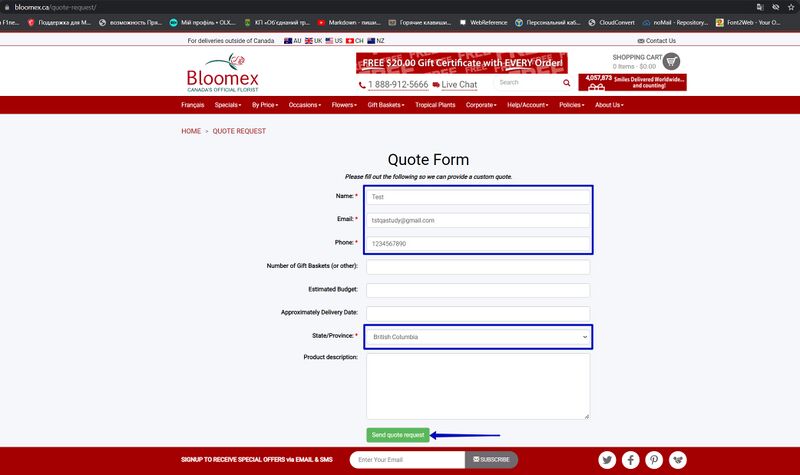
| [[Image:1. The appropriate page is opened 68.jpg|800px]] | |||
1. The appropriate page is opened | |||
2. The page with information about the "Quote Request Form" has content and is displayed correctly | |||
3. Data received successfully | |||
[[Image:2. Data received successfully.jpg|800px]] | |||
4. A message on-site "Thank you - Your quote request has been successfully submitted. A Corporate Account Manager will get back to you shortly" | |||
[[Image:3. A Corporate Account Manager will get back to you shortly.jpg|800px]] | |||
|ENG | |||
Positive | |||
http://cloud.necs.ca/s/FJSdbgmwzzJgdtY | |||
Negative | |||
http://cloud.necs.ca/s/D6Yk25zx2jxnJB2 | |||
|- | |||
| Precondition: | |||
Fill in and send the "Quote Form" | |||
Steps: | |||
1. Go to the menu section "Corporate" | |||
2. Select the category "Quote Request Form" and click | |||
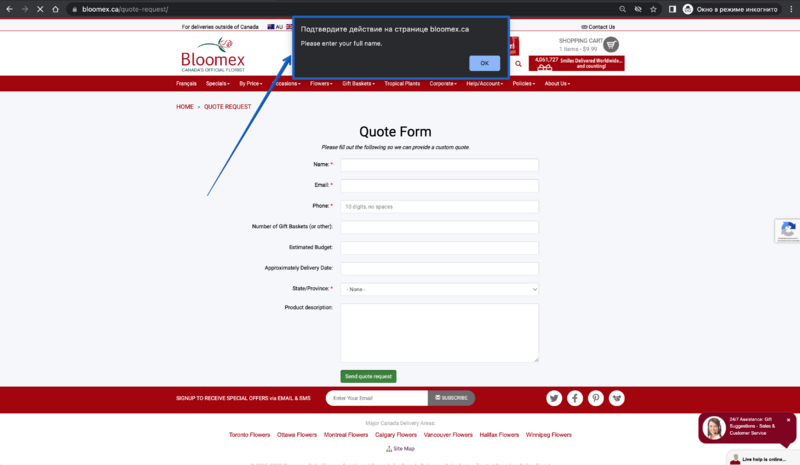
3. Stay all fields empty and click on the "Send quote request" button | |||
4. Check if the letter has arrived at the specified mail | |||
| 1. The appropriate page is opened | |||
2. The page with information about the "Quote Request Form" has content and is displayed correctly | |||
3. The "Please enter your full name." message is displayed | |||
[[Image:4. The appropriate page is opened.png|800px]] | |||
4. A "Thanks for your Quote request" letter has been sent to the mail | |||
[[Image:Thanks for your Quote request.jpg|800px]] | |||
| | |||
|- | |||
|colspan="4" style="background-color:#ffffed;" | | |||
=Live Chat= | |||
| | |||
|- | |||
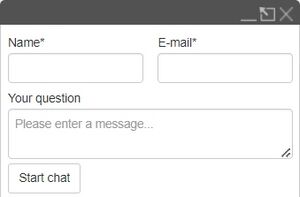
| 72 | |||
| Check to send message to live chat, bot answer, operator answer | |||
| Precondition: | |||
Proceed to the "Live Help is Online" chat | |||
Steps: | |||
1. Enter your "Name", "Email", and "Your question" and click The "Start chat" button | |||
2. Send a message | |||
3. Get the answer | |||
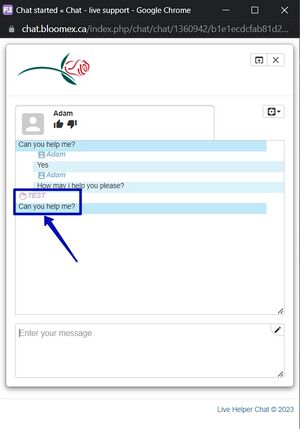
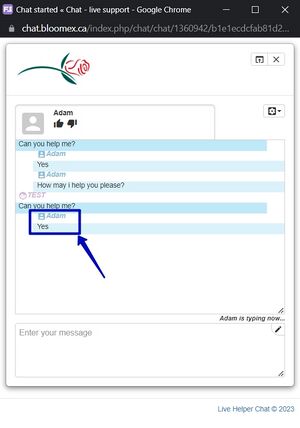
| [[Image:1. The appropriate chat has opened 69.jpg|300px]] | |||
1. The appropriate chat has opened | |||
2. Message sent in chat | |||
[[Image:2. Message sent in chat 69.jpg|300px]] | |||
3. Reply received in chat | |||
[[Image:3. Reply received in chat 69.jpg|300px]] | |||
| | |||
|- | |||
| 73 | |||
| Settings elements: | |||
1. Enable/Disable sound about new messages from the operator | |||
2. Print | |||
3. Send Chat Transcript to your Email | |||
4. Сlose | |||
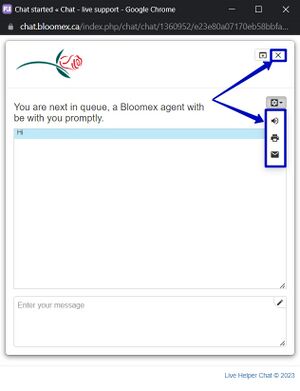
| Precondition: | |||
Proceed to the "Live Help is Online" chat | |||
Steps: | |||
1. Enter your "Name", "Email", and "Your question" and click The "Start chat" button | |||
2. Click the settings icon and check the elements | |||
| [[Image:1. The appropriate chat has opened 69.jpg|300px]] | |||
1. The appropriate chat has opened | |||
2. Control elements: Enable/Disable sound, Print, Send Chat Transcript to your Email and Сlose end the chat are displayed correctly | |||
[[Image:2. Control elements displayed correctly70.jpg|300px]] | |||
| | |||
|- | |||
| rowspan="4" | 74 | |||
| rowspan="4" | Check required fields | |||
| Precondition: | |||
Proceed to the "Live Help is Online" chat | |||
Steps: | |||
Enter your "Name", "Email", and click The "Start chat" button | |||
| Data received successfully | |||
[[Image:Data received successfully71.jpg|300px]] | |||
| | |||
|- | |||
| Precondition: | |||
Proceed to the "Live Help is Online" chat | |||
Steps: | |||
1. Leave the "Name" field empty | |||
2. Enter a valid email in the "Enter email" field | |||
3. Click The "Start chat" button | |||
| Message: "Please enter your name" | |||
[[Image:Message Please enter your name71.jpg|300px]] | |||
| | |||
|- | |||
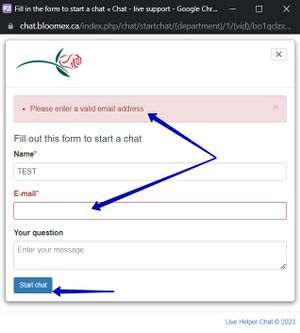
| Precondition: | |||
Proceed to the "Live Help is Online" chat | |||
Steps: | |||
1. Enter a valid name user in the "Name" field | |||
2. Leave the "email" field empty | |||
3. Click The "Start chat" button | |||
| Message: "Please enter a valid email address" | |||
[[Image:3.Message Please enter a valid email address71.jpg|300px]] | |||
| | |||
|- | |||
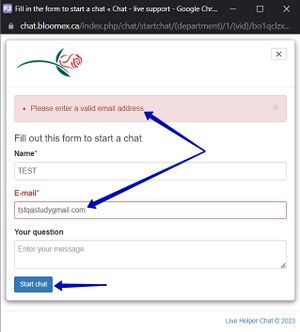
| Precondition: | |||
Proceed to the "Live Help is Online" chat | |||
Steps: | |||
1. Enter a valid name user in the "Name" field | |||
2. Enter an invalid email in the "email" field | |||
3. Click The "Start chat" button | |||
| Message: "Please enter a valid email address" | |||
[[Image:4.Message Please enter a valid email address71.jpg|300px]] | |||
| | |||
|- | |||
| rowspan="2" | 75 | |||
| rowspan="2" | Send an empty message | |||
| Precondition: | |||
Proceed to the "Live Help is Online" chat | |||
Steps: | |||
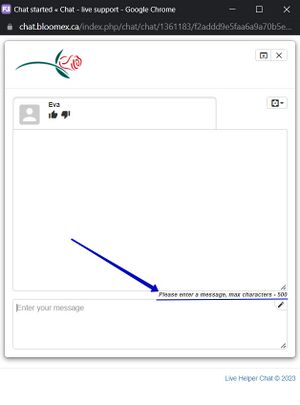
Send an empty message, leave the "Enter your message" field empty, press "Enter" | |||
| Message: "Please enter a message, maximum characters - 500" | |||
[[Image:1 Message Please enter a message, maximum characters - 500.jpg|300px]] | |||
| | |||
|- | |||
| Precondition: | |||
Proceed to the "Live Help is Online" chat | |||
Steps: | |||
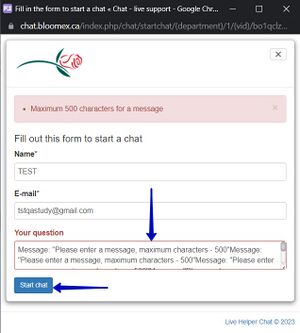
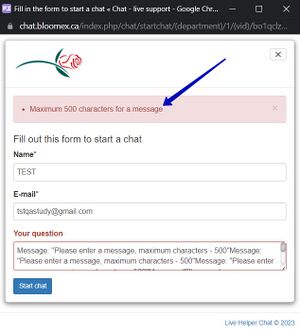
Send 501 characters for a message, and press the "Start chat" button | |||
| Message: Maximum 500 characters for a message | |||
[[Image:2 Message Maximum 500 characters for a message.jpg|300px]] | |||
[[Image:2 2Message Maximum 500 characters for a message.jpg|300px]] | |||
| | |||
|- | |||
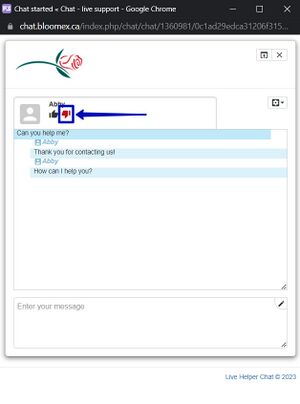
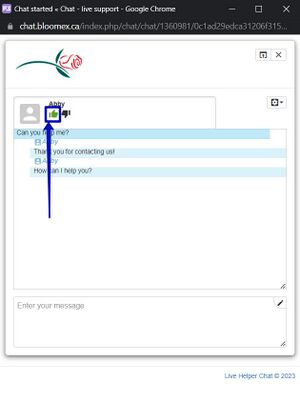
| 76 | |||
| Vote Action (like/do not like) | |||
| Precondition: | |||
Proceed to the "Live Help is Online" chat | |||
Steps: | |||
1. Enter your "Name", "Email", and click The "Start chat" button | |||
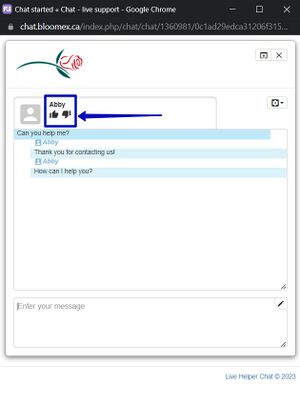
2. Vote Action (like/do not like) | |||
| [[Image:Data received successfully71.jpg|300px]] | |||
1. Data received successfully | |||
2. Action (like/do not like), displayed | |||
[[Image:2. Action (like do not like), displayed.jpg|300px]] | |||
[[Image:3. Action (like do not like), displayed.jpg|300px]] | |||
[[Image:4. Action (like do not like), displayed.jpg|300px]] | |||
| | |||
|- | |||
| 77 | |||
| "Live Chat" through the link in the header | |||
| Precondition: | |||
Proceed to the "Live Help is Online" chat | |||
Steps: | |||
Go to the "Live Chat" link in the "header" of the site | |||
| [[Image:1. Live Chat.jpg|800px]] | |||
[[Image:2. Live Chat.jpg|300px]] | |||
| | |||
|- | |||
|colspan="4" style="background-color:#ffffed;" | | |||
=Policies= | |||
| | |||
|- | |||
| 78 | |||
| Order and return policies | |||
| Precondition: | |||
In the menu section select "Policies" | |||
Steps: | |||
Select from the drop-down list "Order and Return Policy" and check the information on the page | |||
| The information is correctly reproduced on the page | |||
[[Image:The information is correctly reproduced on the page.jpg|800px]] | |||
| | |||
|- | |||
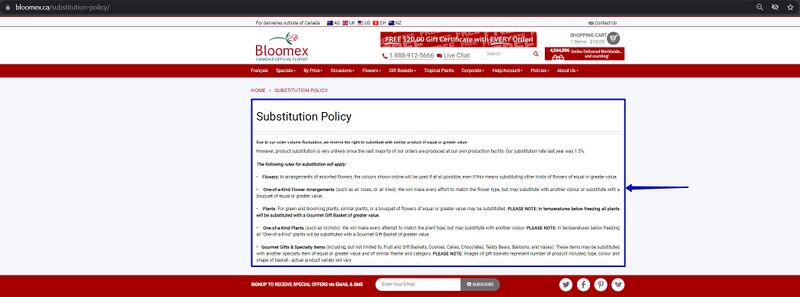
| 79 | |||
| Substitution Policy | |||
| Precondition: | |||
In the menu section select "Policies" | |||
Steps: | |||
Select from the drop-down list "Substitution Policy" and check the information on the page | |||
| The information is correctly reproduced on the page | |||
[[Image:The information is correctly reproduced on the page 76.jpg|800px]] | |||
| | |||
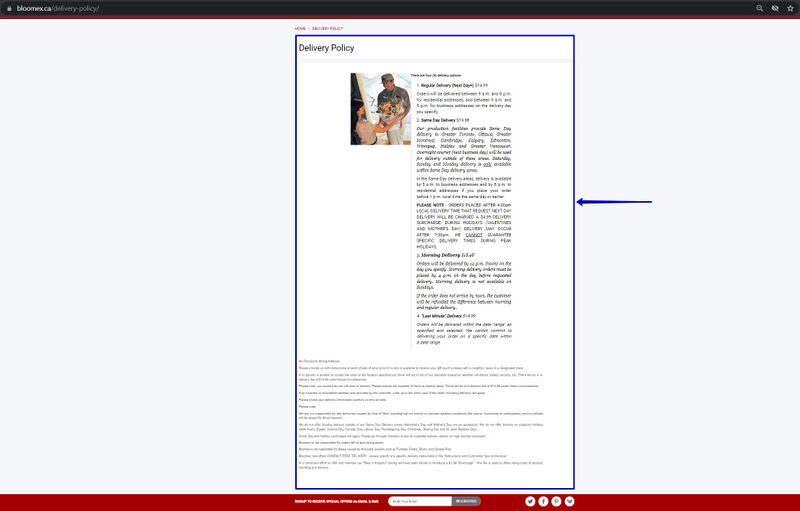
|- | |||
| 80 | |||
| Delivery Policy | |||
| Precondition: | |||
In the menu section select "Policies" | |||
Steps: | |||
Select from the drop-down list "Delivery Policy" and check the information on the page | |||
| The information is correctly reproduced on the page | |||
[[Image:The information is correctly reproduced on the page77.jpg|800px]] | |||
| | |||
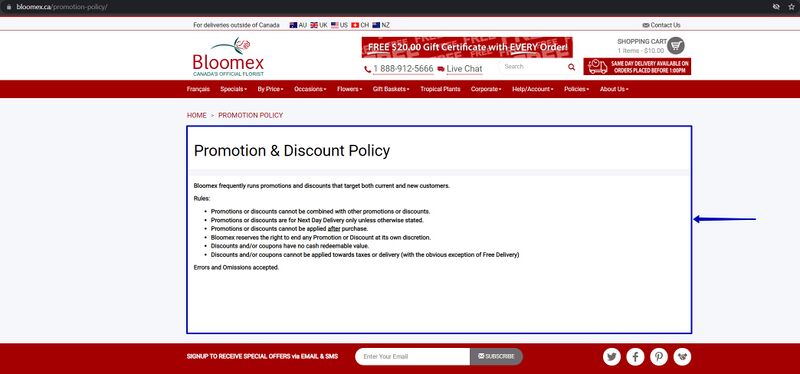
|- | |||
| 81 | |||
| Promotion Policy | |||
| Precondition: | |||
In the menu section select "Policies" | |||
Steps: | |||
Select from the drop-down list "Promotion Policy" and check the information on the page | |||
| The information is correctly reproduced on the page | |||
[[Image:The information is correctly reproduced on the page78.jpg|800px]] | |||
| | |||
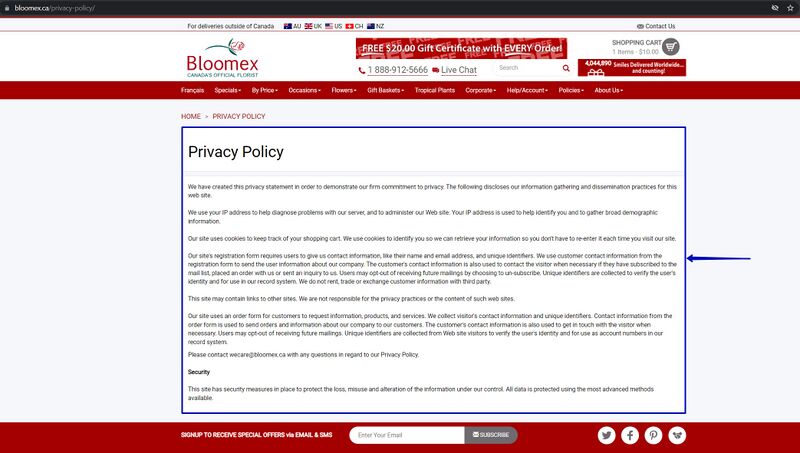
|- | |||
| 82 | |||
| Privacy Policy | | Privacy Policy | ||
| Precondition: | | Precondition: | ||
| Line 2,008: | Line 2,316: | ||
| | | | ||
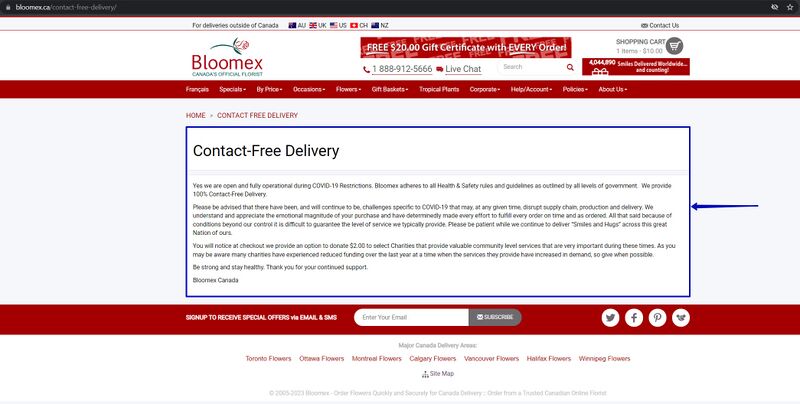
|- | |- | ||
| | | 83 | ||
| Contact-Free Delivery | | Contact-Free Delivery | ||
| Precondition: | | Precondition: | ||
| Line 2,027: | Line 2,335: | ||
| | | | ||
|- | |- | ||
| | | 84 | ||
| Check Top Menu links, categories Flowers, Gift Baskets, Sympathy Flowers | | Check Top Menu links, categories Flowers, Gift Baskets, Sympathy Flowers | ||
| Precondition: | | Precondition: | ||
| Line 2,048: | Line 2,356: | ||
| | | | ||
|- | |- | ||
| | | 85 | ||
| Check map picture on Flowers by warehouse | | Check map picture on Flowers by warehouse | ||
| Precondition: | | Precondition: | ||
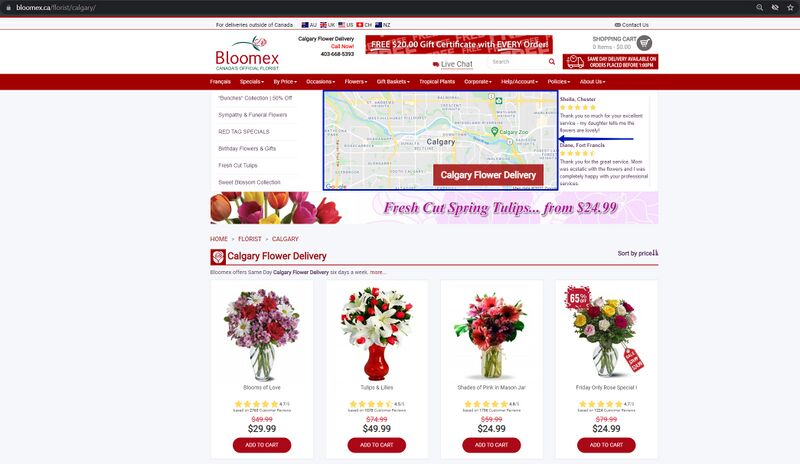
Latest revision as of 22:40, 20 February 2024
< Back to QA and Testing
Release notes of the Admin and Web system for bloomex.ca
| Number | Name | Steps | Expected result | Autotests |
|---|---|---|---|---|
Homepage |
Eng/FR | |||
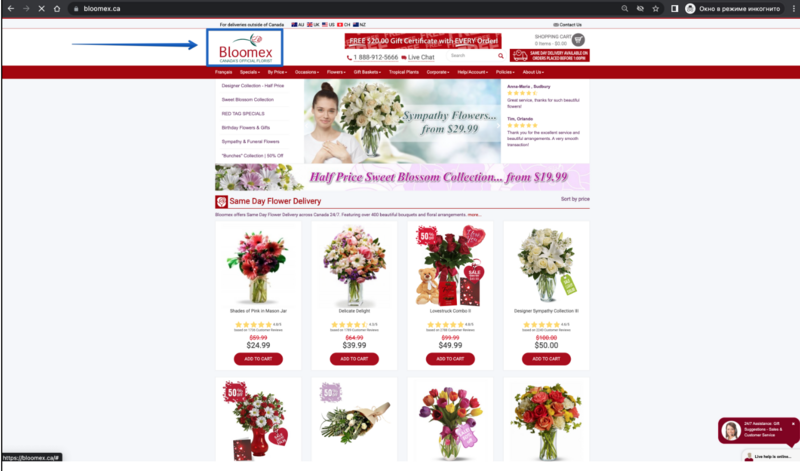
| 1 | Logo on home page | Go to the Homepage | The logo of the company is displayed correctly | |
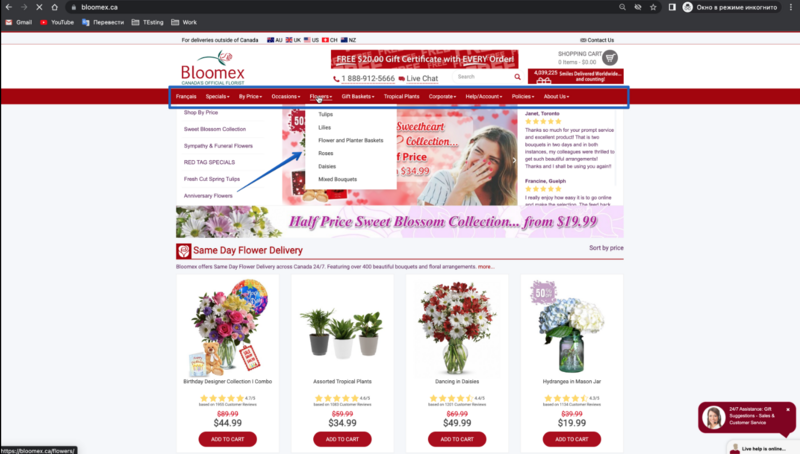
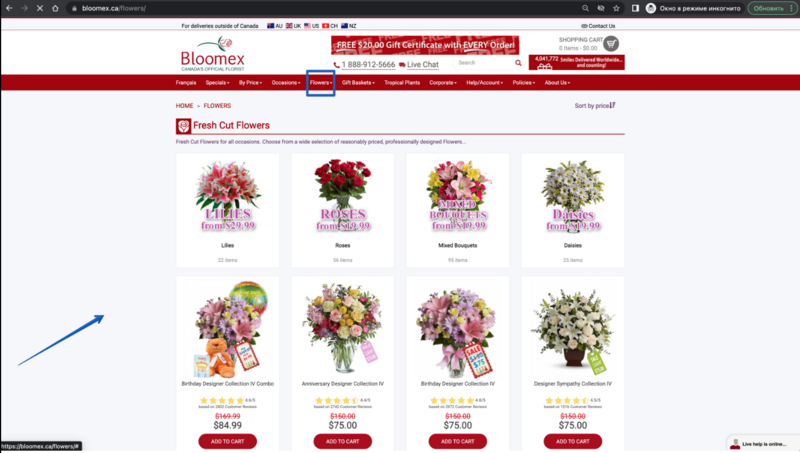
| 2 | All menu main entries | 1. Hover on each menu
2. Click the menu section and categories |
1. The dropdown list is shown after hovering the mouse in the menu section
2. The appropriate page is opened. |
ENG
Specials Section: http://cloud.necs.ca/s/NSWJjFJmEeLHdHb Occasions Section: http://cloud.necs.ca/s/etoZDN6zcP9kkyw Flowers|Plants Section: http://cloud.necs.ca/s/TRfL25MHzw96sHH Gift Baskets Section: http://cloud.necs.ca/s/JJ9HkbLgtnaw3xw Bulk Flowers Section: http://cloud.necs.ca/s/eZgLRrrR9eqPQz7 Corporate Section: http://cloud.necs.ca/s/BmqCEiCtPEZCeDN By Price Section: http://cloud.necs.ca/s/pgBC5dasdDKA7iK Help/Account Section: http://cloud.necs.ca/s/6CAxLFpCbtqE5fe Policies Section (not actual now): http://cloud.necs.ca/s/o47jjK9KM8mNRne
Aide_Compte http://cloud.necs.ca/s/pja5p8swMiePe86 Enterprise http://cloud.necs.ca/s/KH2aCPrxecsM6Q7 Fleurs http://cloud.necs.ca/s/AWxw2i9QabeWyRW FleursEnVrac http://cloud.necs.ca/s/R52XyKCLFKMfqHp Occasions http://cloud.necs.ca/s/3jcKnAbJRGRJMEG PaniersCadeaux http://cloud.necs.ca/s/4cQjSRq4QYs6GkM ParPrix http://cloud.necs.ca/s/4NxwogRpPNtkx4F Politiques http://cloud.necs.ca/s/bCqfEpekJtD6y37 PolitiquesSection http://cloud.necs.ca/s/5xweq8qLNpGaEk6 Spéciaux http://cloud.necs.ca/s/2BoWsoqqPzWq3GW
|
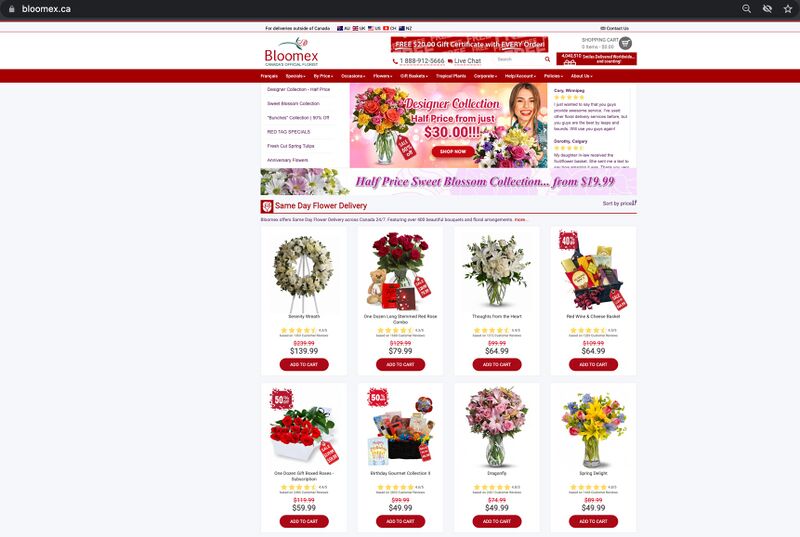
| 3 | Products landing page on the homepage | Check the products landing page and through all page | The product cart on the products landing page contains attributes ( image, review, title, old price, price, button) | ENG
http://cloud.necs.ca/s/BGiqe6XGE5K7R8q FR Landing Page |
| 4 | Banners on the homepage | 1. Check all banners
2. Click the 20$ banner 3. Click the arrow on all sliders 4. Click the "Half price" banner |
1. All banners are displayed (20$ gift certificate, smiles delivered, slider, half price)
2. The page about the "free 20$ gift certificate" is opened 3. All images when scrolling through the banners are displayed 4. The "Sweet Blossoms Collection" page is opened |
ENG
http://cloud.necs.ca/s/zHsc9k3Ae2fJGco FR Banners |
| 5 | Contact us in the header | Click on the "Contact us" button | The "Contact us" page is opened. | ENG
http://cloud.necs.ca/s/LJn3AWWm6cp9ek4 FR ContactUs |
| 6 | Link to the websites of the other countries in header site | Click on the country link | The website of the country you have chosen is opened | ENG
http://cloud.necs.ca/s/p7fftQ57EoYdHwj FR Link Web sites Other Countries |
| 7 | Search results (search by button and by keyboard) | Fill in the "search" field with a valid value and click the "search" button | The search result shows products containing the searching value in the product title or SCU | ENG
http://cloud.necs.ca/s/EWCqSHSRcKxmsEa FR Search Main http://cloud.necs.ca/s/bjGMF3Pkx4EaqRY
|
| Fill in the "search" field with not a valid value (spaсe, special symbols, cyrillic symbols) | The "Nothing found on your request" message is displayed | |||
| Click by "search" button with an empty "search" field | The "The length of the search string must be at least 3 characters" message is displayed | |||
| 8 | Check changing to the French language | Click on the "Francais" button | All website is changed to the French language including the logo | ENG
http://cloud.necs.ca/s/X4LQ85zg2C86JJA FR Change To Language |
| 9 | Footer links | 1. Scroll down to the bottom of the homepage.
2. Click on the warehouse flowers links 3. Click on the site map link 4. Click on any link on a site map |
1. The Footer links are displayed
2. Warehouse flowers links redirect to the appropriate page 3. The site map page is opened and contains (Top Menu, Categories, Flowers, Gift Baskets, Sympathy Flowers) 4. The appropriate page is opened. |
ENG
1-2: http://cloud.necs.ca/s/yxzQZ2SAmgL4w4y FR Footer WH Links |
| 10 | Social links in footer | Click on the social links at the bottom of the homepage | Social links redirect to social networks and partnership link redirect to the partnership page | ENG
http://cloud.necs.ca/s/JmzE5pDWEyNGSEE FR Social Footer Links http://cloud.necs.ca/s/G5sPEPFMjznxTZM
|
| 11 | Function "subscribe" in the footer | Steps:
1. Scroll down to the bottom of the homepage 2. Enter your email in the "Enter Your Email" field and click the "Subscribe" button |
1. The "Subscribe" button and the "Email" field are displayed
2. A "Subscription" letter has been sent to the mail |
ENG
http://cloud.necs.ca/s/WzjssyzTD2JgJe7 FR Subscription |
| 12 | The site displays correctly on different screen resolutions and on different devices | Open the website on different screen resolutions and different devices | The website on different devices with different screen resolutions is displayed correctly | |
| 13 | Favicon | Check on the favicon display | The favicon is displayed in the bookmark | |
Product listing page |
||||
| 14 | Check category displaying
(example Flowers, Gift basket, Shop for Good, by Price, Occasions landing page) |
Click on any category (for example flowers category) | An appropriate landing page with catecories is opened ( for example flowers category) | |
| 15 | Information on category carts | Choose any category | Category carts contain attributes ( image, title, number of items) | |
| 16 | Products sorting (by price) | 1. Click on the "by price" menu section
2. Click on any category (example under 20) |
1. The "by price" button is worked and sorted the products from less to more and vice versa
2. Products is co-priced and the maximum and minimum price does not go out of the range |
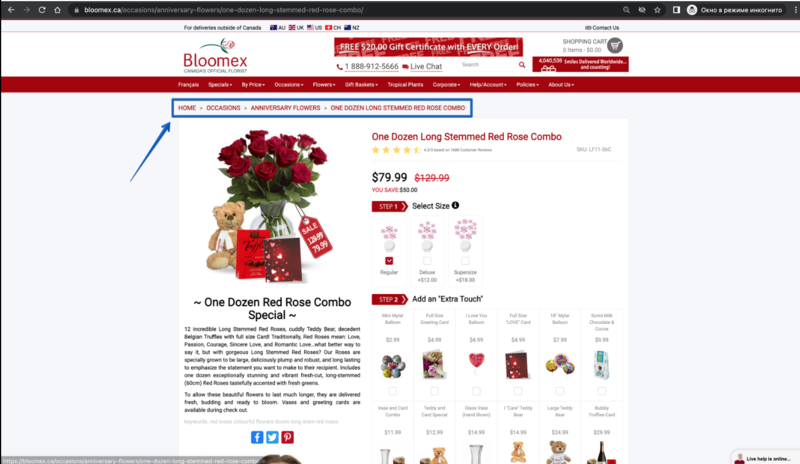
|
| 17 | Breadcrumbs on the product list page | 1. Go to the product list page
2. Click on the breadcrumbs link ( for example "flowers" breadcrumb) |
1. Breadcrumbs are displayed correctly
2. The appropriate page is opened. |
|
Product details page |
||||
| 18 | Product attributes on the product details page ( breadcrumbs, image of product, review, title, SCU, price(old price elso), "select size", "extra touch", social links, buy button, description) | Go to the product details page | The product attributes on the product details page ( breadcrumbs, the image of the product, review, title, SCU, price(old price also), "select size", "extra touch", social links, buy button, description) are displayed | |
| 19 | Change product sizes and "Extra Touch" | Change "select size" and change "Extra Touch" | The "Select size" contains (regular, deluxe, supersize) options, and selected the "Extra Touch" can be added to the cart | ENG
Buy product with product size - Supersize and "Extra Touch" http://cloud.necs.ca/s/bz4JWey6bijiFBo
|
| 20 | Clients reviews | Go to the product details page | Clients reviews contain (5 stars and descriptions) are displayed | |
| 21 | Add product to the Shopping Cart | Go to the product details page and click the "Add to cart" button | The "cart modal inner" contains attributes ("Product successfully added to your Shopping Cart" message, title, quantity, total price, "continue shopping" button, "proceed to checkout" button) and is opened | |
| 22 | Check cart product that out of stock | Search for a product "Sold out"( example in "by price" - "under 20") and go to the product details page | The product details page with the "Sold Out" image and without any steps or buy button is displayed | |
| 23 | Social links to share product | Go to the product details page | The social links redirect to social networks | |
| 24 | Breadcrumbs on PDP | 1. Go to the product details page
2. Click on the breadcrumbs link ( for example "Occasions" breadcrumb) |
1. Breadcrumbs on the product details page are activated and displayed
2. The appropriate page is opened. |
|
| 25 | Glyph icon info sign | Go to the product details page and click the "Glyph icon info sign" | The Glyph icon info sign contains an info alert | |
Cart |
||||
| 26 | Check mini-cart displaying | Precondition:
Add to shopping cart any product and click "continue shopping" button Steps: Hover on shopping cart |
The mini-cart is displayed after hovering the mouse in the shopping cart and contains attributes (total, "view cart" button, "checkout" button) | |
| 27 | Proceed to checkout/cart from the mini-cart | Precondition:
Add to shopping cart any product and click "continue shopping" button Steps: Click on "checkout" button on the mini-cart |
The cart page with the selected product is opened | |
| Precondition:
Hover on shopping cart Steps: Click on the "checkuot" button with empty mini-cart |
The cart page is opened with the "Your Cart is empty" message | |||
| 28 | Check products displaying in cart | Precondition:
Add to cart some products Steps: Click on the mini-cart "Checkuot" button |
The products are displayed with contain attributes (shopping cart summary table, product, price, quantity, total, remove, product title, SCU, image, "continue shopping" button, "proceed to checkout" button) | |
| 29 | Edit product in the cart (quantity, remove) | Precondition:
Add some products to the cart and open cart page Steps: 1. Click on the "plus" button 2. Click on the "minus" button 3. Click on "remove" button |
1. The quantity of product is increased, and the total cost is adjusted accordingly
2. The quantity of product is reduced, and the total cost is adjusted accordingly 3. The product is removed, and the total cost is adjusted accordingly.
|
|
| 30 | Check totals calculation | Precondition:
Add some products to the shopping cart and open the cart page Steps: Click on the "plus" button |
The total price is adjusted accordingly based on the quantity and price of the products | |
| 31 | Remove product from the cart | 1. Go to Homepage
2. Add to Cart any product 3. Click proceed to checkout 4. Remove product from the cart |
Product from the cart was been removed successfully | |
| 32 | Proceed order from cart to continue shopping and add product | Precondition:
Proceed to the cart Steps: 1. Click on the "continue shopping" button 2. Choose any product and click on the "add to cart" button 3. Click on the "proceed to checkout" button |
1. The homepage is opened
2. The "cart modal inner" is opened 3. The cart page is opened with the product that has been selected |
|
| 33 | Proceed to checkout from cart to checkout | Precondition:
Add any product to the cart and proceed to the cart Steps: 1. Click on the "proceed to checkout" button 2. Click on the "proceed to checkout" button 3. Fill in the valid value "create account" form 4. Click on the "register" button |
1. The checkout specials page is opened
2. The express checkout page in opened and contain attributes ("returning customer" form for registered users and "create account" form for not registered users) 3. The form is filled in valid value 4. The "your information" step 1 is opened which contains a form with fields to fill in |
|
| 34 | Checkout specials before checkout | Precondition:
Proceed to specials before checkout Steps: 1. Click on the "add to cart" button 2. Click on the "proceed to checkout" button |
1. The "cart modal inner" is opened with a specials product
2. Specials product is added to cart |
|
Checkout |
| |||
| 35 | Place order as Login user (by credit card) | 1
Precondition: Sign in on a user account Proceed to step 2 of "Billing" Steps: 1. Fill in all the required fields (including valid values credit card fields) 2. Click on the "pay & go to delivery" button 3. Fill in all the required fields and click on the "Complete order" button |
1. All required fields are filled in valid value (including valid values credit card fields)
2. Moved to step 3 of "Delivery Information" 3. All required fields are filled in with valid values and the "Thank you for your order" page is opened |
|
| 2
Precondition: Sign in on a user account Proceed to step 2 of "Billing" Steps: 1. Fill in all the required fields(delivery postal code, delivery date) 2. Fill in incorrect "Name of card" field and correct "Credit Card Number, CVV, Expiry Month" fields 3. Click on the "pay & go to delivery" button 4. Fill in all the required fields and click on the "Complete order" button |
1. All required fields are filled
2. All fields are filled 3. Moved to step 3 of "Delivery Information" 4. All required fields are filled in with valid values and the "Thank you for your order" page is opened |
|||
| 3
Precondition: Sign in on a user account Proceed to step 2 of "Billing" Steps: 1. Fill in all the required fields(delivery postal code, delivery date) 2. Fill in incorrect "Credit Card Number" field and correct "Name of card, CVV, Expiry Month" fields 3. Click on the "pay & go to delivery" button |
1. All required fields are filled
2. All fields are filled 3. The "Please confirm Credit Card details and try again." message is displayed | |||
| 36 | Place order with as login user (by redeem credit) | Precondition:
Sign in on a user account Proceed to step 2 of "Billing" Steps: 1. Select the "Redeem credit" checkbox 2. Fill in all the required fields and click on the "Pay & go to delivery" button 3. Fill in all the required fields and click on the "Complete order" button |
1. The "Redeem credit" checkbox is selected
2. All the required fields are filled in and moved to step 3 of "Delivery Information" 3. All the required fields are filled in and moved to the "Thank you for your order" page |
http://cloud.necs.ca/s/KXdX9R32eP9Z4DB |
| 37 | Place order as user with registration (by credit card) |
Precondition: Create new user account Proceed to step 2 of "Billing" Steps: 1. Fill in all the required fields (including valid values credit card fields) 2. Click on the "pay & go to delivery" button 3. Fill in all the required fields and click on the "Complete order" button |
1. All required fields are filled in valid value (including valid values credit card fields)
2. Moved to step 3 of "Delivery Information" 3. All required fields are filled in with valid values and the "Thank you for your order" page is opened |
ENG
31(1) - Place order as user with registration - Morning delivery http://cloud.necs.ca/s/CJpSDak5tME9tLs |
| 38 | Place order with "Extra Touch" as login user (by redeem credit) | Precondition:
Sign in on a user account Go to the product details page and add the "Extra Touch" product Proceed to step 2 of "Billing" Steps: 1. Select the "Redeem credit" checkbox 2. Fill in all the required fields and click on the "Pay & go to delivery" button 3. Fill in all the required fields and click on the "Complete order" button |
1. The "Redeem credit" checkbox is selected
2. All the required fields are filled in and moved to step 3 of "Delivery Information" 3. All the required fields are filled in and moved to the "Thank you for your order" page |
|
| 39 | Place order as login user with Coupone code | BY CREDIT CARD
Precondition: Create new user account Proceed to step 2 of "Billing" Steps: 1. Fill in all the required fields (including valid values credit card fields) 2. Click on the "pay & go to delivery" button 3. Fill in all the required fields and click on the "Complete order" button |
1. All required fields are filled in valid value (including valid values credit card fields)
2. Moved to step 3 of "Delivery Information" 3. All required fields are filled in with valid values and the "Thank you for your order" page is opened |
|
| BY REEDEM CREDIT
Precondition: Sign in on a user account Proceed to step 2 of "Billing" Steps: 1. Select the "Redeem credit" checkbox 2. Fill in all the required fields and click on the "Pay & go to delivery" button 3. Fill in all the required fields and click on the "Complete order" button |
1. The "Redeem credit" checkbox is selected
2. All the required fields are filled in and moved to step 3 of "Delivery Information" 3. All the required fields are filled in and moved to the "Thank you for your order" page |
|||
| 40 | Use discount(coupon) | Precondition:
Proceed to step 2 of "Billing" Steps: 1. Click “here” to enter a discount or donation code 2. Enter the code sent to the specified email in the field 3. Click Submit 4. Check whether the discount is activated |
Discount(coupon) successfully activated
|
|
| Precondition:
Proceed to step 2 of "Billing" Steps: 1. Click “here” to enter a discount or donation code 2. Enter the not-valid code |
1. The field and "Submit" button is displayed
2. The "Coupon does not exist or has already been used." message is displayed |
|||
| 41 | Check Confirmation email | Precondition:
Sign in on a user account Proceed to step 3 of "Delivery Information" and Steps: Click on the "Complete order" button |
The confirmation email is delivered | |
| 42 | Add/edit delivery address by Address Autocomplete | Precondition:
Sign in on a user account Proceed to step 3 of "Delivery Information" Steps: 1. Fill in the delivery address by "Address Autocomplete" field 2. Click on your address in the drop-down list 3. Edit the delivery address by "Address Autocomplete" field 4. Click on your address in the drop-down list |
1. The drop-down list with your address is displayed
2. All appropriate fields are automatically filled in 3. The drop-down list with your edited address is displayed 4. All appropriate fields are automatically filled in |
|
| 43 | Select delivery date (pay attention to suspicious deliver dates available like same day after offset) and time (before 1 pm and after 1pm) | Precondition:
Test before 1 p.m. Vancouver Sign in on a user account Proceed to step 2 of "Billing" Type in "Vancouver, BC" in the "delivery city/town" field Steps: 1. Click on the "Delivery Date" button 2. Select today's date 3. Place an order |
1. The table contain attributes(step 1: Select your delivery option, step 2: Select your delivery date) is opened
2. The today date is displayed and selected 3. The order is placed |
|
| Precondition:
Test after 1 p.m. Vancouver Sign in on a user account Proceed to step 2 of "Billing" Type in "Vancouver, BC" in the "delivery city/town" field Steps: 1. Click on the "Delivery Date" button 2. Select today's date 2. Place an order |
1. The table contain attributes(step 1: Select your delivery option, step 2: Select your delivery date) is opened
2. The today date is not displayed |
|||
| Precondition:
Test before 1 p.m. Vancouver Sign in on a user account Proceed to step 2 of "Billing" Type in "Vancouver, BC" in the "delivery city/town" field Steps: 1. Click on the "Delivery Date" button 2. Select tomorrow's date 2. Place an order |
1. The table contain attributes(step 1: Select your delivery option, step2: Select your delivery date) is opened and tomorrow date is selected
2. The tomorrow date is displayed and selected 3. The order is placed |
|||
| Precondition:
Test after 1 p.m. Vancouver Sign in on a user account Proceed to step 2 of "Billing" Type in "Vancouver, BC" in the "delivery city/town" field Steps: 1. Click on the "Delivery Date" button 2. Select tomorrow's date 2. Place an order |
1. The table contain attributes(step 1: Select your delivery option, step2: Select your delivery date) is opened and tomorrow date is selected
2. The tomorrow date is displayed and selected 3. The order is placed | |||
| 44 | Fill in Personal Greeting, Signature, and Delivery Information | Precondition:
Proceed to step 3 of "Delivery Information" Steps: Enter valid data in fields: Personal Greeting, Signature, Additional Delivery Information |
Personal Greeting, Signature, and Delivery Information are displayed correctly | |
| Precondition:
Proceed to step 3 of "Delivery Information" Steps: Click on the "Pay & go to delivery" button with empty Personal Greeting, Signature, and Delivery Information fields |
The order is placed | |||
| Precondition:
Proceed to step 3 of "Delivery Information" Steps: Enter in the "Personal Greeting" field or "Signature" field or "Delivery Information" field max + 1 symbols (example: enter 101 symbols in the "Signature" field) |
101 characters cannot be entered | |||
| 45 | Check order totals calculations | Precondition:
Proceed to step 2 of "Billing" Steps: Check the order calculation data |
Calculations with parameters:
Total Items Price, Corporate discount, Coupon discount, Delivery Free, Taxes, Surcharge, Redeem Bloomex Bucks, Redeem Credit, Donation, Total Price - are correct and true |
|
| 46 | Check required and not required fields during checkout | Precondition:
Proceed to step 2 of "Billing" Steps: 1. Enter valid data in the required fields 2. Click "Pay & Go To Delivery" |
1. The data is received
2. Moved to step 3 of "Delivery Information" |
|
| Precondition:
Proceed to step 1 of "Your Information" Steps: 1. Enter valid data in the required fields and leave the "Street number" field empty 2. Click "Next Step" |
1. All required fields are filled in and the "Street number" field is empty
2. The unfilled field is highlighted in red |
|||
| Precondition:
Proceed to step 3 of "Delivery Information" Steps: 1. Enter valid data in the required fields 2. Click "Complete Order" |
1. The data is received
2. The order is created and a confirmation letter is sent to the email | |||
| 47 | Edit products in the checkout (quantity, remove) | Precondition:
Proceed to step 2 of "Billing" Steps: Check the possibility of changing the quantity of the product, removing the product, and the total price of the product |
Functions: remove, quantity, price, total, and calculations - work
|
|
| 48 | Check to select receiving Special promotions from Bloomex | Precondition:
Proceed to step 2 of "Billing" Steps: Activate the check box opposite the inscription "I am interested in receiving Special promotions from Bloomex" |
Special promotions from Bloomex are sent to the specified mail
|
|
| 49 | Check to redeem Bloomex bucks | Precondition:
Proceed to step 2 of "Billing" Steps: 1. Activate the check box opposite the inscription "Redeem Bloomex Bucks" 2. Fill in the recommended fields and "Select Delivery Date" 3. Check "Order Price Detail" whether this function is activated |
1. The check box has been successfully activated
2. The delivery date works correctly 3. The calculations are correct and correspond to reality |
|
| 50 | Сheck dotation to "Make a Wish Canada" | Precondition:
Proceed to step 2 of "Billing" Steps: 1. Activate the check box opposite the inscription “I would like to donate" 2. Fill in the recommended fields and "Select Delivery Date" 3. Check "Order Price Detail" whether this function is activated |
1. The check box has been successfully activated
2. The delivery date works correctly 3. The calculations are correct and correspond to reality |
|
| 51 | Buy Bloomex $20.00 voucher code (https://bloomex.ca/extra-touches-1/) | Precondition:
Find a voucher on the website and purchase it Steps: 1. Choose a $20 voucher and checkout 2. Check your email for confirmation with the given code |
1. Voucher successfully purchased
2. The "Your Bloomex 20$ Voucher code" letter has been successfully sent to the mail |
|
| 52 | Place order with voucher code | Precondition:
Proceed to step 2 of "Billing" Steps: 1. Click "here" on the link: "Click here to enter discount or donation code" 2. Enter a voucher code and click the "Submit" button |
1. The field for entering the "voucher code" is displayed
2. The voucher code has accepted the price reduced |
|
| 53 | Flower with subscription | Steps:
1. Go to the product details page with the subscription 2. Select Duration subscription by checking the checkbox 3. Click the "Add to cart" button |
1. The page with information about the product has content and is displayed
2. Duration subscription is selected 3. The product added to the cart |
|
Abandonment |
||||
| 54 | Add product to the cart page and leave it, you should get an sms and email in about 15-20 mins | Steps:
1. Add the product to the cart and leave it there for 15-20 minutes 2. Check your mail for a reminder letter |
The reminder letter was successfully sent to the post office
|
|
We haven't received Delivery Information for your order |
||||
| 55 | Check "We haven't received Delivery Information for your order" email | Precondition:
Proceed to step 3 of "Delivery Information" Steps: Leave step 3 of "Delivery Information" - without information for 5-7 minutes |
The reminder letter was received
Sms was received
|
|
My account |
||||
| 56 | Account login/logout | Precondition:
The user is registered on the site Steps: 1. Go to the menu sections and click "Help/Account" 2. Enter a valid email in the "Enter email" field 3. In the "Password" field, enter a password 4. Click the "Login" button |
The user successfully authenticated on site
|
|
| Precondition:
The user is Authorization on the site Steps: Click the "Logout" button |
The user successfully log out of the account
|
|||
| 57 | Authorization on the site without data | Precondition:
Authorization on the site without the "email" and "password" Steps: 1. Go to the menu sections and click "Help/Account" 2. Leave the "Enter email" and "Password" fields empty 3. Click the "Login" button |
The user is not authorized on the site. Message: "Please complete the username and password fields"
|
|
| Precondition:
Authorization on the site with a valid "email" and without the "password" Steps: 1. Go to the menu sections and click "Help/Account" 2. Enter a valid email in the "Enter email" field 3. Leave the "Password" field empty 4. Click the "Login" button |
The user is not authorized on the site. Message: "Incorrect username or password. Please try again."
|
|||
| Precondition:
Authorization on the site with a valid "password" and without the "email" Steps: 1. Go to the menu sections and click "Help/Account" 2. Enter a valid Password in the "Password" field 3. Leave the "Enter email" field empty 4. Click the "Login" button |
The user is not authorized on the site. Message: "Please complete the username and password fields"
|
|||
| 58 | Authorization on the site with an invalid email | Precondition:
Authorization on the site with an invalid "email" (email without @) and a valid "password" Steps: 1. Go to the menu sections and click "Help/Account" 2. Enter an invalid email in the "Enter email" field 3. Enter a valid Password in the "Password" field 4. Click the "Login" button |
The user is not authorized on the site. Message: "Incorrect username or password. Please try again"
|
|
| 59 | Authorization on the site with an incorrect password | Precondition:
Authorization on the site with an invalid "password" and a valid "email" Steps: 1. Go to the menu sections and click "Help/Account" 2. Enter a valid email in the "Enter email" field 3. Enter an invalid Password in the "Password" field 4. Click the "Login" button |
The user is not authorized on the site. Message: "Incorrect username or password. Please try again"
|
|
| 60 | The appearance of verification messages | Precondition:
Proceed to the "Account" page Steps: 1. Fill in the valid email in the "email" field 2. Fill in the invalid password in the "password" field 3. Click on the "Login" button |
1. The "email" field is filled in
2. The "password" field is filled in 3. The "Incorrect username or password. Please try again." message is displayed |
|
| Precondition:
Proceed to the "Account" page Steps: 1. Fill in the invalid email in the "email" field 2. Fill in the valid password in the "password" field 3. Click on the "Login" button |
1. The "email" field is filled in
2. The "password" field is filled in 3. The "Incorrect username or password. Please try again." message is displayed |
|||
| Precondition:
Proceed to the "Account" page Steps: 1. Fill in the invalid email in the "email" field 2. Fill in the valid password in the "password" field 3. Click on the "Login" button 4. Click on the "close" button |
1. The "email" field is filled in
2. The "password" field is filled in 3. The "Incorrect username or password. Please try again." message is displayed 4. The "Incorrect username or password. Please try again." message is not displayed |
|||
| 61 | Check that the password is displayed in an encrypted format | Precondition:
Proceed to the "Account" page Steps: Fill in the "password" field |
The password is displayed in an encrypted format
|
|
| 62 | View order details information | Precondition:
Proceed to the "Account" page Login in site Steps: Click on the "Order Number" |
The appropriate page is opened
|
|
| 63 | Lost your password function | Precondition:
Proceed to the "lost password" page Steps: 1. Fill in the valid email in the "email" field 2. Click on the "Login" button 3. Click on the link in your e-mail 4. Fill in the valid value of all fields and click on the "Update" button |
1. The "email" field is filled in
2. The "Link to reset your password has been sent to your e-mail." message is displayed and the reset link is sent to your e-mail 3. The appropriate page is opened and contains attributes (the "New password" field, the "Confirm password" field, the "Show password" checkbox, "Update" button) 4. All fields are filled in and the "Successfully! You are authorized now Go to your account" message is displayed |
|
| Precondition:
Proceed to the "lost password" page Steps: 1. Fill in the valid email in the "email" field 2. Click on the "Login" button 3. Click on the link in your e-mail 4. Fill in the correct "New password" field, and the incorrect "Confirm password" field and click on the "Update" button |
1. The "email" field is filled in
2. The "Link to reset your password has been sent to your e-mail." message is displayed and the reset link is sent to your e-mail 3. The appropriate page is opened and contains attributes (the "New password" field, the "Confirm password" field, the "Show password" checkbox, "Update" button) 4. All fields are filled in and the "Passwords do not match. Try again." message is displayed |
|||
| 64 | Changing the password and logging in under the old password | Precondition:
Changing the password Proceed to the "login" page Steps: 1. Fill in the valid email in the "email" field 2. Fiil in the old password in the "password" field 3. Click on the "Login" button |
1. The "email" field is filled in
2. The "password" field is filled in 3. The "Incorrect username or password. Please try again." message is displayed |
|
| 65 | Check the "Search" field | Precondition:
Proceed to the "login" page Steps: Fill in the order number in the "Search" field |
The "email" field is filled in and displayed
|
|
| 66 | Check the control elements:
1. << Start < Prev 1 2 Next > End >> 2. Change the number of orders per page (Select name = "Limit") |
Precondition:
Proceed to the "login" page Steps: Scroll down |
The "<< Start, < Prev, 1, 2 , Next > , End >>" buttons is displayed
|
|
| 67 | Bloomex buck history | Precondition:
The user is authorized on the site Steps: 1. Go to the menu sections and click "Help/Account" 2. Click the "Bloomex Bucks" link |
1. The page opened "Customer Account"
2. The full story of "YOUR BLOOMEX BUCK HISTORY" is uploaded successfully |
|
| 68 | Flower care page | Precondition:
The user is authorized on the site Steps: 1. Go to the menu sections "Help/Account" 2. Select the category "Flower Care" and Click |
1. The appropriate page is opened
2. The page with information about "Flower care" has content and is displayed correctly |
|
Apply for 20 corporate discount |
||||
| 69 | Check to send the application | Precondition:
The user has not previously issued a "Bloomex Corporate Account" Steps: 1. Go to the menu section "Corporate" 2. Select the category "Apply for 20% Corporate Discount" and click 3. Enter valid data in the required fields and click the "Send Application" button 4. Check your email |

1. The appropriate page is opened 2. The page with information about "Apply for 20% Corporate Discount" has content and is displayed correctly 3. Message received - "Thank You - your application for a Bloomex Corporation Account has been received" 4. A message sent to the mail "New Corporate Account Pending" |
ENG |
Customer Service Survey |
||||
| 70 | Check to send customer service survey form | Precondition:
Proceed to step "Your order has been successfully placed" Steps: 1. After placing the order Click "YES" in Google review 2. Click on the survey link in the message in your email 3. Fill in all fields and click on the "Submit survey" button |
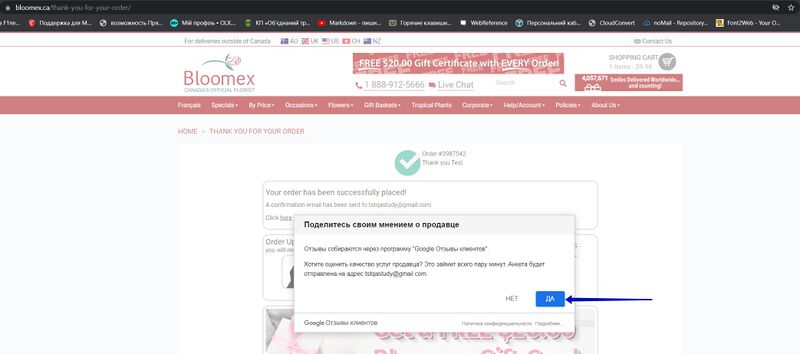
1. The letter "Your opinion matters most to us!" arrived in the mail 2. The appropriate page is opened 3. The message: "Successfully Submitted!" |
|
| Precondition:
Proceed to step "Your order has been successfully placed" Steps: After placing the order Click "NO" in Google review |
Google review is closed | |||
Quote Form |
||||
| 71 | Check sending quote form | Precondition:
Fill in and send the "Quote Form" Steps: 1. Go to the menu section "Corporate" 2. Select the category "Quote Request Form" and click 3. Enter valid data in the required fields 4. Click the "Send quote request" button |

1. The appropriate page is opened 2. The page with information about the "Quote Request Form" has content and is displayed correctly 3. Data received successfully 4. A message on-site "Thank you - Your quote request has been successfully submitted. A Corporate Account Manager will get back to you shortly" |
ENG |
| Precondition:
Fill in and send the "Quote Form" Steps: 1. Go to the menu section "Corporate" 2. Select the category "Quote Request Form" and click 3. Stay all fields empty and click on the "Send quote request" button 4. Check if the letter has arrived at the specified mail |
1. The appropriate page is opened
2. The page with information about the "Quote Request Form" has content and is displayed correctly 3. The "Please enter your full name." message is displayed 4. A "Thanks for your Quote request" letter has been sent to the mail |
|||
Live Chat |
||||
| 72 | Check to send message to live chat, bot answer, operator answer | Precondition:
Proceed to the "Live Help is Online" chat Steps: 1. Enter your "Name", "Email", and "Your question" and click The "Start chat" button 2. Send a message 3. Get the answer |
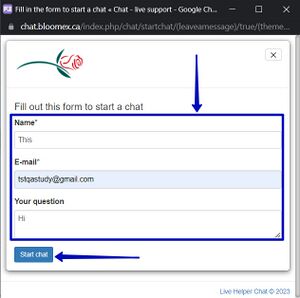
1. The appropriate chat has opened 2. Message sent in chat 3. Reply received in chat |
|
| 73 | Settings elements:
1. Enable/Disable sound about new messages from the operator 2. Print 3. Send Chat Transcript to your Email 4. Сlose |
Precondition:
Proceed to the "Live Help is Online" chat Steps: 1. Enter your "Name", "Email", and "Your question" and click The "Start chat" button 2. Click the settings icon and check the elements |

1. The appropriate chat has opened 2. Control elements: Enable/Disable sound, Print, Send Chat Transcript to your Email and Сlose end the chat are displayed correctly |
|
| 74 | Check required fields | Precondition:
Proceed to the "Live Help is Online" chat Steps: Enter your "Name", "Email", and click The "Start chat" button |
Data received successfully
|
|
| Precondition:
Proceed to the "Live Help is Online" chat Steps: 1. Leave the "Name" field empty 2. Enter a valid email in the "Enter email" field 3. Click The "Start chat" button |
Message: "Please enter your name"
|
|||
| Precondition:
Proceed to the "Live Help is Online" chat Steps: 1. Enter a valid name user in the "Name" field 2. Leave the "email" field empty 3. Click The "Start chat" button |
Message: "Please enter a valid email address"
|
|||
| Precondition:
Proceed to the "Live Help is Online" chat Steps: 1. Enter a valid name user in the "Name" field 2. Enter an invalid email in the "email" field 3. Click The "Start chat" button |
Message: "Please enter a valid email address"
|
|||
| 75 | Send an empty message | Precondition:
Proceed to the "Live Help is Online" chat Steps: Send an empty message, leave the "Enter your message" field empty, press "Enter" |
Message: "Please enter a message, maximum characters - 500"
|
|
| Precondition:
Proceed to the "Live Help is Online" chat Steps: Send 501 characters for a message, and press the "Start chat" button |
Message: Maximum 500 characters for a message
|
|||
| 76 | Vote Action (like/do not like) | Precondition:
Proceed to the "Live Help is Online" chat Steps: 1. Enter your "Name", "Email", and click The "Start chat" button 2. Vote Action (like/do not like) |
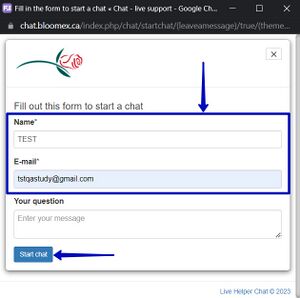
1. Data received successfully 2. Action (like/do not like), displayed |
|
| 77 | "Live Chat" through the link in the header | Precondition:
Proceed to the "Live Help is Online" chat Steps: Go to the "Live Chat" link in the "header" of the site |

|
|
Policies |
||||
| 78 | Order and return policies | Precondition:
In the menu section select "Policies" Steps: Select from the drop-down list "Order and Return Policy" and check the information on the page |
The information is correctly reproduced on the page | |
| 79 | Substitution Policy | Precondition:
In the menu section select "Policies" Steps: Select from the drop-down list "Substitution Policy" and check the information on the page |
The information is correctly reproduced on the page | |
| 80 | Delivery Policy | Precondition:
In the menu section select "Policies" Steps: Select from the drop-down list "Delivery Policy" and check the information on the page |
The information is correctly reproduced on the page
|
|
| 81 | Promotion Policy | Precondition:
In the menu section select "Policies" Steps: Select from the drop-down list "Promotion Policy" and check the information on the page |
The information is correctly reproduced on the page
|
|
| 82 | Privacy Policy | Precondition:
In the menu section select "Policies" Steps: Select from the drop-down list "Privacy Policy" and check the information on the page |
The information is correctly reproduced on the page
|
|
| 83 | Contact-Free Delivery | Precondition:
In the menu section select "Policies" Steps: Select from the drop-down list "Contact-Free Delivery" and check the information on the page |
The information is correctly reproduced on the page
|
|
Sitemap |
||||
| 84 | Check Top Menu links, categories Flowers, Gift Baskets, Sympathy Flowers | Precondition:
Proceed to the site "Footer" and select "Site map" Steps: 1. Check all the links on the sitemap 2. Check the content of the open pages |
1. All links in the categories "Top Menu", "Flowers", "Gift Baskets", and "Sympathy Flowers" work correctly
2. All links have valid content |
|
| 85 | Check map picture on Flowers by warehouse | Precondition:
Proceed to the site "Footer" and select "Site map" Steps: 1. Check all links in the category "Flowers" 2. Check the warehouse map picture |
1. All links in the category "Flowers" work correctly
2. The warehouse map picture is reproduced correctly |
|
Emails
We haven't received Delivery Information for your order
