Adm-eu.necs.ca: Instructions to Multiple boxes delivery&CP Manifests
Split one order to multiple boxes
1. Choose Thingsengraved.ca website on the top.

2. Go to Orders-> Orders management

3. Filter orders by website TE.ca

4. Click on "Edit order" blue pencil button on order.

5. Go to "Boxes&Delivery" tab on the edit window.
On this window you can edit the quantity of ingredients that will be write-off from Warehouse.

6. After write-off quantites edited correctly, press on "Go Manage boxes"
7. If you want to split 1 order to several boxes, you have click on Edit(Blue pencil logo) on this step.

8. Click on Editin near "Items" label. On this window, you can write the size and weight of this box.

9. In this step, you have to split how many products will be in 1st box by slider. Click Save and proceed to "Manage boxes" window again

10. On this step system will not let you go through this step, because you need to add products that are left to other boxes. To do it, you have click on "Add box" button on top of the list.

11. After you pack all your boxes, you have to click on "Coins" logo near box label. on this step, you can get the price of you box from CanadaPOst side.

On this window you can choose the delivery type on CanadaPost side. Choose 1 opetion and click on "Register paarcel"

12. After you registered all your boxes, you will see green "Go to Transmission" button

13. In order to see labels that will be glued on boxes, you have to click on these links:

Here you got label:

14. After getting labels, you can close current window and save the order.

15. You can other delivery packed.

16. After packing all orders, you have to click on "Transmit CP boxes to manifest" button on the top.

17. Press on "Transmit boxes" on the window. it means, that all packed boxes will be transmitted to manifest.

Manifests
18. After loading, you can print the manifest by clicking on "Print Manifest details"

Here you can see Manifest:

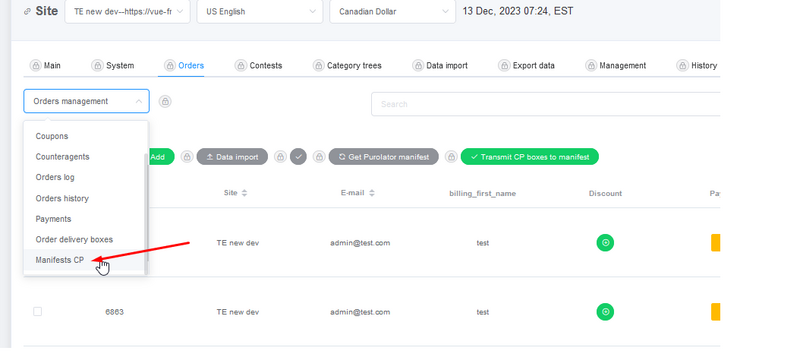
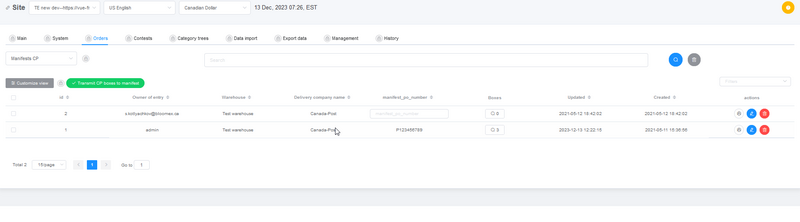
19. Also you can proceed to "Manifests CP" on the dropdown menu and see all your manifests.

You can print and see the list of boxes that includes this manifest.

Delivery cancellation
We have 3 different cases and warning windows when you try to cancel delivery.
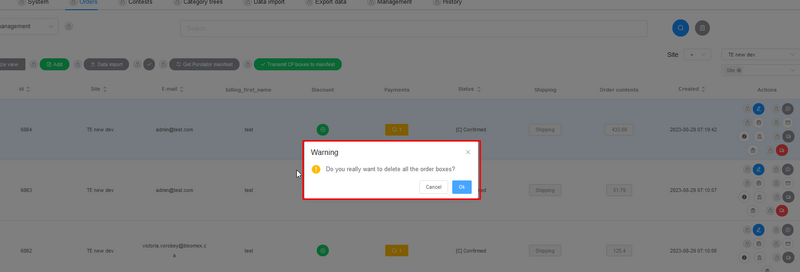
20. When you have not register boxes to manifest yet and trying to delete delivery.
It will just unregister packages on CP side and delete it

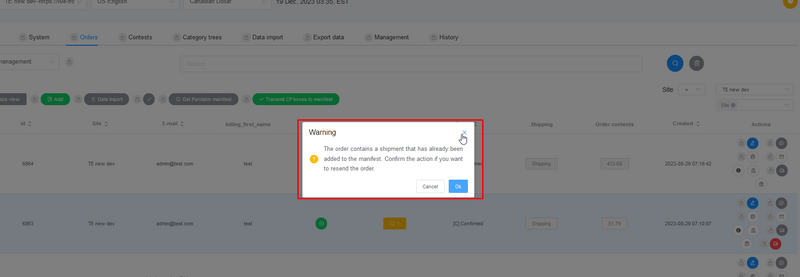
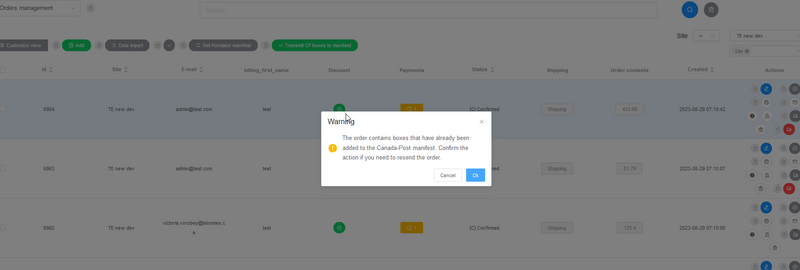
21. When you trying teo delete boxes that are already registered to manifest.
It will say that delivery is already registered on CP manifest and it's possible to delete delivery from manifest. REMEMBER: This action will not delete manifest, cause it's already registered.

22. When you register delivery by Purolator, you can also delete the delivery.
It will delete the delivered boxes, but will NOT delete the Purolator Manifest.